Sensor Hand - Raptor Reloaded Rework
thingiverse
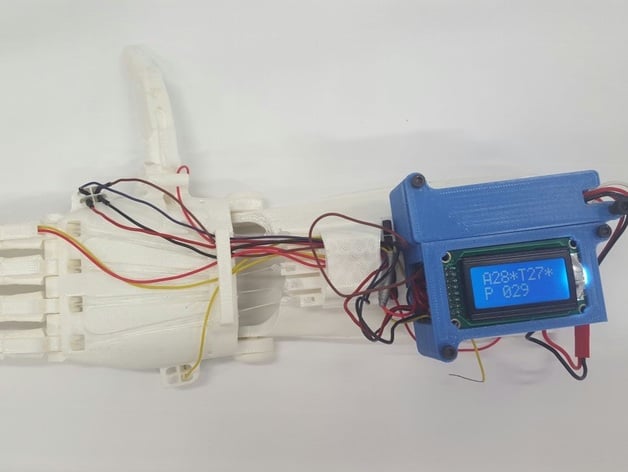
This is one of two hands we created, the Sensor Hand. It features a set of pressure sensors to gauge how hard you're pressing against something or gripping it, as well as the temperature of what you're holding, and sensing the object's temperature. The .3dm files used are available for modification along with the .stl files. Parts still needed: 1. Wrist Pin 2. Wrist Pin Cap 3. Thumb Pin 4. Knuckle Pin 5. Finger Pin 6. Fingertip (You can use either the original or our remakes, thing:1179988 and thing:1182856) 7. Proximal These parts are compatible with the Raptor Reloaded and scale with it. NOTE: 1. The Arduino casing should not be scaled. 2. Although the physical prototype is meant for running two thermosensors and vibration motors, our current Arduino code only supports one set. Print Settings: Rafts: Doesn't Matter Supports: Yes Infill: 30% Notes: Three shells Post-Printing: Firstly, assemble all the parts except the Arduino mount like a normal Raptor Reloaded hand [http://www.instructables.com/id/Assembly-of-e-NABLEs-Raptor-Reloaded-Hand/?ALLSTEPS] Next, add on the sensors. To make the pressure sensors, follow these instructions : [http://www.instructables.com/id/Stickytape-Sensors/?ALLSTEPS] Finally, attach Velcro strips onto the gauntlet and Arduino mount, flash the code into the Arduino, place the Arduino/ LCD assembly [see below] into the mount, and you're done. Velcro attachment for the Arduino mount Additional Material Needed: 1. Velostat sheet 2. Multicore wire or copper wire 3. Cloth tape or duct tape 4. Arduino Nano 5. Battery (We designed the Arduino mount for TURNIGY Nano-Tech 950mAh 3S 25~50C LiPO Pack) 6. Infrared thermometer (We used the MLX90614, but you can use other thermosensors if you want; just edit the code though) 7. LCD Screen (Basic 8×2 Character LCD black on green) 8. Disk vibration motor (Use ROB-08449 or equivalent) 9. 20mm M3 female/female threaded standoff 10. Eight 5mm M3 screws 11. Four 20mm M4 screws 12. 20mm screws (Adjust the size according to tensioner scale) 13. Stripboard 14. Female/male socket strips 15. Male/male socket strips 16. Velcro strips 17. Velcro straps 18. Elastic wristband 19. Elastic (Stretch cord for elastic bracelets works well) 20. Nylon fishing line Tools Needed: 1. Needle-nose pliers 2. Tweezers 3. Needle files 4. Sandpaper 5. Soldering iron 6. Solder 7. Desoldering pump Making the Arduino/ LCD Assembly: The Arduino_mount is specifically designed for our Arduino/LCD assembly. It uses a 33mm x 63mm stripboard. We need to make two sockets: one for the Arduino and one for the LCD screen. To start, we'll work on the socket for the Arduino Mini. We need to solder male/male socket strips onto its legs so it can fit on our previously-made socket. After that's done, we simply stick it in. We now need to make a socket for the LCD screen. For this one, we solder two rows of female/male socket strip onto a 4 x 8 piece of stripboard. Once again, after you're finished soldering, cut off any remaining conductive strips between your connections. Now attach your newly-made socket onto the pins on your LCD display. Place it on the underside so everything fits together well. Finally, attach the Arduino Mini and secure the LCD screen using screws on a 20mm standoff after you've finished making the necessary soldering changes. Directional Vibration Feedback Band NOTE: As of now our Arduino code only supports one thermosensor and vibration motor to be used. However we have thermosensors located in both sides of the palm and motors situated along each side, all set to respond to the specific temperature location being touched. An elastic wrist support makes a good option for your wristband as you won't need much resistance for comfort while also offering flexibility at the same time. The corresponding vibration sensor will activate when heat is located depending on where it's coming from in order to inform the user what they're feeling and alert them about the temperature. Inside the wrist, and towards the back, we'll place vibration motors on either side in line with the location of thermosensors placed on both palms so there's consistent and directional feedback when heat sources come into contact. Once more: when testing the surface of something using the insides of the hand palm and sensing a hot object then vibrations are sensed within wrist while holding or touching the outside skin the other way round at back.
With this file you will be able to print Sensor Hand - Raptor Reloaded Rework with your 3D printer. Click on the button and save the file on your computer to work, edit or customize your design. You can also find more 3D designs for printers on Sensor Hand - Raptor Reloaded Rework.
