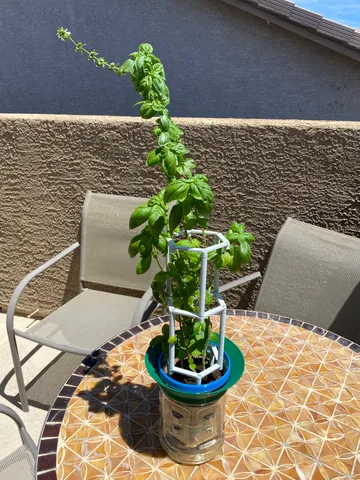
Self-watering Juice Bottle Planter
prusaprinters
When looking for a self-watering planter to move my basil into, I realized I could just cut an empty bottle of juice in half, flip the top upside down, and print a few parts to make the whole thing viable while saving some plastic and upcycling what would've gone to the recycling center. The result is my Self-watering Juice Bottle Planter, designed with parameters and smart prototyping in mind.The bottle cap is fairly simple, and should fit most large bottles just fine. Of course, you could also simply poke a bunch of holes in the cap that already came on the bottle, but I made a custom cap in case you don't have the equipment for drilling through a bottle cap.The two rings in this design, both the simple ring and the spouted ring, were made in Fusion 360 with some pieces/bodies in the file that should facilitate prototyping to make sure everything is the right size before trying to print the whole ring only to find out it doesn't fit your bottle. To do this, I sliced out two pieces of the rings and connected them with a 'stick' to keep the diameter (see last few photos). Quick note about the files The Spouted Ring v2 is the one pictured above; it's tried and tested. But I did encounter an issue with water not flowing into the bottom when there was dirt in the top piece, so I made some ridges in it and made the inner diameter of the ring a bit smaller (v3), with the hope that it allows water to pass through. Since I'm trying not to waste plastic, I haven't had a chance to test the ridged ring design*, so if you're feeling adventurous, give it a go and let me know how well it works. If you're good with Fusion or any other editor, the F3D and STEP files are available, so give it a tweak if you'd like!*The household decided we want a cilantro plant too, so I'm in the midst of testing my v3 ring. Will update as result unfold! Print InstructionsIf you don't use my 3mf or gcode files for the spouted rings, make sure you turn off the Advanced setting for “Ensure vertical shell thickness” under Printer Settings → Layers and perimeters → Quality. Doing so removes the solid infill that Slicer generates for the inside of the slopey bits, which was wasting plastic, adding hours to print time, and causing the printer to shake itself half to death at every layer.As for the regular ring and the bottle cap, no fancy tricks happening there. I printed at 0.2mm resolution in PLA with 0% infill and everything is holding up fine. AssemblyFind a large juice bottle and cut it in half around where the conical shape of the top half ends and it transitions into a cylinder. The bottle I used was the Country Peach juice from Trader Joe's, which worked with a ring that's 115.4mm (4.54 in.). Once the parts are printed, fix each ring to the appropriate piece of the bottle (spouted ring goes to the bottom cylinder, regular ring goes to the top conical piece). Before adding soil or transplanting your plant, I highly recommend using hot glue to seal the rings in place. For the regular ring, you need only apply glue to the inner circle, and the for the spouted ring, apply glue to the outer circle. Hot glue is preferred over something like super glue because the hot glue will actually make a seal and prevent drowning your plant when you go to fill the bottom container, as well as stop any accidental leaks on the outside of the bottle. Once everything's glued in place and the cap is screwed on, add soil to the cone, transplant your green friend, and add water to the bottom resevoir. Place the cone part in the bottom container, and you're good to go! Miscellaneous NotesThe plant trellis in the first photo is the Modular Trellis / Lattice / Plant Support by Nathan, and it works wonderfully!If you encounter any issues with the rings or prototyping them, please let me know and I'll do my best to help out.The last photo of the plant was taken on April 8th, while the first photo was on April 30th, so after a month of occasionally refilling the bottom reservoir, the basil plant has remained healthy and grown quite a lot, which I think is a mark of success for a self-watering container. Let me know how yours goes!Here's a link to the specific bottle I used, in case you've got a TJ's nearby and want to replicate from the same starting point.Everything was printed using various colors from 3DTomorrow, which offers some really great quality PLA, and the owner Callum is super friendly and excited about what he does. For this project I used Forest Green (my favorite green!), a blue-to-green transition spool, and a light grey-to-dark grey transition spool (for the trellis).
With this file you will be able to print Self-watering Juice Bottle Planter with your 3D printer. Click on the button and save the file on your computer to work, edit or customize your design. You can also find more 3D designs for printers on Self-watering Juice Bottle Planter.
