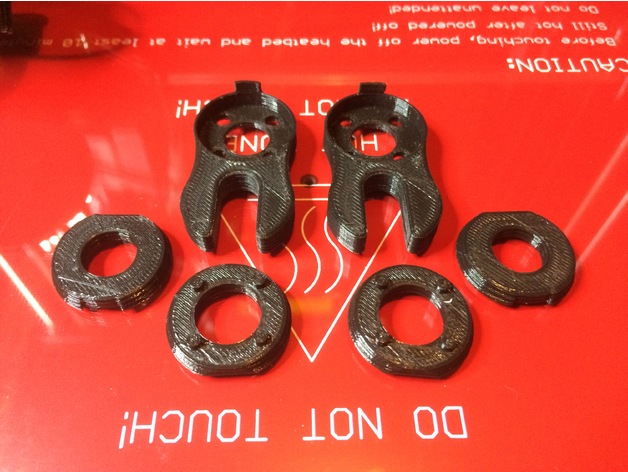
SDX's AntiZ - The Anti-Z-Wobble Guide for Acrylic Geeetech Prusa I3 pro B
thingiverse
··=[ SDX's AntiZ ]=··The Ultimate Guide to Eliminating Z-Wobble on Your Geeetech Prusa I3 Pro B Just another anti-wobble guide, but this one is made by me with a passion for precision. Post-Printing: How to Assemble the Magic What You'll Need: 2x AntiZ Guides 2x AntiZ Spacer A 2x AntiZ Spacer B Double-sided adhesive tape Allen keys to unscrew the brass nut and loosen the coupler Shoe laces or a willing assistant to hold the X-axis in place The Limitations of This Mod Due to the hole size in the metal part, this mod can only compensate for wobbling of up to +/- 1mm. However, with optimal friction between the two spacers, you may still experience minor pattern effects. To minimize force transmission, reduce the friction as much as possible. What's Next? Print a nice object before and after the modification for comparison. Use advanced settings to avoid poor print quality. Print all parts, then do some test prints to ensure smooth movement of the guide on the 8mm rods. Cutting the Friction Bearing Use double-sided adhesive tape to cut out at least four rings (two per side) in the shape and dimension of Spacer B's wider side. Remove the adhesive film for easier cutting. The separating film will serve as your friction bearing, providing a smooth surface for the guide. Assembling the X-Axis Unscrew all eight screws holding the brass nuts in place. Move the complete X-axis up, securing it with shoe laces or an assistant's help. Loosen the couplers clamping the threaded rods and adjust them as low as possible. Installing the Guide Fix the brass nut upside down (longer part upwards) in the guide. Add M3 washers if necessary to secure the nuts. Assemble everything from bottom to top: guide, Spacer A, two "friction bearings," and Spacer B. The flat side of the spacers should face the Y-axis linear bearings block. Final Adjustments Fix the threaded rods in the couplers. Align the X-axis with the Z-axis by rotating one Z-axis threaded rod until the distance between the motor holders and lower X-axis rod is equal on both sides. Hold the other rod while turning to avoid movement caused by the stepper motor's power. Level Your Bed and Print Carefully adjust your Z-endstop and buildplate height. Remove any glass or debris before proceeding. Level your bed and print the gcode from point one. Improving the Mod OF COURSE! You can improve this mod to achieve even better print quality. Try new ideas, modify existing parts, or replace components with more suitable alternatives. If you find a way to enhance the mod, share it with us! My Next Steps: Replace the Chinese couplers with rigid and perfectly aligning ones. Rebuild the Z-Axis with a more rigid linear guide. Replace the threaded rods with Acme threaded ones from an industrial supplier. Picture 1: Coupler Placement and Remaining Space No Marvins were harmed during the testing of this Prusa.
With this file you will be able to print SDX's AntiZ - The Anti-Z-Wobble Guide for Acrylic Geeetech Prusa I3 pro B with your 3D printer. Click on the button and save the file on your computer to work, edit or customize your design. You can also find more 3D designs for printers on SDX's AntiZ - The Anti-Z-Wobble Guide for Acrylic Geeetech Prusa I3 pro B.
