Scintillating grid - Customizable OpenSCAD
prusaprinters
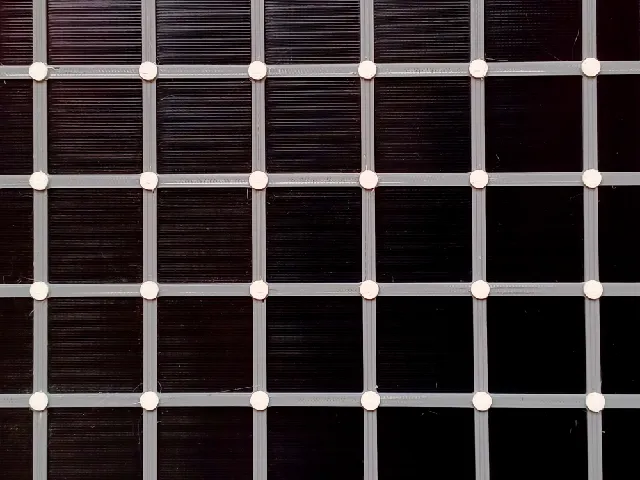
This is an OpenSCAD tool (plus a couple of STL examples) to create a scintillating grid illusion. When viewed from the proper distance, you'll see “ghost” black dots in the center of some of the white dots; they appear and disappear as you move your eyes around the grid. (If you're new to OpenSCAD, fear not and read the appended “Using OpenSCAD customizer” PDF.)If you want to know more about the scintillating grid illusion you can check either Wikipedia or MathWorld, although they don't give much further info. Perhaps the illusion is not well researched enough.I say that because, although the original illusion is with black, gray and white, it works with other colors. Since the OpenSCAD file allows you to change the colors for the preview (using either an SVG name like black or white, or an hex code prepended by #, like #FFFFFF), you may check if the illusion works or not on your screen before printing. In my (very) limited research, I've checked that it works with yellow, gray and black, and with yellow for dots, gray for lines and blue for squares. I'd say that opposite colors don't always work, and it's more a matter of contrast, and setting the brightest color for the dots.Using either a “raised” print style (dots taller, in Z, than lines and squares) or a “embossed” style (dots lower than squares) doesn't seem to affect the result.PrintingIt's extremely easy to print this using a z-based color change, so you don't need a MMU/AMS/etc. Even more, quite often PrusaSlicer will recognize the print as a “plate or logo” and offer to make the color changes for you automagically. If you do manual changes, just remember that the layer/z height at which the color should be is the first layer of the new color, not the last one of the old. Color changes are done after layer change and before start printing that layer. This is pretty intuitive for some people, and totally counterintuitive for some other people (me included).Now, when it comes to printing (and choosing the heights if you're doing your own grid with OpenSCAD), you have two main choices: to either “go safe” or “go thin”.“Go safe” means having the parts (squares, dots, grids) tall enough so that the color of the filament fully shows. Usually, 1mm will be enough except for translucent filaments (which may be interesting with the “embossed” style), some yellows…“Go thin” means having the parts as thin as possible to get a very flat print, so you'll need to use very opaque colors. Matte filament usually is very opaque; so using f.i. PolyTerra Charcoal Black, Fossil Grey (gray?) and Cotton White lets you do a print that is about 1-1.2mm thick in total. FWIW, the examples are made with 1mm per part, so 3mm total.Anyway, it will be a lightweight enough print to simply double-tape to a wall, or frame it somehow, without much hassle; but if you want to use a frame with glass, you'll definitely want to “go thin” to fit the print.Checking the Blending DistanceOh my. What am I talking about?Well, if you use HueForge, you may already have heard of the BD (blending distance) which is “the same as the TD, but in print height”.If you're not, let's say that the Blending Distance is the minimum height of a 100% infill print for a given filament to show its full color and stop blending with any color below. The easiest way to find out the BD of a filament is to print a test swatch with the same settings you'll be using in your print. That swatch has some raised squares of increasing height over a flat surface of another color (like black or white). When the squares start looking the same, the filament has reached (and surpassed) its BD. If you're interested in this, you may either check my Detailed TD calibration step test for HueForge (which is intended for HF and uses 0.08 and 0.04mm layer heights) or try out to make your own swatches with my OpenSCAD swatch generator. And if you're interested in color blending… hey, you definitely should check out HueForge. Personal license costs less than a roll of filament, it really takes 3D printing to the next level, the community is amazing and Steve is a great guy. (And if you're wondering, no, I'm in no way affiliated with, sponsored by or whatnot whatever by HF. I just really like it.)
With this file you will be able to print Scintillating grid - Customizable OpenSCAD with your 3D printer. Click on the button and save the file on your computer to work, edit or customize your design. You can also find more 3D designs for printers on Scintillating grid - Customizable OpenSCAD.