Saturn V Display Case Stand
prusaprinters
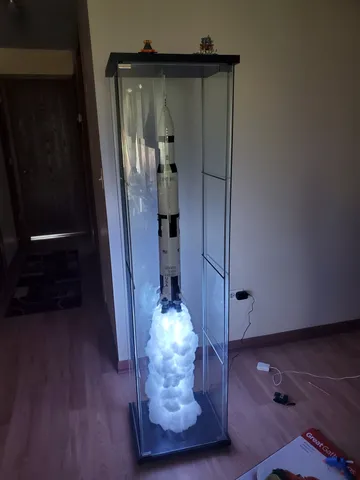
Display case stand for LEGO Saturn V model. Designed to pressure fit a 1/2 inch nut at the base and replaces the center F-1 engine for extra stability while mounted. Print instructionsFor best color matching results I suggest starting the print with a black filament then changing it to white or clear at 22mm. Be very careful when removing the supports as top layer of exhaust tubes is very thin for better lighting effects. Parts Used: Assembled Saturn V LEGO Set (3D printable design under construction, Amazon link here https://redirect.is/2013701) wooden base plate (bottom of a display case from Ikea in this example, link here for Amazon alternative https://redirect.is/t2cy4ip) LED rope or strip lights (16 ft was enough for a 2ft rod) (Amazon link https://redirect.is/mev7gnx or https://redirect.is/kvg49r8) 2 ft long 1/2 inch diameter threaded steel rod 3 x 1/2 inch nuts 2 x 1/2 inch inner diameter washers Small bag of cotton stuffing (Amazon link https://redirect.is/261ejur) hot glue gun (only used 1 stick, link here https://redirect.is/26f2oa8) drill with 1/2 inch bit Assembly: Insert one of the nuts into the bottom of the stand. Should be a tight fit. Screw in the rod to desired height. Be sure not to go too tight. Secure the lights to the printed stand. I used a figure 8 pattern to weave the lights down the tubes, however, I am considering putting the lights inside of the tubes to further eliminate any single point light sources. About 3/4 of the entire length of lights should be used on the top portion and remaining 1/4 tightly wrapped around the rod with wider gaps towards the bottom. Secure cotton stuffing to the plastic base, thick enough to scatter any single light sources from the LED strip, but not too thick to block most light and add too big of a cone spread close to nozzle ends. Wrap the rod with cotton stuffing until the thickness matches the top section. Ensure not to compress the stuffing too much which will block out most of the light. At this stage turn on the lights to full brightness and use red color to minimize eye strain. Simulate smoke plums by creating various sized balls out of stuffing and attaching them to the rod section of the stand. Organized chaos works best for a realistic look. Set aside the stand and prep the base by drilling a 1/2 inch hole in the middle of your wooden base. If your base is thick enough you can sink in the washer by 1/2 inch, however, the easier and faster option is to add 4 legs to the wooden base to account for the nut and washer that will be attached in step 9. Drill another 1/2 inch hole towards the back of your display base. This hole will be used to pass thru the wire from the lights. Thread on a nut to the rod about 2 inches up. Add the washer and insert into the center drilled hole. Add a washer and thread on a nut from the underside of the wooden base. Adjust the height of the top nut to allow for clearance underneath the base. Using 2 spanners tighten the 2 nuts together squishing the washers and wood in between of them. Almost done! Pass the end of the lights thru the additional hole in the wooden base and seal with glue gun to avoid cable fraying. Grab the light remote and check out your creation! This is my very first project and looking forward to designing more as I learn more. Thanks for checking this out! Looking forward to seeing your rockets take off!
With this file you will be able to print Saturn V Display Case Stand with your 3D printer. Click on the button and save the file on your computer to work, edit or customize your design. You can also find more 3D designs for printers on Saturn V Display Case Stand.