Sandman Dream Ruby
prusaprinters
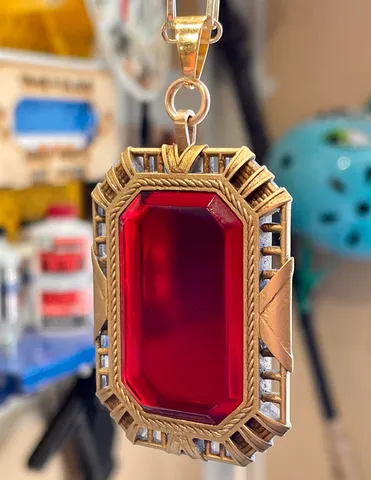
Sandman Dream RubyThis model is based on the dream ruby seen in Netflix's adaption of Sandman. The ruby can be seen in close-ups in episode 5, 24/7 (the diner episode). The end of episode 4 also shows the ruby resting in Morpheus's hand, a good shot for a sizing reference.This work is licensed under the Creative Commons Attribution Share-Alike 4.0 (CC BY-SA 4.0) license.SizingThe ruby's frame is 53.6mm x 38.8mm without the top hook. That's roughly 2.125" x 1.5". When held in the palm of an average sized 6' tall man, this size matches close-up shots of Morpheus holding the ruby in an open hand at the end of episode 4.The chain used in the show appears to be a "paperclip chain" (links are skinny rectangles with rounded corners). If you size episode 5 reference shots to the above measurements, the chain links are roughly 1mm wide. That's a standard size for chains of this type, so it should be easy to find a compatible chain that looks correct.STL FilesThere are multiple versions of the frame, but the recommended options are:1 x Dream Ruby1 x Frame with Hole1 x Triangle ConnectorAll of the options are explained below:Dream Ruby - The ruby you will need if you aren't printing one of the "one piece" files; print in a red translucent resin.Dream Ruby Complex - Like Dream Ruby, but with additional geometry (more in Printing Tips below)Triangle Connector - Optional connector that can be used instead of a metal jump ring (more in Note on Jump Rings below)Frame with Hole - Frame with a hole for inserting a metal hook (more in Making a Metal Hook below)Frame with Hook - Frame with a modeled hookOne Piece with Hole - Frame and ruby as one piece with a hole for inserting a metal hookOne Piece with Hook - Frame and ruby as one piece with a modeled hookPrinting TipsThe Dream Ruby.stl can be printed by laying the side of the ruby flat on the print bed. No supports are needed. Supports can actually be detrimental to the final product.The Dream Ruby Complex.stl file contains additional geometry that create the lines you can just barely see in the reference image (e.g., the line that runs vertically down the center). This geometry means it can't lay flat on the print bed. It is slightly more screen accurate, but gems can be deceptively tricky to print. Any sagging or other deformations will make the ruby fit poorly in the frame. Sagging facet lines also ruin the look of the gem and how light passes through it. You may need to experiment with supports and print settings.You can also try splitting the complex ruby in half and printing the halves against the print bed. You may not even need to glue the halves together if you strategically use dabs of CA glue inside the frame.If you go with this approach and want to rejoin the halves, you will need to be careful to perfectly align the edges and use a clear adhesive that won't cloud the resin or add noticeable thickness and spreads evenly to keep the gem clear. Evenly spreading and then squishing a thin layer of 5 minute epoxy might do the trick, but this has not been tested. It may also be possible to use UV resin and cure it through the gem, but the gem may be too thick to let enough UV light in to cure the resin.For the frame, follow your usual SLA workflows (e.g., tilt about 45°, use supports, etc). If using PrusaSlicer, let it find the orientation for best surface quality. Start with automatic supports and then move supports out of small details. It will be difficult to sand or fill imperfections in crevices.If printing a frame with a modeled hook, make sure the hook is well supported so it does not deform or break when being pulled from the FEP film.Alternative ModelsThere are also "one piece" files with a 0.15mm chamfer along the interior of the frame to create a fake seam between the frame and ruby. These files include "with Seam" and are in the Alternative Models folder.If printing the frame and ruby as one piece, you will want to mask off the ruby to paint the frame. Any mistakes or paint bleed will be visible. The 0.15mm chamfer is very small, just enough to create a fake seam between the ruby and frame. If you do a weathering wash, this seam will capture and hold paint to help hide any small masking mistakes or paint bleed.The dream ruby is not weathered or beat up. In fact, it looks quite clean in the show, even after being in storage for years (as seen in episode 4). Still, a light wash with some browns, like raw umber acrylic or oil paint, gives any gold paint job a lovely burnished look that really helps sell the paint as real metal. If you have trouble masking the ruby and don't mind doing an acrylic or oil wash, these files and a wash may help you "hide your crimes."Assembly & Pieces to BuyYou'll need the following items to assemble your necklace:1 x gold bail hook pinch clip1 x gold paperclip chain1 x jump ringThe above items should be readily available at most craft stores (e.g., Michael's, JoAnn Fabrics). Look in the bead and jewelry sections. The supplies should be relatively inexpensive (~$15-20). The chain is the bulk of the cost. Unless you know someone who might have these supplies, you will need to buy packs of rings and bail hooks, so you'll have plenty of supplies.Tip: Check the clearance aisles for the bail hooks and jump rings. You can often find these supplies at 50% off (or more) and pay only $2 for a pack. You might also be able to find spools of paperclip chain that you can buy by the foot. That's usually much cheaper than the pre-cut chains, especially if you plan to make more than one dream ruby.The bail hook goes over the chain (not through any links). The orientation of the frame's hook is the same as the bail hook, so you need a jump ring to connect the two. See below for more information about your jump ring options.Separate Frame & Ruby AssemblyIf you've printed the ruby and frame separately, test assembly before sanding anything so you can be sure not to sand too much. If you introduce a gap between the ruby and the frame, you won't be able to hide it easily.The ruby has a nub that fits inside a cavity at the bottom of the frame's interior. Align the ruby's nub with that cavity and carefully lever the ruby inside the frame. The fit will be tight, but if you need a lot of pressure, stop and lightly sand the sides of the ruby or the frame's interior. Light passes with 400-600# sandpaper should be enough to let you insert the ruby for a test fitting.The ruby should not require any glue. If you are installing a metal hook, the bottom of the hook will fit inside a small divot at the top of the ruby to help pin it in place.If you polish the sides of the ruby a little too much, there is a reduction in the friction between the frame and the ruby, and the ruby won't stay put. You can use tiny dabs of CA glue to fix the ruby in place, but don't do this until after you have painted the frame. Paint may add enough to the frame that the ruby fits tightly once more. If the ruby still falls out too easily, scratch away some paint down to the resin before gluing.Finishing the RubyIf your ruby (separate or the ruby section of the one piece print) is cloudy, you can fix this with your favorite gloss top coat. Clean up any imperfections with 600# sandpaper. You will have nearly invisible layer lines that will be more noticeable later, so knock them down now. Use a fine emery board (nail file) or a popsicle/craft stick to ensure you don't round over any facets with your fingers.Finish the ruby with a gloss top coat. You can use an airbrush or a rattle can. It does not matter. You can even dunk the ruby in something like Minwax glossy polyurethane or similar products sold in wide mouth cans for woodworking. Dunking may be preferable to get an even coat without imperfections that can come from uneven sprays or "dust" from overspray.Let your top coat dry and then test it in your frame. The top coat may make it so the ruby does not lever in easily. Also, you may peel away some of the top coat during assembly. That could affect the finish on the visible areas of the ruby, so you may want to mask off the sides of the ruby or lightly sand the cured top coat (only the sides) prior to assembly.Be careful with masking. The tape should be no wider than the sides of the ruby (6mm) to avoid pooling where the tape meets the ruby. If you rush and misalign the tape or peel it away too quickly, you'll get bare spots on visible edges of the ruby. These bare spots will be very noticeable! Take your time with this.When applying the top coat, it's best to do both sides at once. This is unavoidable if dunking the ruby. Apply a thin piece of masking tape to one side of the ruby and use a tiny dab of CA glue on the tape to attach a bamboo skewer or craft stick. You now have a handle to hold while applying your top coat. If you use something thicker than the side of the ruby (e.g., a craft stick), be careful not to let top coat pool between the handle and the ruby.Once the top coat is cured, the handle should come free easily. If the tape isn't holding the ruby, you can also glue your handle directly to the ruby. As long as you use only a dab of CA glue, the handle will pop off, and then you need only do some light sanding to remove any glue on the ruby.Making a Metal HookUsing the version of the frame model with a hole for a metal hook is recommended. A brass hook looks nice, helps sell your paint job as metal, and will be much more durable than a printed resin hook. If you plan to wear the ruby, you don't need to worry about the paint on the hook getting scratched off or something catching the frame and breaking the hook.Buy some 1mm thick brass flat stock. This brass is also available at craft stores. Look in the metal stamping area of the store. At a store like Michael's, you should be able to find an "Impress Art" metal stamping display where you can buy small packs of 1mm thick stamping blanks. These blanks can be easily cut down with metal snips or on a belt sander. You can also use a band saw, but be very careful if you do.Make a 2mm wide strip that is at least 20mm long. Creep up on that 2mm width with a rotary tool or file. Test fit the strip in the frame, do a pass with your sander/grinder, test fit, and repeat until you have a fit that is tight but still allows the bar to stick out a little bit inside the frame.About 8mm of the hook will be inside the frame. Mark 6mm above the frame and use pliers (preferably rounded jeweler's pliers made for making smooth bends) to bend the metal into a loop about 1mm wide. You should have a hook that's about 5mm tall (total of 11mm tall with the 8mm extension).Cut away any excess material, so your loop ends about 1mm above where the top of the frame will be. Finally, smooth over the edges and shape the cut you just made into a V shape with a file. Look at the frame model with the hook included as an example of how the final hook should look.Note on Jump RingsIn the included image, the screen-used prop's jump ring is a flat triangle. It looks like a custom piece, so this collection includes a Triangle Connector.stl file for a printable stand-in. To use it, you'll need to go with a metal hook that can be bent around the printed triangle connector.You can get triangles to use as jump rings, but they won't match the prop. The triangle is flat (not bent metal wire) with 1-1.5mm thick sides. The inner triangle has chamfered corners that leave roughly 2mm open, just enough for the hook. The chamfer also helps the bail hook hold the triangle in the proper orientation.Commonly available triangle jump rings are made of thin wire and have more room inside that allow the frame's hook to slide side to side. The best store-bought option is a basic circular jump ring. You may be able to find very small triangle jump rings that will work.Eagle-eyed viewers may notice the bail hook/jump ring/hook configuration changes during the close-up scene in 24/7. The ruby enters the scene, slowly spinning and out of focus. The focus transitions from John Dee to the ruby until the ruby is in focus right as it stops moving. While moving, the attachment configuration appears longer than a single jump ring, and there's no triangle piece. That may allow the ruby to spin a certain way for the cinematography. We can conclude the dream ruby seen during the in-focus part of the scene (i.e., the dream ruby with the triangle) is the hero prop and the triangle connector is the most accurate option. That said, the ruby looks great with a regular jump ring.
With this file you will be able to print Sandman Dream Ruby with your 3D printer. Click on the button and save the file on your computer to work, edit or customize your design. You can also find more 3D designs for printers on Sandman Dream Ruby.