Samsung Galaxy Note 3 Case w/ Cover, Magnetized
thingiverse
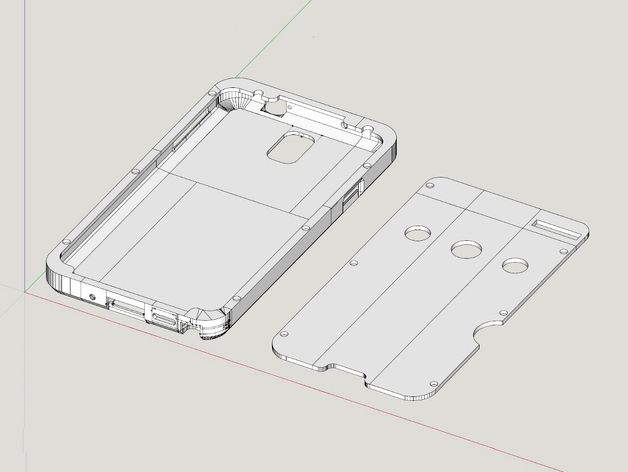
UPDATE 10-15-2014 I recently uploaded a revised version of my Galaxy Note 3 cover, addressing an issue that user Kareesmoon had brought to my attention - a small gap in the bottom corners. This new design retains the features of my original Ultimate Samsung Galaxy Note 3 case but does away with the Sugru bumpers. The main difference between this variation and its predecessors is the lack of Sugru bumpers. If you're looking for other options, here are the details: * Ultimate (Magnets, Cover, Bumpers): http://www.thingiverse.com/thing:407517 * No Cover (Sugru Bumpers, No Magnets): http://www.thingiverse.com/thing:424089 * No-Frills (No bumpers, no cover, no magnets): http://www.thingiverse.com/thing:415418 The design allows printers with small build areas to print it, making it possible for users with devices like the Printrbot Simple Metal to still access this fantastic case. A highlight of my new design is the protective cover featuring holes cut out specifically to display the time and music/audiobook/podcast navigation buttons. This allows you to keep an eye on the time discreetly during a movie without disturbing others around you! To hold everything in place, I incorporated tiny magnets that you can easily find at under $3 online. Additionally, these magnets are used at the back of the case, enabling you to detach the cover when needed or use it as a stand for hands-free viewing. It's worth noting that this design fits snugly around the Galaxy Note 3 without needing its original back piece in place. You can easily remove the top and bottom sections to access the battery or sd card at any time. During initial development, I did print out holes on the cover that allowed for picture taking while attached to the phone's back. However, as most people take their phones' covers off during photo ops, this feature was scrapped in favor of keeping things simple. Now let's dive into assembly and tips! ### Instructions & Parts List: * For printing: Top, Bottom, Cover (all using support structures). I highly recommend checking InTheGarage's Slic3r settings found at http://www.camwatt.com/printrbot-simple-metal-slic3r-settings.html. * Removal of support material requires care with pliers and possibly fine tuning with a Dremel or sandpaper. Note the precision required to get a perfect fit; this may involve additional work around openings. Keep testing until everything aligns seamlessly (remove Galaxy Note 3's back first since it's not needed). There's a bit of extra length built into the parts where Top and Bottom meet, allowing for a smooth edge without any gaps. Sand those areas to achieve perfection. Next: 1. Use your Dremel to carefully make some small magnet holes; there should be 6 on the front case, 6 on the cover, and another set of 6 at the back. 2. These need tight fittings, especially considering some printers might print their cases slightly large. Just apply a little extra adhesive during step five if you notice that gap. This applies only to back side magnet holes due to differences in printer settings. To assemble: 1. Place your tiny magnets inside these holes using Epoxy Adhesive (preferably http://amzn.to/1tqn1MR). Ensure they all go into the correct directions, considering that each direction impacts function differently: - For case: 6 magnets at one polarity and a mirrored direction for remaining three groups of 2-4 each (total is twelve but six must face down towards back piece to provide necessary separation; don’t make this common). 2. If you see any signs of distortion during production process due warped parts – you've probably discovered your warps are in place now because if water fails its attempt there’s always alternative for it like baking within one hundred ninety degrees Fahrenheit (twenty-one centigrade) but still try bending after getting them dry completely; this helps straighten them up slightly. 3. The cover fits nicely into position – ensure all components securely in line at time and then add your magnetic closures at each end making sure none come off so they do provide best possible securement. You are good to go with it! Accessing battery or SD card by breaking down the case just means taking those pieces back apart but always a straightforward action when things have aligned perfectly after being put together in correct orientation. Enjoy the protective Galaxy Note 3 case.
With this file you will be able to print Samsung Galaxy Note 3 Case w/ Cover, Magnetized with your 3D printer. Click on the button and save the file on your computer to work, edit or customize your design. You can also find more 3D designs for printers on Samsung Galaxy Note 3 Case w/ Cover, Magnetized.