Rubbermaid 5 L/21 Cup Single Spool Dry Box
prusaprinters
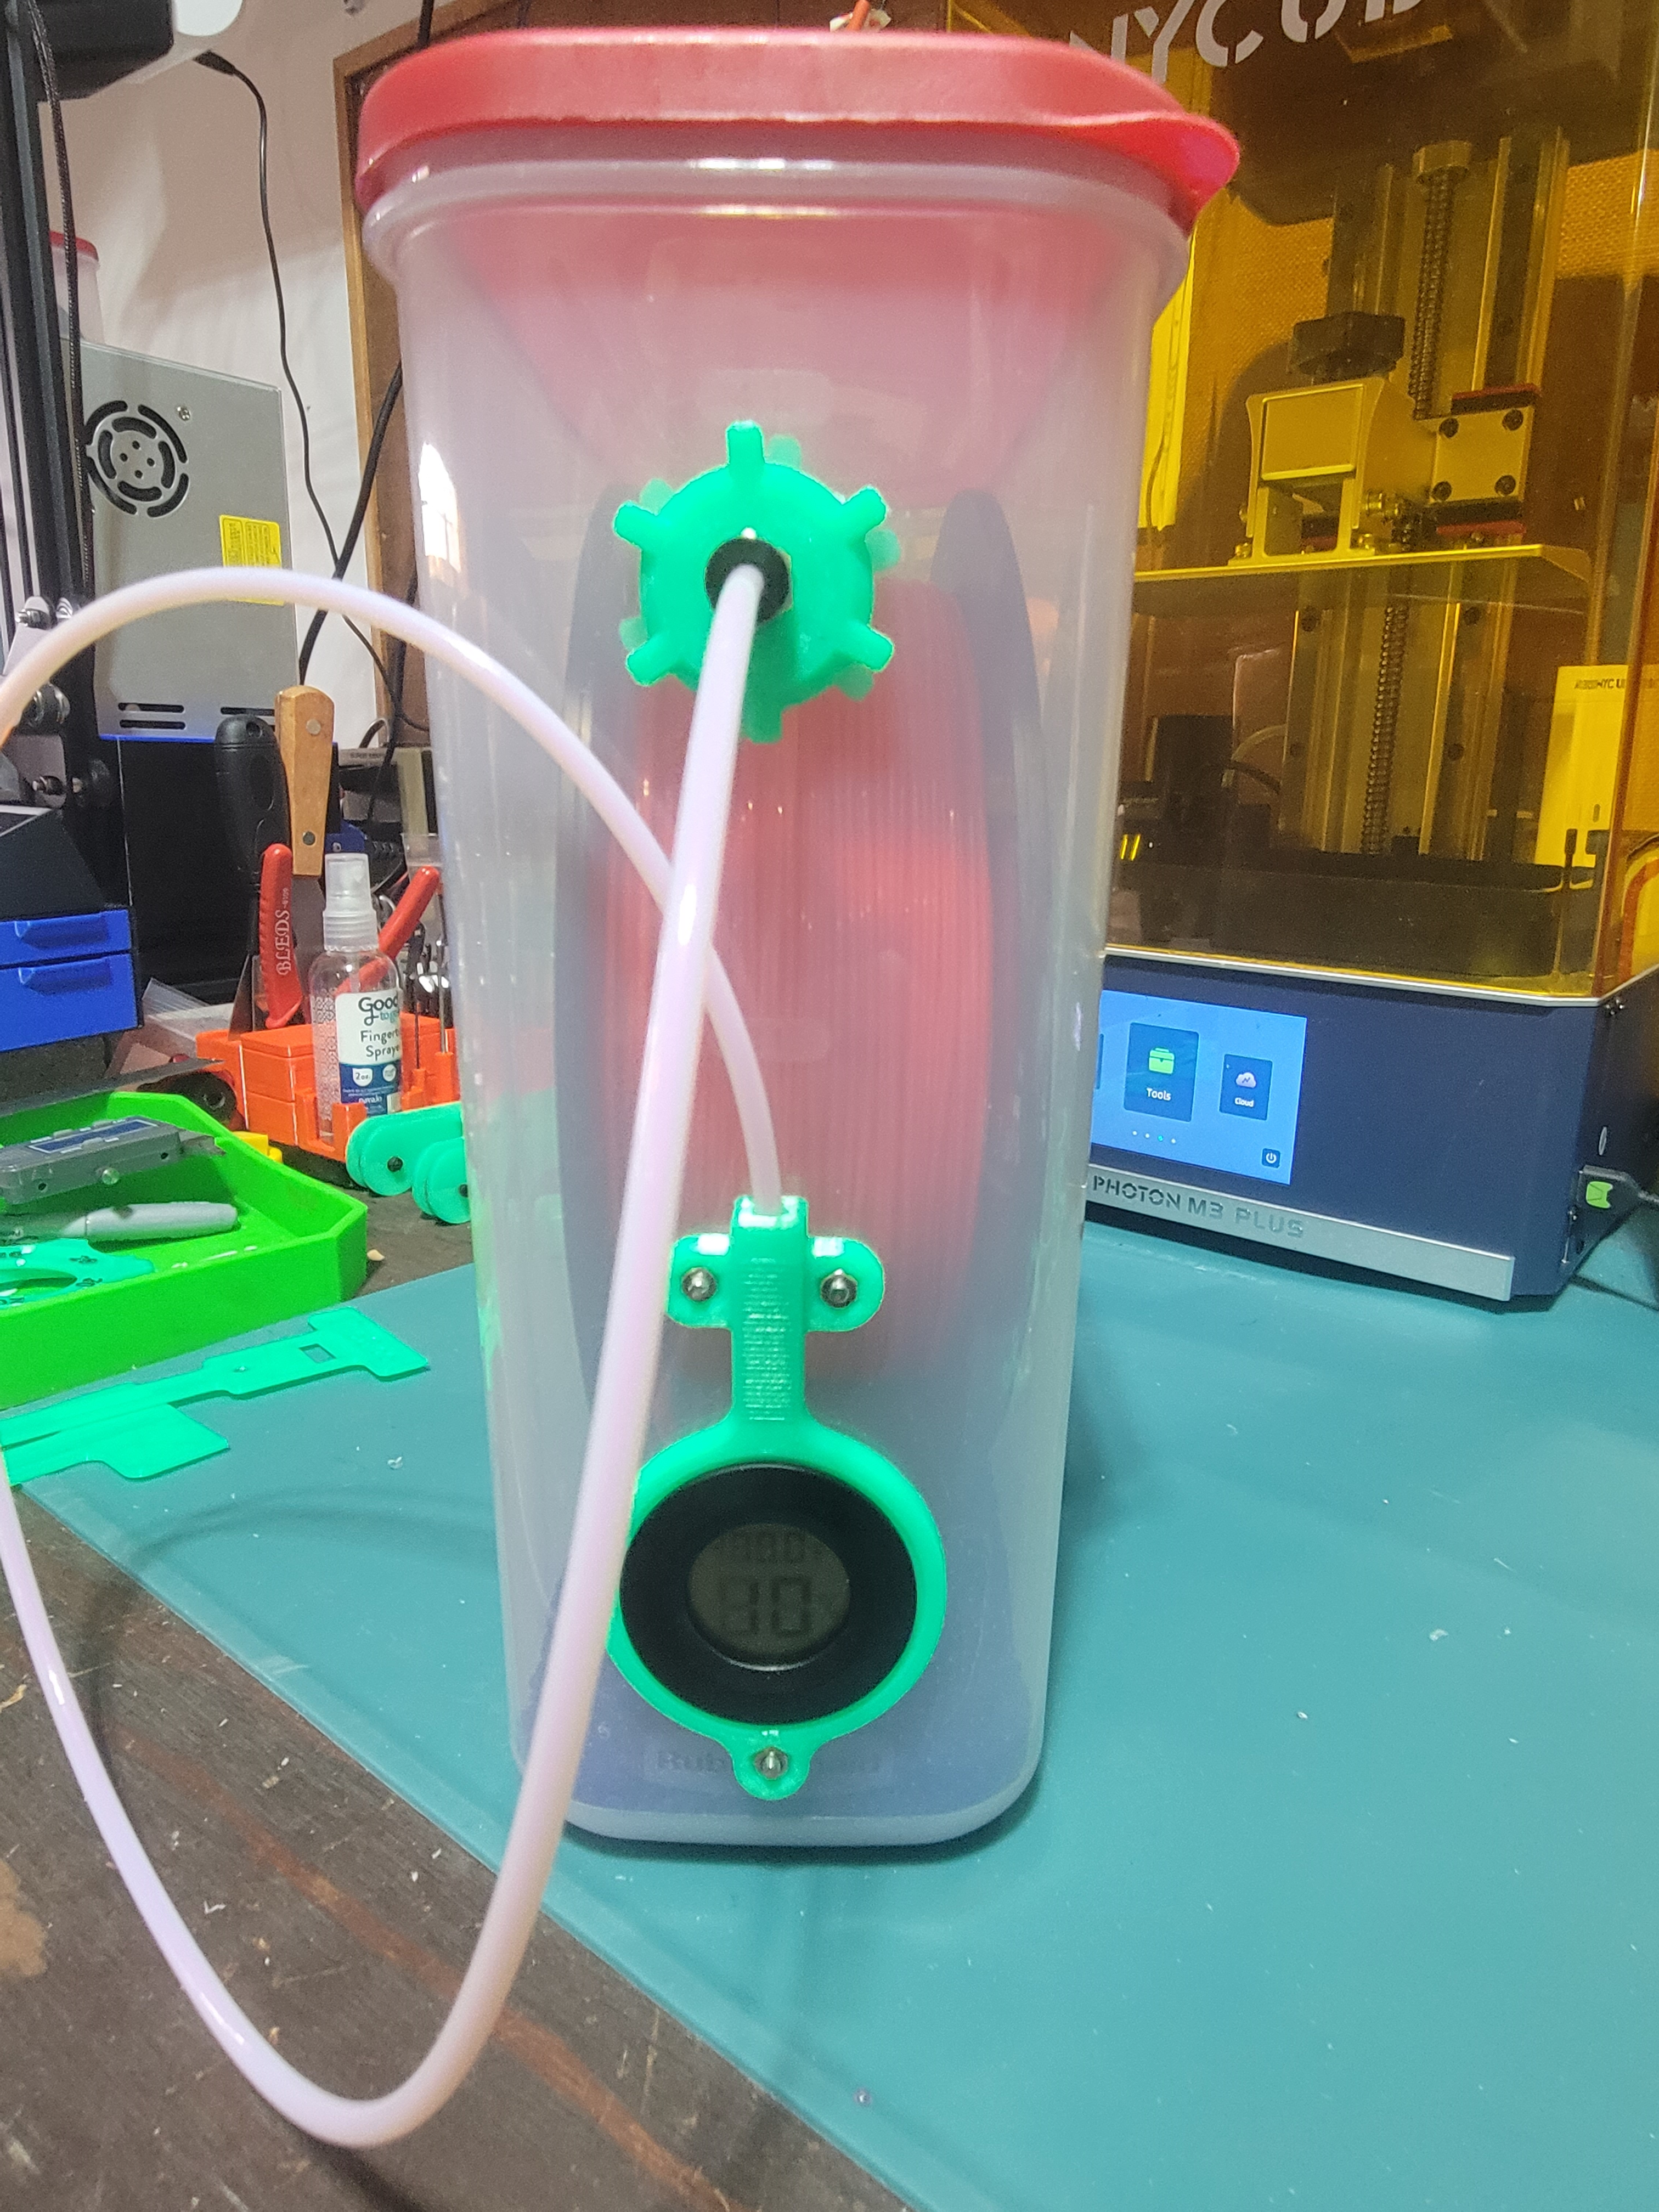
<p>I have a half of dozen of these individual dry boxes to compliment my larger multi-spools ones. Originally I used a sled design similar to the TUSH spool holders that sat on the bottom of the container. These worked fine as all the spools that went in them were from the same manufacturer and the spool design hadn't changed… then it did.</p><p>Wider spools no longer fit in the containers and this was a problem. So I scrapped the sled design and started using a spool hole hanger system, like <a href="https://www.printables.com/model/3359-airtight-filament-storage-container-and-spool-hold">tdiggity</a>'s. Give this model a like if you use my setup. </p><p>Ultimately, what we have here is the final (for now) evolution of my single dry box set-up, modified from a few different models over the years. Because I'm a bit OCD and don't like looking at a sea of boxes with different spacing for everything I made templates to insure my boxes have a consistent look to them. It's way overkill, yes. But I find work flows easier using the knolling principle. Also, I've found that these dimensions work well for a variety of spool sizes so I won't ever have to go through this process again… </p><p><strong>What You'll Need</strong></p><ul><li>5 Litre / 21 Cup Rubbermaid container</li><li>Speed square or two straight-edges.</li><li>M3-8mm bolts with Hex nut (5.5mm across flats). 7 each.</li><li><a href="https://smile.amazon.com/dp/B07FCPJRFH?psc=1&ref=ppx_yo2ov_dt_b_product_details">Hydrometer</a>.</li><li><a href="https://smile.amazon.com/ExcelFu-Straight-Pneumatic-Connector-Long-Distance/dp/B07P2XRCC1/ref=sr_1_2?crid=5LUOU44J8K8A&keywords=PC4-M10&qid=1668405370&s=industrial&sprefix=pc4-m10%2Cindustrial%2C150&sr=1-2">PC4-M10</a> PTFE Coupler.</li><li>3mm Drill bit.</li><li>Stepper Drill bit at least 7/8 (Just over 20mm) in diameter.</li><li><a href="https://smile.amazon.com/Bi-metal-Annular-Electric-Plastic-Drywall/dp/B08L6DHY84/ref=sr_1_1?crid=364W7H2FTIS2P&keywords=Hole+Saw+with+Heavy+Duty+Arbor%2CHSS+Annular+Hole+Saw+Cutter+Drill+Bit+for+All+1%2F2+Electric+Drills+for+Wood%2CPlastic%2C+Drywall+and+Metal%2841mm%29&qid=1668406058&s=industrial&sprefix=hole+saw+with+heavy+duty+arbor%2Chss+annular+hole+saw+cutter+drill+bit+for+all+1%2F2+electric+drills+for+wood%2Cplastic%2C+drywall+and+metal+41mm+%2Cindustrial%2C143&sr=1-1">41mm hole saw</a>.</li></ul><p>You shouldn't have to scale any of the pieces. The threads on the Bowden tap should be smooth even if your machine isn't perfectly tuned. I've printed a half-dozen of ‘em and they’re smooth as butter. The M10 coupler will screw into the Bowden tap nice and easy by hand.</p><h4><strong>Instructions </strong></h4><p>The pictures should be easy enough to follow but just in case here is a long winded breakdown:</p><ol><li>Find the center of the sides for the roller brackets. I use a speed square for this. It's a bit tricky because of the curves on the container so take your time.<ol><li> Another method that works well is set a straight-edge along the short side so it extends up. Butt another straight-edge against it and measure 115mm inwards. That's close enough to center. Because the container tapers smaller towards the bottom, the 115mm measure will become increasingly inaccurate as you move further down the container but 1 rulers width from the top will get you close enough.<ol><li>Apply the bracket template so the center mark lies within the center window of the template. Mark the holes. Drill these out for M3 bolts. Repeat on the other side.</li><li>Secure the brackets using M3 bolts</li></ol></li></ol></li><li>Apply the face template to the Litre side of the container. The 4 Litre label should sit within the box at the top of the template. I've noticed that Rubbermaid varies the position of these label so if your container doesn't match, use the speed square method (or simply mark the center of one of those labels) and place the center mark within the center cutout of the template. Mark the holes and drill out for M3 bolts or to be used as a pilot hole.</li><li>Using a stepper drill bit, drill out the top hole of the face large enough for the Bowden Tap to fit. Go slow and use light pressure, these containers are crazy brittle.</li><li>Secure the Hydrometer Cutout template to the 2 horizontal holes using M3 bolts. Drill out the bottom hole of the template and secure using M3 bolts.<ol><li>Using a 41mm hole saw, drill out the hydrometer hole. Go Slow and use light pressure, these containers are crazy brittle.</li><li>Remove the Cutout Template and secure the Hydrometer and Bowden Keeper using the three M3 bolts.</li></ol></li></ol><p>If you like what I'm doing here, please consider making a <a href="https://www.paypal.com/donate/?business=FCRT59L53FP8J&no_recurring=0&item_name=Your+donation+helps+maintain+my+Search+%26+Rescue+gear.+We+are+all+volunteers+and+entirely+self-funded.+Thanks+for+your+support.&currency_code=USD">small donation</a>. These funds help me (in part) maintain my volunteer efforts in Search and Rescue.</p>
With this file you will be able to print Rubbermaid 5 L/21 Cup Single Spool Dry Box with your 3D printer. Click on the button and save the file on your computer to work, edit or customize your design. You can also find more 3D designs for printers on Rubbermaid 5 L/21 Cup Single Spool Dry Box.