 thingiverse
RodentBot
Update 3/22/13 - Still working on this. The contest had me really rushing things, trying to condense things, make things smaller, and fit it all onto one build platform/print. Now I feel free and can start uploading parts of the robot that can be printed separately.
Ever watch your hamster or gerbil running in its wheel, wondering if it's imaging that it's traveling to the exotic reaches of the Earth? Well, now it can! Using this creation you can allow your rodent to transform that rotational energy into a walking robot that uses Theo Jansen's miraculous leg linkage!
All parts were made specifically for this project, not imported, but some things such as the pins will likely be turned into public customizable libraries for others to use after this project is finished.
This project is close to being finished but not quite. Some parts still need finished (wheel to legs assembly) and the gears need printed and tested. The linkage and pins have been printed and work together creating a nice smooth motion. I imagine the wheel itself would be just fine.
I have been a really big fan of 3D printing as of late and have been getting into OpenSCAD modeling. I don't have my own 3D printer but I do have access to a couple hours a week from a local club. My development of shared libraries could really use some personal testing and winning this contest would allow me to create many more things for the public good!
Still working on generating the STL! I'll unlabel this as a WIP when finished and printable!
Instructions
Running into issues creating an openscad preview of the assembly. Linkages, body, gears, all will likely change over the next few days as I work on this
Try out a set of legs. Print two copies of the leg.stl and one bodyAndThreeGears.stl
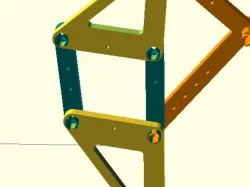
Put the legs together. Each of the linkages have a number of dots on them to identify. You can use the picture of the legs put together to figure out what goes where.
Attach the gears to the body. Looking at the body longways it has 5 pegs on it, the gears will go on the middle three. (Center gear hole!) Keep the outer two gear's holes aligned at the same angle.
Attach the legs to either side of the body. Where link three and four go together will go into the outer hole of the outer two gears. The last pin of the body will go into the 'hip' which is the right-triangle looking piece, at the larger angle'd hole.
Now you have a working pair of legs! You can hold the body parallel to the ground and use your finger to spin the middle gear and both legs should make a walking motion!
//----- If you're working on printing this, I'd stop here and wait for me to catch up with the rest of the robot. I have to figure out how to attach the body's to the wheel itself right now. ------//
Repeat steps 1-4 three more times to make a total of eight legs.
To be continued.
Direct link to the original creator's page
More from agweb

Similar Models





Model Specifications
Frequently Asked Questions
How do I download RodentBot?
Click the "View on thingiverse" button above to visit the original model page on thingiverse. You can download the STL file directly from the creator's page for free.
What 3D printer can I use for this model?
This STL file is compatible with most FDM 3D printers (Creality Ender 3, Prusa MK3S+, Bambu Lab, etc.) and resin printers (Elegoo, Anycubic). Check the original page for recommended print settings and materials.
Is this 3D model free to download?
Yes, this model is available as a free download on thingiverse. Some creators accept tips or donations.
Can I modify this STL file?
Most STL files can be modified using free software like Blender, TinkerCAD, or Meshmixer. Check the license on the original thingiverse page to see if modifications are permitted by the creator.