Rocket System Aurora
pinshape
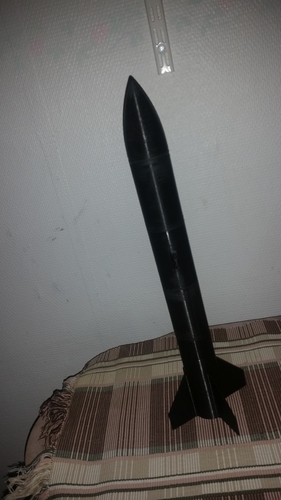
This is an upgraded version of the original model made by "Landru" on Thingiverse, now renamed as "Rocket System Aurora." This rocket system will become fully customizable with your feedback. To make this possible, I need your input on things that are incorrect, should be improved, or new ideas. The example models are not meant to be printed directly; they serve as inspiration only. Open the .zip file to access the STL files. Current Version: 1.2 New features include Payload Bay Parts. The package contains various components: * Large Body Tube + Payload version * Medium Body Tube + Payload version * Small Body Tube + Payload version * Payload Adapter * Payload Coupler (required in special cases) * Dual Female Adapter * Dual Male Adapter * Ogive Nosecone + Payload version * Conical Nosecone + Payload version * Nosecone Coupler + Payload version * Engine Holder 32mm * Engine Upper Stop 32mm * Blank Fincan * Fincan 24mm * Fincan 18mm * Fincan Angled 2xCluster 18mm Coming Soon: * Camera Mounts in various sizes (maybe a customizable size mount) * Fincan with small fins * Launchpad + Rocket Mount Currently Working On: * Booster holder for 18/24 mm engines, 2x Booster holder and 4x Booster holder. Changes To Be Made: * Optimize Conical Nosecone for supersonic airflows. * (Depending on effort), maybe change all "put-together-parts" so they have threads instead of needing glue or other adhesives. Instructions: Step 1: Select Components. You will need at least a nosecone, body tube, fincan, and nosecone coupler. You can use multiple body tubes and fincans to create a longer and more stable rocket if desired. Step 2: Print parts. They should fit together perfectly on your printer. You may need to sand some mating surfaces or add tape for the correct fit. Step 3: Screw the nosecone to the coupler. Glue if necessary. Step 4: Tie the nosecone coupler to the fincan through the body tube with a 3ft non-flammable cord. Attach a parachute or streamer if desired (HIGHLY RECOMMENDED). Step 5: Insert Motor and add a short drywall screw to the rear of the rocket for motor retention. You can also put tape on the rocket motor for a tight friction fit. Or, if you use a homemade rocket engine (only 32mm outer diameter compatible for now), use an empty fincan with an Engine holder 32mm directly on top, then place body tubes between and add the engine stop to prevent it from shooting up through the rocket. Step 6: Fly safely and have fun! Make sure you are at a safe distance from houses and other things to prevent damaging property or people.
With this file you will be able to print Rocket System Aurora with your 3D printer. Click on the button and save the file on your computer to work, edit or customize your design. You can also find more 3D designs for printers on Rocket System Aurora.