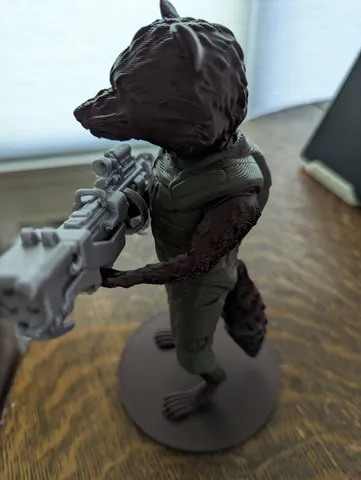
Rocket Racoon Remix
prusaprinters
Rocket Racoon from Guardians of the Galaxy. I modified the previous model posted by John Arent in 3 ways:Made the assembly pins & holes longer & thicker.Tightened the assembly tolerances between pins & holes.Flattened the bottom surfaces of the legs platform, the body, & the head.The model now stands on it's own assembled without gluing, but you'll probably want to glue it anyway. Only the gun from the original model remains the same.Printed with 0.3mm Draft mode, PLA, on MK3S. It should work on Mini, MK4, or XL with no problem.I also experimented with Organic Supports & make recommendations for the best way that I found to use them.Organic Supports in PrusaSlicer 2.6.0Under Support material settings, turn on Generate support material, make sure Auto gernerated supports is selected, set Overhang threshold to 28 degrees, & set Style to Organic. Leave all other support settings at default.For the legs, body, & head pieces, set the flat bottom surfaces on the build plate.For the legs, that's the bottom platform.For the head it's the bottom of the neck.For the body, it's the bottom of the knees.On the body, before slicing, paint on Support Blockers inside all the assembly holes. This will prevent supports from marring the hole surface & interfering with the assembly tolerance.For the arms & tail with no flat surfaces to face the build plate, I found that the organic supports are difficult to remove & leave a poor finish where the part is near the build plate.The gun has flat surfaces, but none that are appropriate for grounding on the build plate.Instead, raise these parts above the build plate a few mm before slicing. That's not an easy or straight-forward thing to do. I got some advice from the Prusa Forum & have organized some instructions as follows. I'm using the tail piece as an example, but it could also be done with the arms individually or all 3 pieces (tail & 2 arms) at the same time.Add the part rr_tail-3.STL to the build plate.Rotate the tail so that the assembly pin faces up. This will prevent supports from marring the surface of the pin & interfering with the assembly tolerance.Right-click the part, select Add part, then select Box. A box now appears highlighted on the build plate.With the box still highlighted (the tail object not highlighted), go to the Part manipulation dialog on the right side of the screen & click the lock symbol on the Scale options.Set the X & Y scales each to 50% & the Z scale to 10%. The box should now appear as a small square wafer & is still the only object highlighted.Select the Move icon on the left side of the screen. Move the box straight down to a position 3-6mm below the surface of the build-plate. Ignore the warning that an object outside the print area was detected.Right-click the box object & select Infill.Set Fill Density to 0%.Right-click the box object again & select Layers and Perimeters.Set all layers & perimeters to 0.The box object is now a non-printing object.Select the tail object.Select the Place on face icon on the left side of the screen.Select the bottom surface of the non-printing box object which is now below the build-plate.The tail object is now suspended above the build plate so that organic supports will form around it like a cradle.Slice the object & send it to the printer.Let me know if you try these organic support instructions, & leave feedback or recommendations for improvements.
With this file you will be able to print Rocket Racoon Remix with your 3D printer. Click on the button and save the file on your computer to work, edit or customize your design. You can also find more 3D designs for printers on Rocket Racoon Remix.
