Rocket Fly-away Rail Guide V2
thingiverse
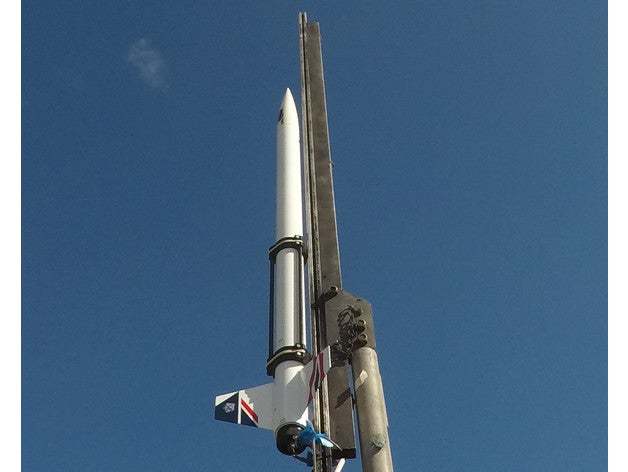
**Edit October 23rd, 2019** Added a 50mm version for Mr_Phelps. **Edit July 20th, 2019** Flight testing resulted in successful launches of one F (CTI Pro24 3G), one G (CTI Pro24 6G) and one H (Aerotech) motors. The design worked well overall, but there was one breakage due to weakness where the two screws hold each of the carbon fibre tubes. Carry some spares, and you'll be fine. **Edit July 7th, 2019** Version 2.4 is uploaded to fix minor config issues. Solidworks source is moved into the zip file. **Edit July 4th, 2019** Version 2.3 is uploaded. Each size of rail guide now has two files for A (top) and a B (bottom), containing two pieces each - you'll need to print one of each file (four pieces total). If you printed this prior to July 4th, then you have the "A" version - download and print a "B" file to get a complete rail guide. **OVERVIEW** This is a new and stronger fly-away rail guide for medium power and high power model rocketry. It's used to launch sport rockets as an alternative to gluing on launch lugs or screwing rail buttons directly onto the rocket body. **PARTS** - Each size of rail guide has an A and a B file containing two pieces each for top and bottom. You'll need to print one of each file (four pieces total) to assemble the guide properly. - Three 8.3mm OD carbon fibre tubes - 300mm or longer for larger size rockets and around 200mm for the smaller sizes. - Four delrin or nylon rail buttons. - Four M4 x 15mm screws with M4 nuts to secure the rail buttons. - Eight M3 x 12mm countersunk screws with M3 nuts to secure the outside carbon fibre rods. - Two M3 screws to physically secure the centre carbon fibre rod (optional / just-in-case). - Four 80mm rubber bands (two each for top and bottom for redundancy). **ASSEMBLY** - First add four rail buttons secured by M4 x 15mm screws with M4 nuts. - Slide the three carbon rods into the holes at each end to create the rail guide assembly. If the hinge formed at top and bottom falls apart, turn either the top or bottom pieces upside down so that it all holds together. - As the rods slide in, pass the rubber bands around each rod as shown in the photo to create a spring. - Secure the rods with eight M3 x 12mm countersunk screws and M3 nuts. - Add a thin layer of electrical tape, foam or similar on the inside of the rail guide to provide grip on the rocket body and protect your paintwork. - It's ESSENTIAL that the two halves open freely - if there is any sticking or binding disassemble and sand or file away any rough spots / add a lubricant such as dry graphite to ensure the assembly opens with minimal friction. A word on filament: - We've been printing test versions in PLA and had successful launches so far. - Settings were 1.75mm PLA, 0.2mm layers, 30% infill, support is required, no brim or raft. - Fully assembled weight was around 120 to 150 grams, however the guide is discarded immediately after the rocket clears the rail. - Through testing it seems a thicker wall is the key to higher strength prints. The finished product is quite strong .... BUT.... - Our experience is that PLA is very poor for long term use as it is quite hygroscopic and becomes brittle after a few months. - For long term use, definitely use one of the newer high strength filaments that are stable in high humidity and provide greater shock resistance. - Even using polycarbonate we've shattered the centre hinges launching G and H motors (the rockets themselves launched fine / just the rail guide ended in pieces). Recommend take some spares to your launch site.
With this file you will be able to print Rocket Fly-away Rail Guide V2 with your 3D printer. Click on the button and save the file on your computer to work, edit or customize your design. You can also find more 3D designs for printers on Rocket Fly-away Rail Guide V2.