RoboForce Hun-Dred Action Figure
prusaprinters
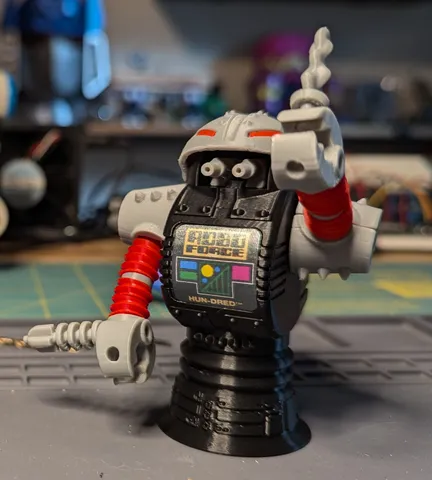
This is a from-scratch rebuild of the RoboForce figure Hun-Dred. It's about ⅔ the original scale. There's no pneumatic arm action, but I did include the button in the back that uses a ballpoint pen spring and the arms can bend inward using black or red pipe cleaners. I printed this on my Prusa XL to print the red eyes in the helmet, but that could easily be painted later instead. All other parts are single-color prints. Glue is only needed for the shoulders and the spring for the back button. Everything else friction-fits together. Parts are oriented for printing and comments on each part indicate if a brim or support is needed. Back Button/Trigger:Cut a ballpoint pen spring down to 13mm in length. Squeeze one end slightly so that it friction presses into the black button piece. Then use a bit of super glue in the top of the body to hold the other end of the spring. Be careful not to glue the button itself to the body!Arms:Each arm will be need four of the Arm Segment pieces, one Elbow, one Hand, and one Shoulder (Shoulder Back and Shoulder Front). The two parts can use small pieces of 1.75mm filament in the small holes to align them when gluing together later, although it's intentionally a tight fit.The Arm Segments have a slight angle, allowing the arms to bend inward. Thread a black or red pipe cleaner through/around the Hand first, then add two Arm Segments, one Elbow, two more Arm Segments, and finally loop around the Shoulder segment. Loop the ends of the pipe cleaner around the Shoulder segment to hold it, with a little slack to allow the arms to bend later. See the Arm Assembly images for reference. Then glue the shoulder pieces together. If you find you have too much slack, twist the hand or shoulder 1 or 2 times to tighten it up. Once the shoulder glue dries, glue in the Shoulder Peg and let it dry.Helmet/Eyes:First, insert the Helmet Post pieces into the sides of the head, typically starting on the inside and pushing them out. Don't push them all the way through, just enough to get each one started. Put the Helmet over top of the head, tilt it back, then push the Helmet Posts on each side the rest of the way out, into the holes on the Helmet. Push the posts flush on the inside of the head. Last, slide the Eyes into the head, along the slot in the center. Chest Logo:The Chest Logo.png can be printed onto either paper or a silver inkjet sticker sheet. You'll need to resize the image to 19mm high by 19mm wide. I used the free Silhouette Studio software for that. Once printed, cut it out and glue it onto the body. Even if you use sticker paper, I've found adding gluestick to the edges helps it stick better over time. I also sprayed two layers of clear gloss spray paint over the sticker to prevent smudging. RoboForce Figures (so far):SOTAHun-DredCoptorEnemy
With this file you will be able to print RoboForce Hun-Dred Action Figure with your 3D printer. Click on the button and save the file on your computer to work, edit or customize your design. You can also find more 3D designs for printers on RoboForce Hun-Dred Action Figure.