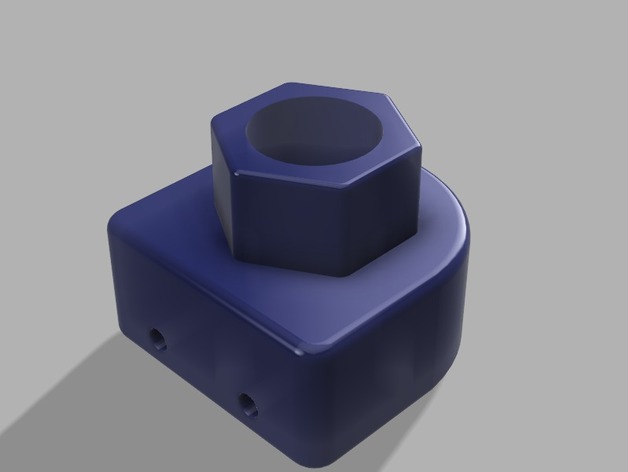
Robo R1 TR8 Lead Screw / Coupling Upgrade
thingiverse
For people who experience Z Axis ribbing and seek an affordable alternative to the "Official" Robo3D Z Axis upgrade, follow these steps. Print two copies of the provided model, which is an adapter that transforms a brass leadscrew nut into a hexagonal form fitting snugly onto the Robo3D X Idler's hexagon opening. A slight taper on the hex minimizes backlash. With this adapter in place, Z axis build height remains unchanged and Auto-level functionality operates normally. Additionally, use four M3 x 8 mm (#4 x 3/8") self-tapping screws to secure the leadscrew nut firmly into position. Meanwhile, this adapter replaces the auto-level stabilizers required for attaching Z Axis leveling microswitches. Install two M2.5 x 8 mm (#2 x 3/8") self-tapping screws to secure the microswitches to the adapter securely. Moreover, replace flexible motor shaft couplings with solid ones. Obtain two couplings featuring a 5mm bore on one end and an 8mm bore on the other. Further required parts include two TR8*8 leadscrews, along with accompanying nuts measuring approximately 300-350 mm in length. Designed to provide an accessible alternative to Robo upgrades while minimizing installation complexity, this solution doesn't require disassembling your Robo extensively or removing any wiring or stepper motors. Consequently, there is less risk of damaging lead screws during the process. To ensure accurate measurements and proper functioning, please print this model carefully, paying attention to provided specifications and calibrate your extruder properly prior to use. This setup works seamlessly with most printing requirements. Required hardware for assembly includes: Two TR8*8 Lead Screw and Nut Assemblies, 300-350 mm in length 2 - Solid Motor Couplings with 5mm and 8mm bores 4 - M3 x 8 mm Self-Tapping Screws Optional: 8 - M3 x 8 mm Self-Tapping Screws (may be used) To successfully integrate the upgrade into your Marlin firmware, you will need to modify one specific line within Configuration.h: #define DEFAULT_AXIS_STEPS_PER_UNIT {80,80,2650,723.38} You'll also require accurate knowledge of lead screw parameters to adjust the settings appropriately using a step calculator or adjusting settings based on actual hardware characteristics
With this file you will be able to print Robo R1 TR8 Lead Screw / Coupling Upgrade with your 3D printer. Click on the button and save the file on your computer to work, edit or customize your design. You can also find more 3D designs for printers on Robo R1 TR8 Lead Screw / Coupling Upgrade.
