Robo 3D Full Graphics LCD Swivel Riser Feet
thingiverse
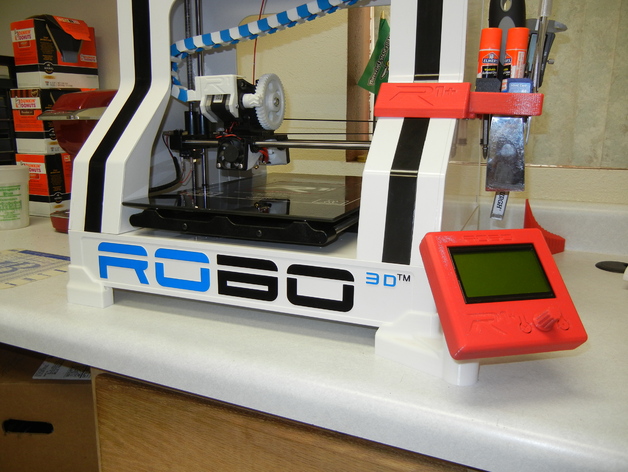
This design was modeled after Mike Kelly's: http://www.thingiverse.com/thing:681887, with a few modifications added in. The Riser Feet are working great and require no fixes whatsoever. They were built to be used with the bottom cover, but they would likely work without it as well. They also use the existing holes of the bottom cover for mounting purposes. It may be necessary to increase the height where the screws are located if you don't have the bottom cover available, or simply use a washer/spacer instead. To assemble this design, you will need to obtain a few longer screws for the Riser Feet as the standard screws are a bit too short. The exact size is #10 - 1" Long, I believe. I have uploaded STL, SolidWorks, STEP, and IGES files so that you can edit them if needed. I am not going to post the STL files of the LCD Case until I verify their accuracy. My first LCD Case did not turn out as expected, so I decided to redesign it. However, I haven't printed the new design yet. The LCD Case is intended for a Sainsmart Full Graphics LCD, which is why this project remains a work in progress until I print the LCD Case again. So far, this has been an incredibly fun project, and it makes my Robo R1+ look exceptionally great! If anyone would like to request any modifications, please let me know and I will do my best to accommodate your needs. EDIT I have completed printing my new revised LCD case for the SainSmart Controller, and everything fits perfectly. This is no longer a work in progress since I have uploaded all the necessary files to create this design. And I have verified that they all function properly with my setup at least. I have removed all old files and uploaded all updated files, including all SolidWorks, STL, STEP, and IGES files. The Riser Feet remain unchanged, but I completely redesigned the way the case is modeled. Which, in my opinion, looks better, fits better, and is easier to install. Six screws are definitely not required to install the LCD; I added them because they were lying around. Also, the Front fits so snug that you wouldn't even need to screw the Back to the Front. Don't forget to Like and Upload your Make! EDIT If you would like this same setup but have a RepRap Full Graphics LCD or 2004 LCD, I have remixed it to fit those versions: RepRap Full Graphics LCD Remix: http://www.thingiverse.com/thing:1773140) 2004 LCD: http://www.thingiverse.com/thing:1825916/ Print Settings Printer Brand: Robo 3D Printer: R1 ABS + PLA Model Rafts: No Supports: Yes Resolution: .2 Infill: 25% Notes: You will need to use supports under the Mount Holes for the Riser Feet. You should not need supports in the Tunnel of the LCD Swivel Riser. You will definitely need supports for the LCD Back, but you shouldn't need supports for the LCD Front if you print with the face on the bed. Print the LCD Case the way I have them oriented to avoid needing supports for the Front. Infill for the Front should be around 60% to fill the button extrusion; otherwise, it will be hollow, which would likely be fine. I use S3D for slicing. For the supports on the Back, I adjusted the Max Overhang Angle to 70 degrees instead of 45 degrees. This removes a ton of unnecessary supports and basically only puts the supports in places parallel with the bed. Post-Printing Hardware (1) SainSmart Full Graphics LCD Controller with Cables (obviously) (4) #10 - 1" Long Rounded Head Screws (8) #4 - 1/2" Long Flat Head Screws
With this file you will be able to print Robo 3D Full Graphics LCD Swivel Riser Feet with your 3D printer. Click on the button and save the file on your computer to work, edit or customize your design. You can also find more 3D designs for printers on Robo 3D Full Graphics LCD Swivel Riser Feet.