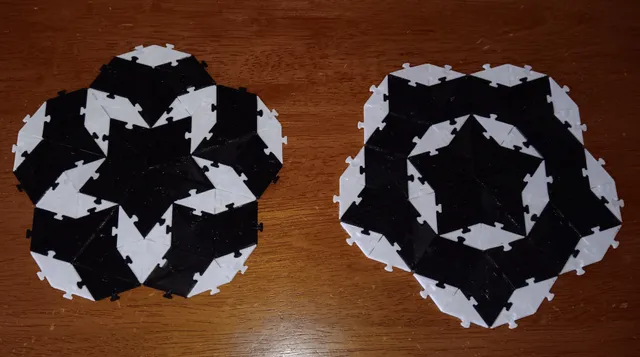
Robinson triangles (alternative version)
prusaprinters
Robinson triangles, introduced by R. M. Robinson, are another way to build a Penrose aperiodic tiling. https://tilings.math.uni-bielefeld.de/substitution/robinson-triangle/ They have the advantage of representing halves of rhombs during deflation using simpler rules. Robinson used four colors to enforce orientation. The pieces in this printable are contoured with a 2-layer jigsaw boundary, and can be flipped so only two are needed. The pieces are shaped to force the correct placement when snapped together. Each thick or thin rhomb is composed of two triangles, one flipped relative to the other, and connected at a jigsaw tab.Note: my earlier printable uses a decomposition into kite and dart halves. While it is a little simpler, it does not follow Robinson's deflation rule (but can be made to by grouping the tiles).Because it is impossible to 2-color these triangles consistent with flipping, one of the jigsaw nubs must be suspended, creating an overhang (unlike the earlier version) that presents a challenge in 3D printing. Two alternative solutions are provided here:Printing two layers that can be attached after printing.Using a support for the overhang that can be snapped off.There are pros and cons to each method. I encourage you to try both. Note that the support method actually uses less material, despite requiring you to discard a small part.Printing two layersThe models thick-rhomb-half-top and thick-rhomb-half-bottom slide together on a dovetail and hold with snaps in back. The top surface will flex up slightly but will snap into place, as this picture shows:I have included additional photos but it should be fairly clear when you inspect the pieces.At this size, it is hard to guarantee a good snap fit, though the dovetail holds very reliably. Sometimes they snap very well after printing. If they are a little wiggly, it will not affect their use as tiles, but I have found that a drop of acetone (generic nail polish remover) on each corner is enough to hold them in place if the wiggle really bothers you.While this is a complicated solution, it does show how to make a piece that is colored differently on each side, which may be of interest in other tiling projects.Printing with supportUse the model thick-rhomb-half-snapoff-support. Once it is printed, the rectangular protuberance can be snapped off by hand without damaging the tile. This part can be discarded. While this is simpler than the two-layer solution, it leaves a rough underside to the nub that can potentially cause problems fitting pieces. I have reduced the thickness from 1.1mm to 0.9mm to compensate, and you may consider filing it smooth. I have not found that necessary. Here are pictures before and after snapping off the support. .Warning: I found that setting “top solid layers” higher than the default of 4 on Flashprint made it impossible to snap off the support. You may need some trial and error depending on your printer and filament. I am using a Flashforge Adventurer 3 Pro 2 with R3D PLA.Laying out the tilesThese pictures illustrate Robinson deflation using these tiles. Finally, the white triangle is equivalent to the kite half in the earlier printable, so you may mix and match these pieces.The main difference between this and the earlier design is that the layout will show two colors of rhombs rather than kites and darts. You can also get that effect in the earlier design by printing some of the half halves the same color as dart halves.
With this file you will be able to print Robinson triangles (alternative version) with your 3D printer. Click on the button and save the file on your computer to work, edit or customize your design. You can also find more 3D designs for printers on Robinson triangles (alternative version).
