RGBtoHDMI adapter housing for Amiga 500
prusaprinters
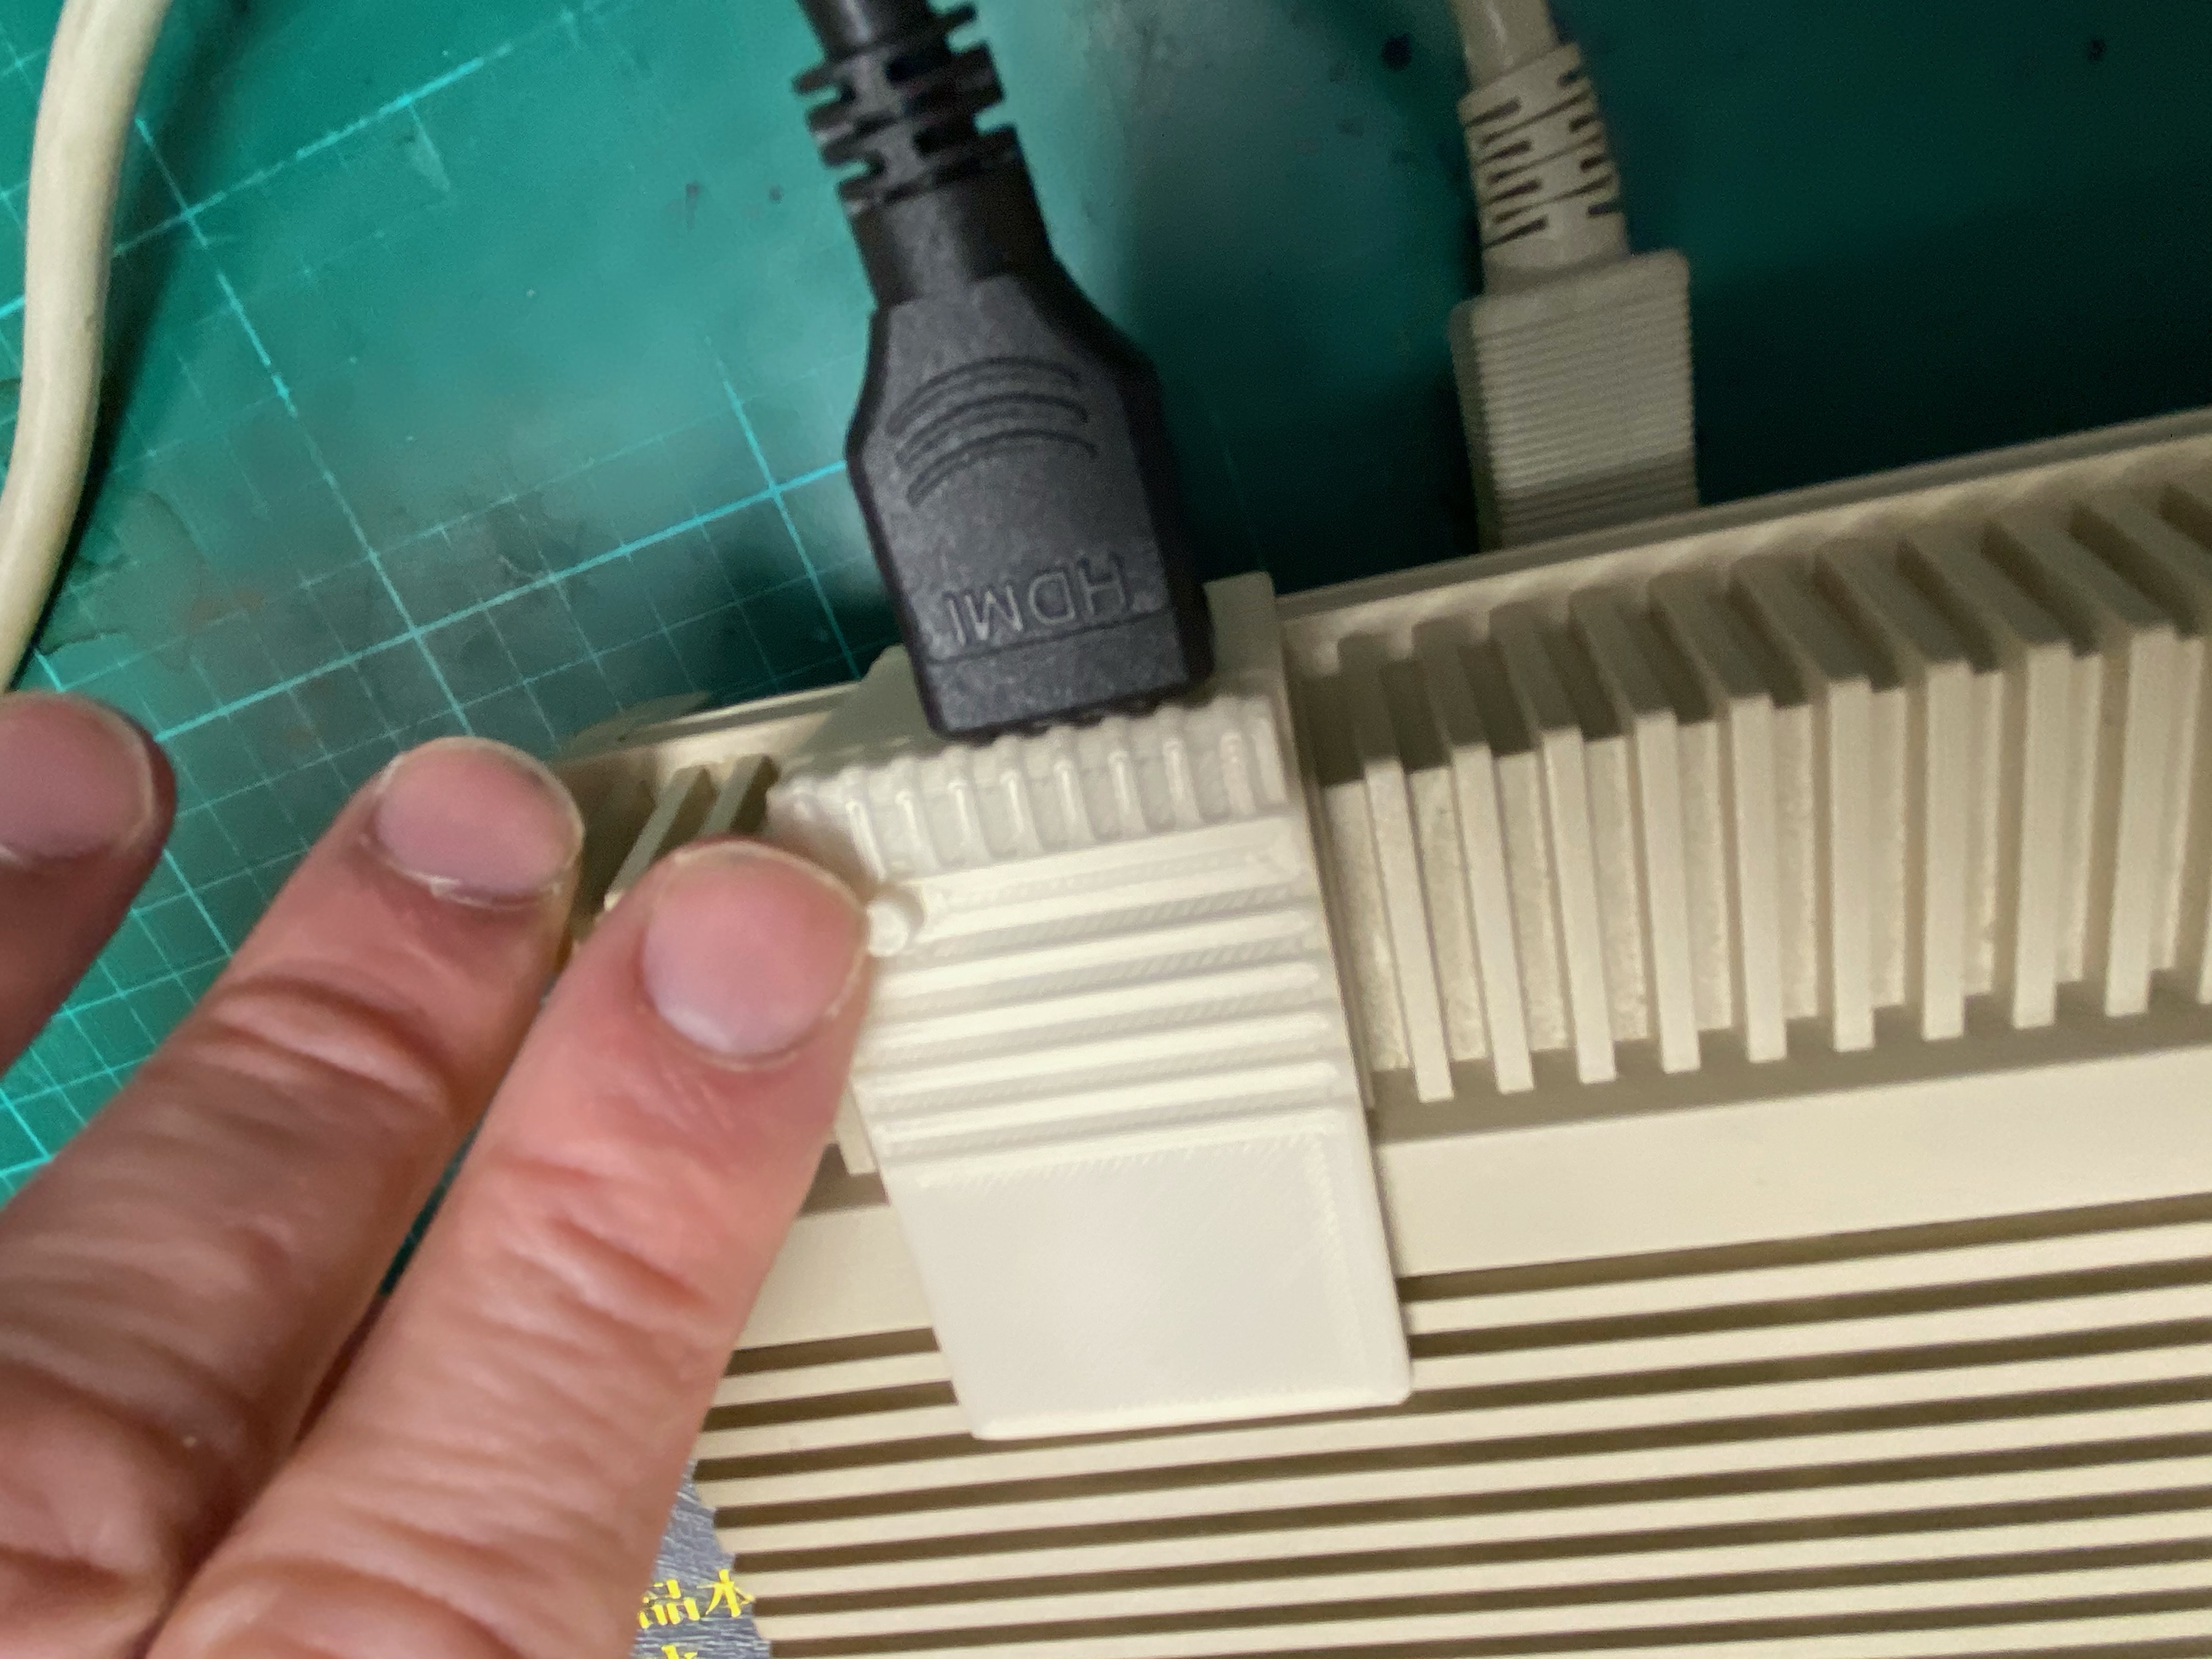
<p>This is a non destructive way of fitting a HDMI output to the Amiga 500.</p><p>Adding the RGBtoHDMI adapter to the original Amiga 500, gives it the ability to deliver a perfect digital HDMI output. When the small board is fitted inside the Amiga on the Denise Chip, the problem arise how to get the HDMI cable out of the Amiga. </p><p>I've come up with the following solution:</p><p>This little housing, for a Female HDMI connector, clips right on the Amiga case. I tried to design it in the A520 TV modulator style, so it should not look to much out of place in the 80' computer design. </p><p>What you need: </p><ol><li>mini HDMI male pcb + HDMI Female pcb + ribbon cable. (AliExpress)</li><li>a small switch</li><li>a cubble of long pcb pins</li><li>2-wire dupont cable Female-female</li><li>a little bit of wire</li></ol><figure class="image image-style-align-left image_resized" style="width:50%;"><img src="https://media.prusaprinters.org/media/prints/63688/rich_content/4ca7f907-e681-4cc6-9035-8535887518fa/cable.png#%7B%22uuid%22%3A%224f966640-9033-468d-b953-e423a24ccfdd%22%2C%22w%22%3A584%2C%22h%22%3A630%7D"></figure><p> </p><p>Ribbon Cable length about 30cm.</p><p>HDMI Female often called A4</p><p>mini HDMI male called C1</p><p> </p><p> </p><p> </p><p> </p><p> </p><p> </p><p> </p><p> </p><figure class="image image-style-align-left"><img src="https://media.prusaprinters.org/media/prints/63688/rich_content/a95c8000-a0d1-4279-82ee-4fb4836efa91/button1.png#%7B%22uuid%22%3A%22ac81fd3c-fd57-467f-a01b-ca29b42200ff%22%2C%22w%22%3A199%2C%22h%22%3A182%7D"></figure><p> </p><p> </p><p>Tactile Switch Panel PCB Mount Momentary TACT Switch Push</p><p> </p><p> </p><figure class="image image-style-align-left image_resized" style="width:50%;"><img src="https://media.prusaprinters.org/media/prints/63688/rich_content/21bf20f8-4fee-4013-848b-f888e5f3f26c/20210414_173307.jpg#%7B%22uuid%22%3A%22793aae18-9e0c-4d12-9f97-1bf40a8e3154%22%2C%22w%22%3A4032%2C%22h%22%3A3024%7D"></figure><p> </p><p> </p><p> </p><p> </p><p> </p><p> </p><p> </p><p> </p><p> </p><figure class="image image-style-align-left image_resized" style="width:50%;"><img src="https://media.prusaprinters.org/media/prints/63688/rich_content/93000123-ceb1-4c40-9f9d-5931ee3e7f93/20210414_173359.jpg#%7B%22uuid%22%3A%224a4047c1-7cf1-41df-97e6-54c2157e658c%22%2C%22w%22%3A4032%2C%22h%22%3A3024%7D"></figure><p> </p><p> </p><p> </p><p> </p><p> </p><p> </p><p> </p><p> </p><p> </p><p>Now 3d print the housing.</p><figure class="image"><img src="https://media.prusaprinters.org/media/prints/63688/rich_content/2f2056b7-0409-4822-ad1d-fb144ac99cc4/image29.jpg#%7B%22uuid%22%3A%2241187ce0-03f2-45e5-9e05-82b5677b9234%22%2C%22w%22%3A4032%2C%22h%22%3A3024%7D"></figure><p> </p><p>Remove Support and fit the HDMI PCB.</p><figure class="image image_resized" style="width:75%;"><img src="https://media.prusaprinters.org/media/prints/63688/rich_content/7609f82a-ac03-4b55-8e39-e09ffb7f117f/image24.jpg#%7B%22uuid%22%3A%22ac8eafc3-3948-4b8f-a422-dc757fc2df4c%22%2C%22w%22%3A3024%2C%22h%22%3A4032%7D"></figure><p> </p><p>Sodder the push-button to the wire and the PCB pins.</p><figure class="image"><img src="https://media.prusaprinters.org/media/prints/63688/rich_content/177f39f3-9673-4979-9c86-baa7333d7ebd/pushwithwire.jpg#%7B%22uuid%22%3A%2292e5bba8-89c1-43b4-83e4-523ac044e592%22%2C%22w%22%3A3709%2C%22h%22%3A1200%7D"></figure><p> </p><p>Place the push-button rod. </p><figure class="image"><img src="https://media.prusaprinters.org/media/prints/63688/rich_content/fb6100e9-58e3-4801-bc4c-015801d798c2/image22.jpg#%7B%22uuid%22%3A%226a41d4b5-1873-42f9-bb5d-6f89785335a9%22%2C%22w%22%3A3024%2C%22h%22%3A4032%7D"></figure><p> </p><p>Fit the switch on the bracket</p><figure class="image"><img src="https://media.prusaprinters.org/media/prints/63688/rich_content/1faa3063-e7d6-40d4-8fe2-619161c7cab5/image18.jpg#%7B%22uuid%22%3A%22fdf35380-4dde-407a-9475-f9d3045833ed%22%2C%22w%22%3A3024%2C%22h%22%3A4032%7D"></figure><p> </p><p>Mount the bracket over the small tab. Make sure the button rod is right on the push button. </p><figure class="image"><img src="https://media.prusaprinters.org/media/prints/63688/rich_content/36b111f9-f61c-4c10-891a-08bce5352ac8/image17.jpg#%7B%22uuid%22%3A%22cae59a61-a6ba-428e-95c4-4fc28537f72e%22%2C%22w%22%3A3024%2C%22h%22%3A4032%7D"></figure><p> </p><p>Put in the ribbon cable</p><figure class="image"><img src="https://media.prusaprinters.org/media/prints/63688/rich_content/00d741ba-348a-484a-ba82-b0636c3ed88b/image16.jpg#%7B%22uuid%22%3A%2299574a2c-3e51-4f34-93e0-a397d21e0cc4%22%2C%22w%22%3A2170%2C%22h%22%3A2597%7D"></figure><p> </p><p>Now place it on top of the Amiga. <br>Place the pins in the first row of the vents. <br>Put the ribbon cable through the vents.</p><figure class="image"><img src="https://media.prusaprinters.org/media/prints/63688/rich_content/030df419-0d6f-4f2a-a686-ba8918b674f3/image15.jpg#%7B%22uuid%22%3A%22edb95800-0d37-488b-bfe8-a4520a34e93e%22%2C%22w%22%3A2096%2C%22h%22%3A2603%7D"></figure><p> </p><p>Clip it on the Amiga top cover.</p><figure class="image"><img src="https://media.prusaprinters.org/media/prints/63688/rich_content/6b2cbb88-dc75-4759-b5f3-922e55371605/image11.jpg#%7B%22uuid%22%3A%2204df076b-34ca-4dc2-ae7f-4249caa8550c%22%2C%22w%22%3A3024%2C%22h%22%3A4032%7D"></figure><p> </p><p>Lastly fit the wires inside the Amiga. <br>Fit the dupont on the protruding-pins and the switch-pins on the Denise PCB.<br>Fit the mini HDMI on the ribbon cable and connect it to the Raspberry Pi. </p><figure class="image image-style-align-left image_resized" style="width:75%;"><img src="https://media.prusaprinters.org/media/prints/63688/rich_content/2fb1713b-0056-4162-b17e-56b04e0f4011/image5.jpg#%7B%22uuid%22%3A%220b56e048-c4ae-4f0c-ad44-c7ddd192ab5e%22%2C%22w%22%3A3024%2C%22h%22%3A4032%7D"></figure><p> </p><p> </p><p> </p><p> </p><p> </p><p> </p><p> </p><p> </p><p> </p><p> </p><p> </p><p> </p><p> </p><p> </p><p> </p><p> </p><p> </p><p> </p><p> </p><p> </p><p> </p><p>Dual HDMI version: </p><figure class="image image_resized image-style-align-left" style="width:36.34%;"><img src="https://media.prusaprinters.org/media/prints/63688/rich_content/2c979eb6-5563-455f-8379-9b849c01bd8d/image.png#%7B%22uuid%22%3A%22fdc190ea-1e53-422f-82c4-3522569c10e3%22%2C%22w%22%3A625%2C%22h%22%3A465%7D"></figure><p> </p><p> </p><p> </p><p> </p><p> </p><p> </p><p><a href="https://www.prusaprinters.org/prints/66472-dual-hdmi-housing-for-amiga-500">https://www.prusaprinters.org/prints/66472-dual-hdmi-housing-for-amiga-500</a></p><p> </p><p>Links to the RGBtoHDMI project:</p><p><a href="https://github.com/c0pperdragon/Amiga-Digital-Video">https://github.com/c0pperdragon/Amiga-Digital-Video</a></p><p><a href="https://amitopia.com/excellent-rgb-to-hdmi-adapter-for-ocs-and-ecs-amiga-is-out/">https://amitopia.com/excellent-rgb-to-hdmi-adapter-for-ocs-and-ecs-amiga-is-out/</a></p><p><a href="https://hackaday.com/2020/12/30/amiga-now-includes-hdmi-by-way-of-a-raspberry-pi-daughterboard/">https://hackaday.com/2020/12/30/amiga-now-includes-hdmi-by-way-of-a-raspberry-pi-daughterboard/</a></p><p> </p>
With this file you will be able to print RGBtoHDMI adapter housing for Amiga 500 with your 3D printer. Click on the button and save the file on your computer to work, edit or customize your design. You can also find more 3D designs for printers on RGBtoHDMI adapter housing for Amiga 500.