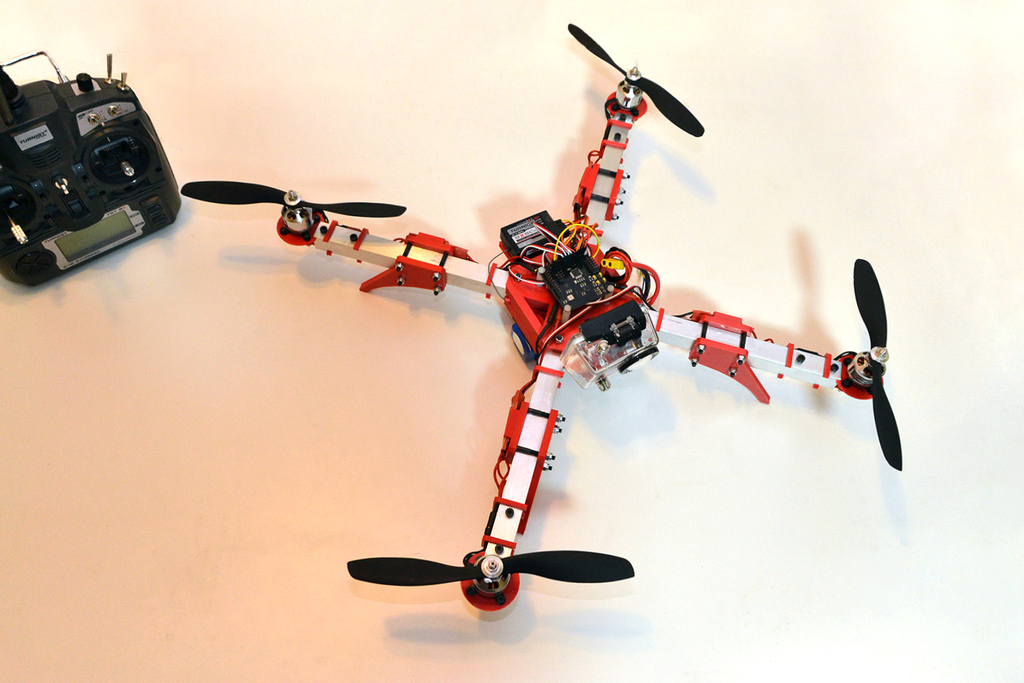
Rev One Quadcopter
prusaprinters
<p><strong>Update</strong>: This "Revision One Quadcopter" is no longer supported. I learned some new tricks and better things are to come.</p> <p>This was designed entirely in Tinkercad back in early 2012. Now it's finally being released to the public. It's very easy to build if I do say so myself.</p> <p> <figure class="media"> <oembed url="http://youtu.be/HHRKwZdfyoc"></oembed> </figure> </p> <p>Essential hardware you will need for the frame includes:</p> <ul> <li>24x 35mm M4 socket-cap screws (For mounting center hub to arms and landing gear to arms)</li> <li>16x 25mm M4 socket-cap screws (For mounting arms to motor mounts)</li> <li>16x 14mm M3 socket-cap screws (For mounting motor cross-plates to motor mounts.)<ul> <li>4x 6mm M3 socket-cap screws (For mounting flight controller)</li> </ul> </li> <li>4x 20mm M3 nylon standoffs (Also for mounting flight controller)</li> <li>M3 nylon nuts (Also for mounting flight controller)</li> <li>M3 and M4 nylock nuts (To hold everything together)</li> <li>At least 1m of 19mm / 1.5mm square aluminium tubing (Will be measured, cut, and drilled to form the arms)</li> </ul> <p>The motor mounts are designed to carry the 28xx series cross plates of your motors.</p> <p>Read instructions.</p> <h3>Instructions</h3> <p>When printing, print the motor mounts and landing gear (skids) at 100% or so. The top and bottom center hubs should be printed at no less then 18% infill with at least four shells. You'll want these shells to create a kind of buffer when you need to bore out holes or file down certain sections.</p> <ol> <li>Cut four 235mm long pieces of 19mm / 1.5mm square aluminum tubing and clean/file the inner and outer edges. You can use "tool-miter_box_90.stl" if you don't have a better way of making perfectly perpendicular cuts.</li> <li>Slide "tool-hole_drill_template.stl" on the end of each bar and use a marker to accurately mark each hole.</li> <li>When drilling, you can use a 5/32inch bit for these 4mm holes. These holes must be as perpendicular as possible, so unless you have a drill press I suggest you mark and drill from each side on each end of the bar.</li> <li>Align the holes and push in a motor mount into one end of each bar. The mount should stop when the tab on the bottom touches the bar. Use some 25mm M4 socket-cap screws and nylock nuts to hold them together.</li> <li>Now test to see how the bars fit into both hubs. Use a file or sand paper to refine these if necessary. They should be a moderately snug fit. Also, drill out the blocked holes on the bottom hub. These made it easy for your printer to print the overhangs.</li> <li>Get some 35mm M4 socket-cap screws and insert them into the recessed holes on the bottom hub. Align them with the empty holes you drilled on the bars. The flat parts of the motor mounts should face upwards when the center bottom hub is at the bottom.</li> <li>Take the top hub and insert any combination of add-on "shelves" (gopro or slotted) into the triangular cut outs from the inside. You very well may need to refine these edges to get them to fit. Don't force them.</li> <li>Take a four 6mm M3 socket-cap screws and insert them into the recessed holes on the underside of the top hub. Secure these from the underside with four 20mm M3 nylon standoffs.</li> <li>Align the holes on the top hub with the screws protruding from the assembly below. The aluminum bars should sit flush with the cavities on the hubs. Secure it all gingerly with a few nylock nuts.</li> <li>Finally, get the two halves of a landing gear assembly and insert some 35mm M4 socket-cap screws into the piece with the recessed holes. Sandwich an aluminum arm between this and an actual landing gear piece. Again, gingerlly tighten these down. Actually, keep them loose so you can adjust them later to eliminate slack in the ESC wires. Each landing gear incorporates a clip to secure any ESC with a 24mm width. I suggest you use Turnigy Plush 18amp or 25amp ESCs.</li> </ol> <p>The rest is up to you. But if you want to know more, visit the full write up with images here: <a href="http://goo.gl/gGZf7">http://goo.gl/gGZf7</a></p> Category: R/C Vehicles
With this file you will be able to print Rev One Quadcopter with your 3D printer. Click on the button and save the file on your computer to work, edit or customize your design. You can also find more 3D designs for printers on Rev One Quadcopter.
