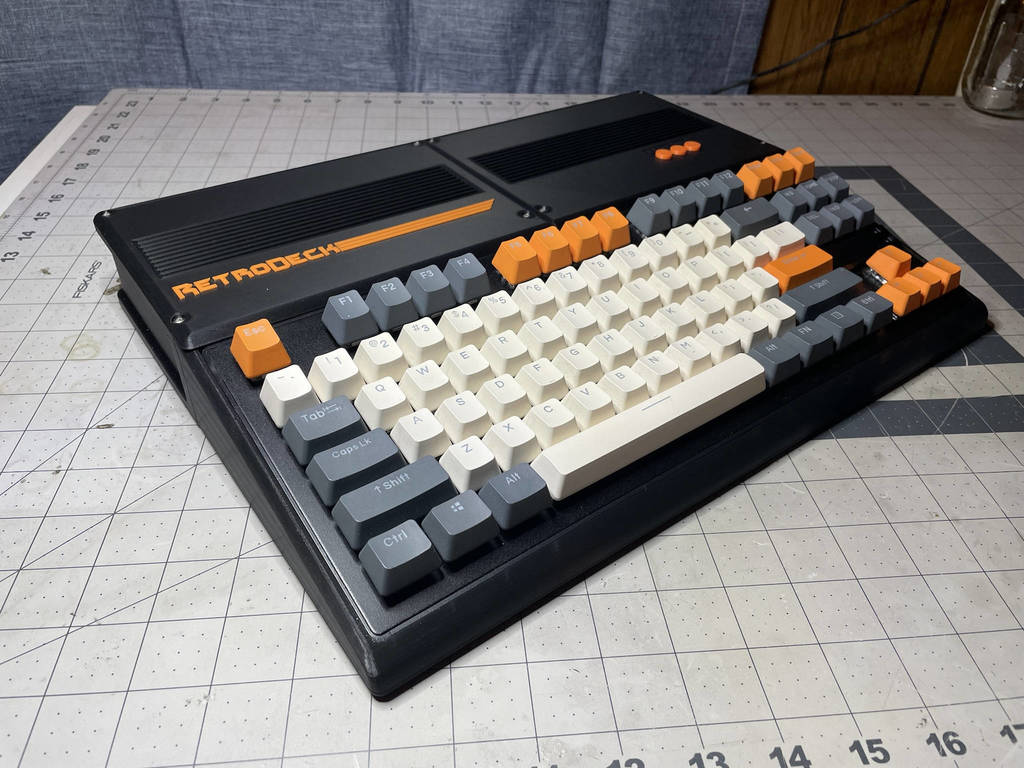
RetroDeck - Raspberry Pi 3 and MiSTer wedge style computer case
prusaprinters
<p>This was a fun project to design an old fashioned wedge style computer case around a modern mechanical keyboard and Raspberry Pi or MiSTer for old retro computer emulation stuff. The backright and backleft pieces can easily be remixed to house a raspberry pi 4 or pretty much any other small form factor single board computer. There are a couple other projects like this but I couldn't find one that worked well with my available parts so I went ahead and designed my own. I'm not an expert at this stuff by any means so maybe I didn't design this stuff the way you would, but it prints fine for me and works for me.</p><p>I've included the SolidWorks part files so if you use SolidWorks you can easily remix this. If you aren't interested at poking at this thing in SolidWorks you don't need to download it.</p><h3>Parts you probably don't have on hand</h3><ul><li>keyboard: <a href="https://www.amazon.com/gp/product/B07RWLNTNG/ref=ppx_yo_dt_b_search_asin_title?ie=UTF8&psc=1">https://www.amazon.com/gp/product/B07RWLNTNG/ref=ppx_yo_dt_b_search_asin_title?ie=UTF8&psc=1</a></li><li>single USB extension (for the right side): <a href="https://www.amazon.com/gp/product/B07C87FYLY/ref=ppx_yo_dt_b_asin_title_o05_s00?ie=UTF8&psc=1">https://www.amazon.com/gp/product/B07C87FYLY/ref=ppx_yo_dt_b_asin_title_o05_s00?ie=UTF8&psc=1</a></li><li>double USB extension (for the left side): <a href="https://www.amazon.com/gp/product/B08HVB4ZHR/ref=ppx_yo_dt_b_asin_title_o05_s01?ie=UTF8&psc=1">https://www.amazon.com/gp/product/B08HVB4ZHR/ref=ppx_yo_dt_b_asin_title_o05_s01?ie=UTF8&psc=1</a></li><li>ethernet extension (for MiSTer build only): <a href="https://www.amazon.com/gp/product/B07TYH668P/ref=ppx_yo_dt_b_asin_title_o06_s01?ie=UTF8&psc=1">https://www.amazon.com/gp/product/B07TYH668P/ref=ppx_yo_dt_b_asin_title_o06_s01?ie=UTF8&psc=1</a></li><li>SD Card Extension (for MiSTer build only): <a href="https://www.amazon.com/gp/product/B09CKRDFTH/ref=ppx_yo_dt_b_asin_title_o03_s00?ie=UTF8&psc=1">https://www.amazon.com/gp/product/B09CKRDFTH/ref=ppx_yo_dt_b_asin_title_o03_s00?ie=UTF8&psc=1</a></li><li>OTG USB Hub (for MiSTer build only): <a href="https://www.amazon.com/gp/product/B01JL837X8/ref=ppx_yo_dt_b_asin_title_o01_s00?ie=UTF8&psc=1">https://www.amazon.com/gp/product/B01JL837X8/ref=ppx_yo_dt_b_asin_title_o01_s00?ie=UTF8&psc=1</a></li></ul><h3>Parts you probably do have on hand since you're thinking of maybe possibly becoming interested in considering building this thing</h3><ul><li>Raspberry Pi 3. I used a B+ or a MiSTer (the de10 nano and the analog I/O board)</li><li>12 M3x10 Screws to screw the top panels on after it's all assembled</li><li>8 M3x20 Screws to screw the bottom case pieces together</li><li>8 M3 Nuts to go with the M3x20 screws</li><li>Some self tapping screws that seem to be the right size to hold the raspberry pi in. (if you're going for the pi version. Just use the screws the de10 nano came with for the MiSTer)</li></ul><h3>Parts that are optional but would be cool</h3><ul><li>Rubber feet for the bottom.</li></ul><h3>What do you need to download?</h3><p>Everyone will need front left.stl and front right.stl<br>Then if you're building for MiSTer download all the files with mister in the name, and if you're building for Raspberry Pi 3 then all the files with rpi3 in the name.</p><p>If you're bulding for the MiSTer you'll need to print 3 of the buttons.</p><h3>Printing Notes</h3><p>For top left I printed the lettering and the lines next to the letters in a different color but that is by no means required. I used the pause at layer (one of the post processing things in Cura) and change filament method.</p><p>Note: Tolerances are pretty tight because I wanted this thing to look nice and feel solid. I printed on an Ender 3 v2 with cheap filament from Micro Center so it doesn't require high end stuff, but it does require a fairly well calibrated printer to ensure everything is the right size so make sure your steps/mm are calibrated for X, Y, Z, and the extruder, and make sure your surface is level and clean since these are pretty big parts and the bottom pieces can take a long time to print (23 hours each for the fronts, 18 hours for the backs on my Ender 3 v2 with a spring-steel PEI build sheet anyway - those times are for 0.12mm layer height. I just did it with that layer height so it would look nicer. 0.2 works fine).</p><h3>Print Settings</h3><p>Supports are only needed on backleft and backright. I make use of support blockers in Cura to only have thin supports every 5CM or so. No need to have them go across the whole thing. I also have support blockers block any of the screw holes and captive nut cavities because they aren't needed there and can be a pain to remove. Finally I also have support blockers go across the whole bottom curve thing because supports aren't needed there. The rest of the files don't need supports of any kind.</p><p> </p>
With this file you will be able to print RetroDeck - Raspberry Pi 3 and MiSTer wedge style computer case with your 3D printer. Click on the button and save the file on your computer to work, edit or customize your design. You can also find more 3D designs for printers on RetroDeck - Raspberry Pi 3 and MiSTer wedge style computer case.
