Replicator full acrylic windows and hood non-laser cut CTC Dual
thingiverse
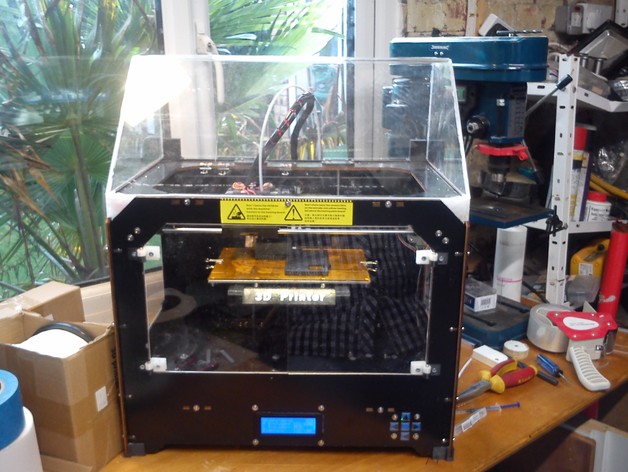
Acrylic Windows and Hood without Laser Cutting Acrylic Sheet Print Settings Printer: CTC Dual (Makerbot Clone) Rafts: Doesn't Matter Supports: Doesn't Matter Resolution: 0.2 Notes: This is for a CTC Dual Printer. Supports may be required for the side window slots. Some fettling may be required to clean hinge mating surfaces. Post-Printing Acrylic 1500mm x 500mm, 3mm acrylic should do it. Check measurements against printer, bends done by hand so radius varies slightly. Finished edge of hood sits on vertical timber all round the printer. Bend hood before trimming to length. I ended up with one large slot rather than three small ones for cables and filaments. Round corners of hood sides to match finished bend radius of main hood. I used a cheap electric tile cutter (diamond saw) to cut acrylic, no water. To make hood: 1. Clamp work-piece to bench on 20mm timber with an 18-20mm dowel forming the bends along edge of bench. 2. Gradually heat full length of bend with hot air gun until it becomes pliable, took about five minutes to reach this point. 3. Keep heat going and push a length of timber against sheet to keep bend straight over full length. 4. Form bend round dowel, check angle with set square, remove heat; it's hot so use gloves. Hold in position while it cools for several minutes. 5. Progressively round corners of hood sides to fit inside radius of hood bends. They will be slightly different unless you get a perfect bend. 6. Glue sides to hood and hold in place with strong tape for tight mating, masking tape along edges to protect against glue seepage; I used hard plastic glue. Superglue didn't work. 7. Leave overnight for full cure. Trim front edge to length at 45-degree fence on tile saw; it's a bit awkward handling bulky thing. Trim rear edge if needed. Clamp rear of hood firmly between two sheets of timber and using a hole saw cut through one piece of timber and the acrylic together. Cut tangents from the hole down to the bottom edge for a semi-rounded slot; I used a 67mm hole saw for a single slot. Hinges I used pop rivet mandrels cut down to make hinges. Drill holes in top halves (door side) of front door hinges and centers (hood) of hood hinges. The printed holes provided a good interference fit. Set door hinges so clearance is good relying on push-fit, then mark and drill for 3mm screws. Only drill out the front of hinge holes and timber; screws cut their own thread in un-drilled rear holes. Side Windows Fit strips to left and right corners of bottom edge of side openings; they are handed and slot into the bottom of acrylic. Mark and drill holes so that top clips can rotate up to engage top of window opening, ensuring clips won't foul on Y axis motor cables. Using the same technique as hinges, drill out the front of clip and sandwich the acrylic between the clips using a screw to self-tap into rear half of clip. Hood Clips Use cut-down pop rivet mandrels to fix hinges together. Slide clip through triangular holes in rear corners of printer so that it is flush; slide hood down into upper slots in the clips. The hood should hinge up or can be fully removed altogether.
With this file you will be able to print Replicator full acrylic windows and hood non-laser cut CTC Dual with your 3D printer. Click on the button and save the file on your computer to work, edit or customize your design. You can also find more 3D designs for printers on Replicator full acrylic windows and hood non-laser cut CTC Dual.