Replacement Hero Droid Radar Eye
prusaprinters
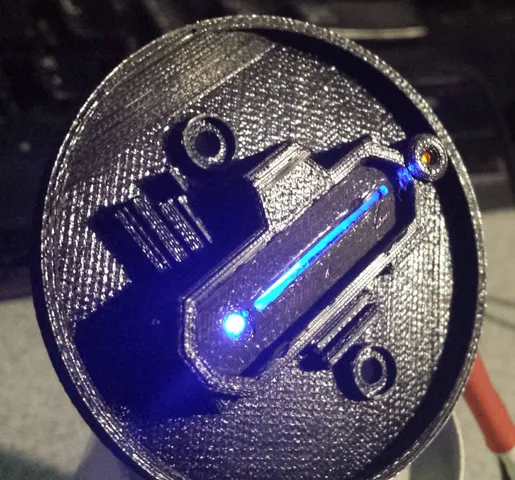
This is a custom replacement for the internal components of the Radar Eye on the Spin Master Hero Droid BB-8. I created this to use in my custom droid dome. The intent was to give the eye a narrow horizontal gradient of light, rather than just a single LED. IMPORTANT NOTES: This Printable assumes that you have disassembled the Hero Droid BB-8's dome in order to remove the existing Radar Eye, and then extracted and disassembled the Eye. Opening the original dome requires removal of four recessed triangle head screws, which is done with a 1.8 triangle head driver (either purchased or DIY) or via a lot of messing around with a small but longish flathead precision screwdriver (one with a roughly 0.09 in/2.3 mm wide end). Disassembly is generally a little bit fiddly (for example, the mainboard will need to be disconnected from the radar eye LED at minimum and possibly from all other LEDs, microphones, and sensors. The IR sensors for “follow-me” mode are glued in place around the rim, and you need to put them back in the same position they started for that mode to work properly. etc.) As such, the process is beyond the scope of this Printable. You may be able to get some idea from this post or this post on the BB-8 Club forum, but you will need to register to be able to see them.Also, illuminating the Printable as shown requires two 3mm LEDs (and the necessary current-limiting resistors). I would suggest using LEDs with roughly complementary colors, but the choice is up to you. In my case, I use fully custom electronics in my custom dome, so I power the eye from those. If you use this in a stock dome, you will need to figure out a solution for powering these LEDs yourself (you might be able to drive one from the original Radar Eye LED connection to the motherboard, but probably not both). PRINTING AND ASSEMBLY NOTES:Print the “Core Lower” part in white (or paint the curved edge of the fin white/silver … the entire purpose of this part is to reflect the light of one of the LEDs to create the gradient). The other parts should normally be printed (or painted) black.Test fit the parts as described below after painting (if any) but before attempting to assemble permanently. You may need to scale the Core parts or do some minor sanding to adjust the tolerances.The Core Lower is pressed into the back of the Core Upper. One LED mounts in the assembled core pointing sideways, and glued in place. It drives the illuminated horizontal stripe of the radar eye and the small dot to its left, as shown below. The other LED is attached directly to the Radar Eye Base, pointing outward, and creates the small dot indicator on the opposite side of the Eye.The Core assembly is then slid into the Radar Eye Base from the rear so it looks look like the photo below. (Note: the leads on the side-mounted (blue) LED must be bent 90 degrees toward the rear of the eye before you can slide the Core assembly in.) This is what the rear of that part looks like when mounted inside my custom dome. Yellow LED's leads hot glued on image left, Blue LED's leads to the right of the white Core. The assembly can now be attached to the original exterior Radar Eye lens/surround or your custom dome. Note the slope on the very top of the Radar Eye Base rim shown above, as well as the countersunk posts with holes in them just above and below the central horizontal structure. These are meant to key onto features of the original Radar Eye surround/lens and provide the screw holes to attach the parts together. The following closeup shows the outer lens's topmost mounting post: It looks like this in operation. While wiring and operating the LEDS is also beyond the scope of this printable, I used a higher resistor rating on the yellow LED to prevent it from overwhelming the blue one (since it points forward and the blue one does not). On my droid, both LEDs are also controlled by an Arduino Nano. The blue one has a subtle flicker while the yellow one pulses slowly.
With this file you will be able to print Replacement Hero Droid Radar Eye with your 3D printer. Click on the button and save the file on your computer to work, edit or customize your design. You can also find more 3D designs for printers on Replacement Hero Droid Radar Eye.