Renewable Energy Demonstration Raspberry Pi Cabinet
prusaprinters
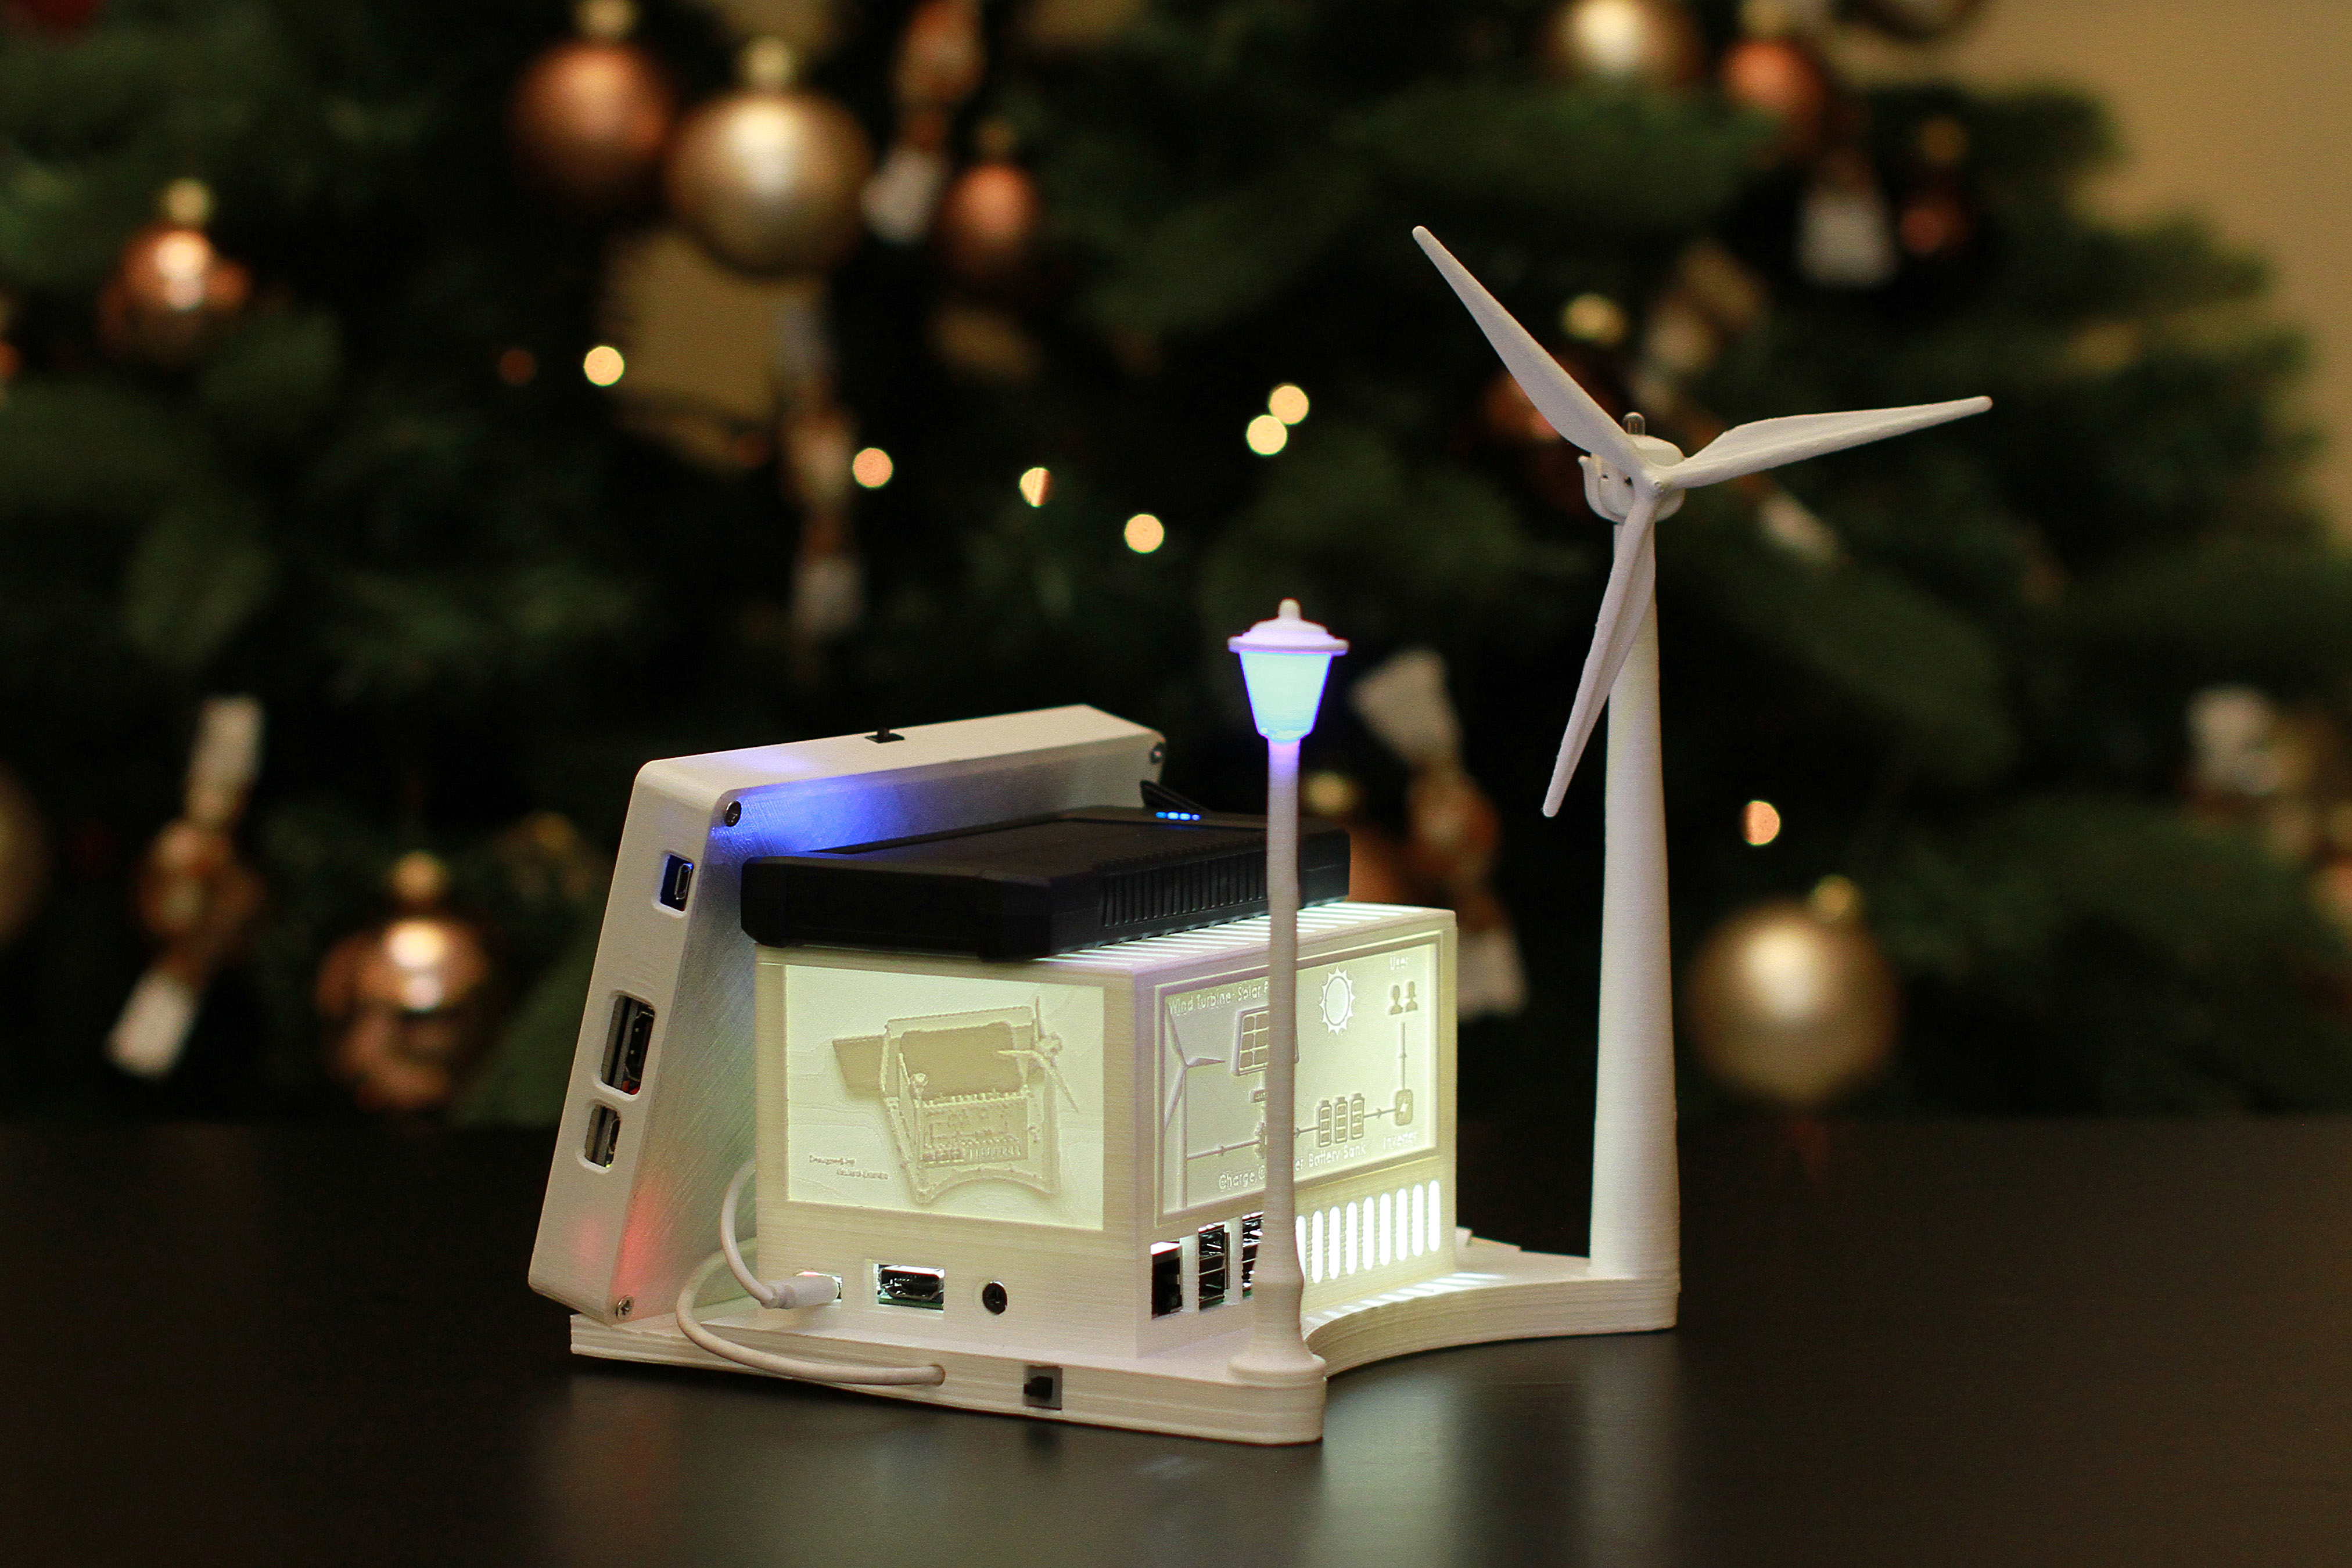
<p>A perfect Christmas gift for Raspberry Pi and Renewable Energy lowers.<br/> This complex design is an interactive Renewable Energy demonstration Raspberry Pi (RPI) case with a process diagram about the wind solar hybrid electricity generation. It contains a lot of recycled element. This design has a fully functional and adjustable (reversed direction to use like a fan) wind turbine, and photovoltaic cell which can recharge the power bank. It has also a red LED on the top of the wind turbine which is blinking and an other blue LED which operates as a street lamp. Both of them are programable from the RPI. The RPI can be used as a server and in this case it is a server cabinet.</p> <p>You can customize this case with your own side walls.</p> <p>Watch my short demonstration video:<br/> <a href="https://youtu.be/2rNdK6mnyPs">https://youtu.be/2rNdK6mnyPs</a><br/> <figure class="media"> <oembed url="https://www.youtube.com/watch?v=YhQLmHbD7sI"></oembed> </figure> </p> <h3>Print instructions</h3><h3>Category: DIY Print Settings</h3> <p><strong>Notes:</strong></p> <p>Walls:<br/> Infill: 100%<br/> Layer hight 0.1mm</p> <p>The smaller side walls are made with the so called Lithophane technology. You can make your own picture with the help of this app from this site:<br/> <a href="/apps/customizer/run">http://www.thingiverse.com/apps/customizer/run</a>?</p> <p>The front panel diagram is made in Solidworks.<br/> If you have a 0.2mm nozzle than I could recommend to use it for the best quaility.</p> <p>Base:<br/> Infill: 30%<br/> Layer hight 0.2mm<br/> IMPORTANT:<br/> Do not let the slicer to make support material inside the cable tubes from the lamp and the wind turbine. The long rectengular shape in the middle could get support because it is easy to take off.<br/> The Base part should get around 100°C (I used PLA) or even higher bed temperature to avoid the Warping effect.</p> <p>Turbine blade:<br/> Infill: 100%<br/> Layer hight 0.1mm</p> <p>Lamp + Lamp cap, Turbine parts, Display Frame:<br/> Infill: 100%<br/> Layer hight: 0.2mm</p> <h3> How I Designed This</h3> <p>The hardest to design geometry from the model is the wind turbine blade.<br/> I used these instructions to make my own blade profile.</p> <p><a href="http://blogs.solidworks.com/tech/2015/08/create-wind-turbine-blade-using-surface-lofts.html">http://blogs.solidworks.com/tech/2015/08/create-wind-turbine-blade-using-surface-lofts.html</a></p> <p>You can find profiles from here:<br/> <a href="http://wind.nrel.gov/airfoils/shapes/S809_Shape.html">http://wind.nrel.gov/airfoils/shapes/S809\_Shape.html</a></p> <p>I also made an adjustable angle turbine blade concept, check it out.</p> <p>RPI sizes:<br/> <a href="https://www.raspberrypi.org/documentation/hardware/raspberrypi/mechanical/RPI-3B-V1_2.pdf">https://www.raspberrypi.org/documentation/hardware/raspberrypi/mechanical/RPI-3B-V1\_2.pdf</a></p> <h3> Custom Side Pictures</h3> <p>For your own side walls the recomended picture sizes:<br/> 88mm x 54mm x 0.8mm base plate and 78mm x 50mm picture area (5mm frame at the sides and 2mm from the top and bottum) which has normaly 2mm additional thickness but it is up to you.</p> <p><strong>Costumizable side picture recommended sizes</strong></p> <h3> Wiring</h3> <p>I have built in a reset switch for the RPI to make it more confortable.<br/> It has a slide switch for the wind turbine.<br/> Every cable runs inside the modell so be carefull how do you print it out. (see the print settings).<br/> For the LED-s I used 220 ohm resistors between the RPI GPIO pins and the LEDs.<br/> For the Reset button, you need to connect it to the RUN pins, that are located on the board. You need to solder some connector pins on it if you do not want to solder the cables directly to the board.</p> <p>Street Lamp wiring:<br/> The positive side of the LED is connected to the GPIO17 pin (which is notionally the first user GPIO pin. It’s physical location is pin 11 on the GPIO connector), the negative side is connected to one of the ground pins. (pin 9 is handy for this purpose)</p> <p><strong>Lamp LED wire path</strong></p> <p><strong>Reset button wire path</strong></p> <p><strong>USB to slide Switch to DC-DC converter wire path</strong></p> <p><strong>DC-DC converter out to DC-motor wire path (The red LED is going through in the same way just it is connected to the RPI)</strong></p> <p><strong>Wire connections: reset switch (Blue, White), Red LED (Red. White), Blue LED (Green, White), Cooling fan (Red, Black)</strong></p> <h3> Raspberry Pi setup</h3> <p>The red LED on the top of the wind turbine is connected as an ACT LED on the RPI so it is always flashing when the RPI working.<br/> To set up this, you need to add the following line to /boot/config.txt<br/> You can type into the terminal that:</p> <p>sudo nano /boot/config.txt</p> <p>Than add: (I used it on GPIO26)</p> <p>dtoverlay=pi3-act-led,gpio=26</p> <p>ctr +x,<br/> y<br/> Enter<br/> After reboot, it should work.</p> <p>Street Lamp setup:<br/> In terminal simply type:<br/> gpio mode 0 out (this means that we set up the pin for output)<br/> gpio write 0 1 (here we turn it on)</p> <p>if you want to turn it off you can type:<br/> gpio write 0 0</p> <p>If you want to write a program for this you can follow the instructions from this link:<br/> <a href="https://thepihut.com/blogs/raspberry-pi-tutorials/27968772-turning-on-an-led-with-your-raspberry-pis-gpio-pins">https://thepihut.com/blogs/raspberry-pi-tutorials/27968772-turning-on-an-led-with-your-raspberry-pis-gpio-pins</a></p> <h3> List of Materials</h3> <p>I used a lot of recycled parts but I searched on the internet some similiar ones which are fit to my modell.<br/> My DC motor and slide switch is from a broken RC helicopter,<br/> The cables and LED-s are from an old PC case that somebody thrown out.<br/> The cooling fan is from an old graphic card.</p> <p>Display:<br/> <figure class="media"> <oembed url="https://www.youtube.com/watch?v=dr9YGyOCWbM"></oembed> </figure> </p> <p>DC motor:<br/> <a href="http://www.ebay.de/itm/3-7V-25000RPM-18-x-12-x-10mm-Body-Micro-DC-Motor-for-Airplane-Model-/192057583914?hash=item2cb786292a:g:t4sAAOSwZQRYV~gA">http://www.ebay.de/itm/3-7V-25000RPM-18-x-12-x-10mm-Body-Micro-DC-Motor-for-Airplane-Model-/192057583914?hash=item2cb786292a:g:t4sAAOSwZQRYV~gA</a></p> <p>DC-DC Converter:<br/> <a href="http://www.ebay.de/itm/301588715679?_trksid=p2057872.m2749.l2648&ssPageName=STRK%3AMEBIDX%3AIT">http://www.ebay.de/itm/301588715679?\_trksid=p2057872.m2749.l2648&ssPageName=STRK%3AMEBIDX%3AIT</a></p> <p>LED-s:<br/> <a href="http://www.ebay.de/itm/Transparente-High-Quality-LEDs-Leucht-Dioden-in-verschiedenen-Grosen-und-Farben-/171370401875?var=&hash=item27e678d053:m:myDHtgaZcdvr4vHanhSXiCA">http://www.ebay.de/itm/Transparente-High-Quality-LEDs-Leucht-Dioden-in-verschiedenen-Grosen-und-Farben-/171370401875?var=&hash=item27e678d053:m:myDHtgaZcdvr4vHanhSXiCA</a></p> <p>Switch button:<br/> <a href="http://www.ebay.de/itm/10pcs-SS12F44G4-1P2T-3-Pin-DIP-2-Position-SPDT-Vertical-Slide-Switch-for-PCB-/262234663122?hash=item3d0e6768d2:g:Z5oAAOSwT6pVkQP6">http://www.ebay.de/itm/10pcs-SS12F44G4-1P2T-3-Pin-DIP-2-Position-SPDT-Vertical-Slide-Switch-for-PCB-/262234663122?hash=item3d0e6768d2:g:Z5oAAOSwT6pVkQP6</a></p> <p>Reset button:<br/> <a href="http://www.ebay.de/itm/10pcs-8-5-x-8-5mm-x-18mm-Momentary-Tactile-Tact-Push-Button-Switch-DIP-Black-Cap-/291580828727?hash=item43e3925c37:g:IAUAAOSwdvpWENhQ">http://www.ebay.de/itm/10pcs-8-5-x-8-5mm-x-18mm-Momentary-Tactile-Tact-Push-Button-Switch-DIP-Black-Cap-/291580828727?hash=item43e3925c37:g:IAUAAOSwdvpWENhQ</a></p> <p>PowerBank:<br/> <a href="http://www.ebay.de/itm/222312659492?_trksid=p2060353.m2749.l2648&var=521156094361&ssPageName=STRK%3AMEBIDX%3AIT">http://www.ebay.de/itm/222312659492?\_trksid=p2060353.m2749.l2648&var=521156094361&ssPageName=STRK%3AMEBIDX%3AIT</a></p> <p>Fan is from this board, but it is better if you search for a 5V small fan it has enough space to built in up to 60mm fans:<br/> <a href="https://www.asus.com/Graphics-Cards/EN7300GSHTD_Series/">https://www.asus.com/Graphics-Cards/EN7300GSHTD\_Series/</a></p> <p>Keyboard:<br/> <a href="http://www.ebay.de/itm/Rii-Mini-K12-Bluetooth-3-0-Tastatur-mit-Touchpad-aus-Metall-Retoure-/332075562031?hash=item4d513ef42f:g:mk4AAOSw44BYZOLt">http://www.ebay.de/itm/Rii-Mini-K12-Bluetooth-3-0-Tastatur-mit-Touchpad-aus-Metall-Retoure-/332075562031?hash=item4d513ef42f:g:mk4AAOSw44BYZOLt</a></p>
With this file you will be able to print Renewable Energy Demonstration Raspberry Pi Cabinet with your 3D printer. Click on the button and save the file on your computer to work, edit or customize your design. You can also find more 3D designs for printers on Renewable Energy Demonstration Raspberry Pi Cabinet.