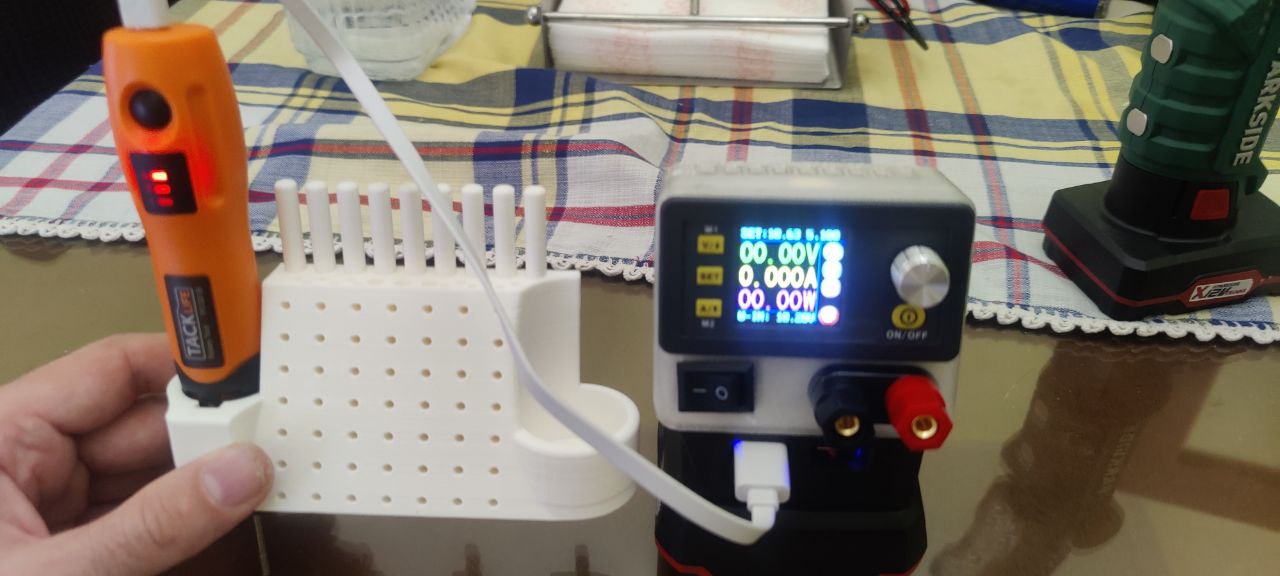
Remix PARKSIDE X20V TEAM RD DPS3005 PORTABLE 100W POWER SUPPLY WITH USB PORTS
prusaprinters
<figure class="media"><oembed url="https://www.youtube.com/watch?v=4fe4Qfccduc"></oembed></figure><p> </p><p>This is a remix of PARKSIDE X20V TEAM RD DPS3005 PORTABLE 100W POWER SUPPLY of the user JAAANIK uploaded to the cult3d web with a couple of usb charging ports added.</p><p>I leave the link to the original model. All thanks and greetings to the user JAAANIK.</p><p><a href="">https://cults3d.com/en/3d-model/tool/parkside-x20v-team-rd-dps3005-portable-100w-power-supply</a></p><p>Materials needed:</p><p>-Soldering iron .<br>-Wire .<br>-2 male connection terminals at least 21mm long.<br>-1 switch 15x21mm<br>-4 screws m3x20mm<br>-4 nuts m3<br>-2 screws m3x8mm<br>-1 USB DC-DC converter QC3.0 QC2.0 two ports 12/24v<br><a href="">https://a.aliexpress.com/_u9HbRX</a><br>-1 DPS3005 or similar<br><a href="">https://a.aliexpress.com/_vkOipr</a><br>-1 double banana terminal</p><p><a href="">https://a.aliexpress.com/_vscqVF</a><br>-Quick glue.</p><p>1º Print the models. You have print files with and without supports.</p><p>2º Once printed make sure that the holes of screws and cables are clean.</p><p>3º Pass each one of the cables through the hole of the battery connector and solder the terminals to them. Insert the terminals to the bottom and glue them with glue to prevent them from moving.</p><p>4º Solder the positive cable of the battery connector to the positive pole of the dc-dc converter.</p><p>5º Screw the dc-dc converter to the battery connector with the m3x8mm screws. Do not tighten with too much force since you can damage the thread.</p><p>6º Solder a wire to the negative pole of the dc-dc converter.</p><p>***Warning***.</p><p>Do not solder by mistake the negative cable of the battery connector to the negative pole of the dc-dc converter.</p><p>7º Connect the rest of the wires as shown in the representative pictures or the connection map to the power connector of the DPS3005. Do not connect the banana plug yet.</p><p>***Note<br>Using connection terminals will ensure easier future repairs. However, you can always solder and do without them ***.</p><p>8º Place the nuts in the holes of the case. Make sure they are perfectly flush in their position.</p><p>***Note<br>Using a drop of glue to fix the nuts to the housing ensures that they will not fall off when you are assembling the assembly ***.</p><p>9º Place the DSP3005 and the banana plugs into the housing.</p><p>10º Connect the wires to the DPS3005 and the banana plug as shown in the sample images. Pull the wires out of the switch through the hole.</p><p>11º Screw the assembly with the m3x20mm screws.</p><p>12º Solder the wires to the switch and place it in its position.</p><p>13º Now you can connect the equipment to the battery.</p><p><br>**** WARNING<br>Remember that Parkside x20v batteries do not have over-discharge protection so you must be careful not to discharge below 20V. Check the battery voltage in the bottom right corner of the DPS3005 *****</p><p> </p><p>I remind you that I have some more designs on my cult3d page and I accept donations.</p><p><a href="">https://cults3d.com/es/usuarios/kjbturok/creaci%C3%B3n</a></p><p><br>If you have been useful I appreciate a like and follow me.</p><p> </p><p><br>Thanks and best regards.</p><p> </p><p> </p><p> <strong>ESPAÑOL</strong></p><p> </p><p>Esto es un remix de PARKSIDE X20V TEAM RD DPS3005 PORTABLE 100W POWER SUPPLY del usuario JAAANIK subido a la web cult3d al que se le an añadido un par de puestos usb de carga.</p><p>Dejo el link al modelo original. Todas los agradecimientos y un saludo a el usuario JAAANIK.</p><p><a href="">https://cults3d.com/en/3d-model/tool/parkside-x20v-team-rd-dps3005-portable-100w-power-supply</a></p><p>Materiales necesarios:</p><p>-Soldador .<br>-Cable .<br>-2 terminales de conexión macho de al menos 21mm de largo.<br>-1 interruptor 15x21mm<br>-4 tornillos m3x20mm<br>-4 tuercas m3<br>-2 tornillos m3x8mm<br>-1 Convertidor DC-DC USB QC3.0 QC2.0 de dos puertos 12/24v<br><a href="">https://a.aliexpress.com/_u9HbRX</a><br>-1 DPS3005 o similar<br><a href="">https://a.aliexpress.com/_vkOipr</a><br>-1 terminal banana doble</p><p><a href="">https://a.aliexpress.com/_vscqVF</a><br>-Pegamento rápido.</p><p>1º Imprime los modelos. Tienes archivos de impresión con y sin soportes.</p><p>2º Una vez impresos asegúrate que los orificios de tornillos y cables estén limpios.</p><p>3º Pasa cada uno de los cables por el orificio del conector de batería y suelda los terminales a estos. Introduce los terminales hasta el fondo y pégalos con pegamento para evitar que estos se muevan.</p><p>4º Suelda el cable positivo del conector de batería al polo positivo del conversor dc-dc.</p><p>5º Atornilla el conversor dc-dc al conector de batería con los tornillos m3x8mm. No aprietes con demasiada fuerza ya que puedes dañar la rosca.</p><p>6º Suelda un cable al polo negativo del conversor dc-dc.</p><p>***Advertencia***</p><p>No sueldes por error el cable negativo del conector de batería al polo negativo del conversor dc-dc.</p><p>7º Conecta el resto de cables como se ven en las fotos representativas o el mapa de conexiones al conector de energía del DPS3005. No conectes el conector banana aún.</p><p>***Nota<br>Usar terminales de conexión te asegura reparaciones futuras mas fáciles. Aun que siempre puedes soldar y prescindir de ellos.***</p><p>8º Coloca las tuercas en los huecos de la carcasa. Asegúrate de que están quedan perfectamente enrasadas en su posición.</p><p>***Nota<br>Usar una gota de pegamento para fijar las tuercas a la carcasa te asegura que estas no se caigan cuando te encuentres montando el conjunto.***</p><p>9º Coloca el DSP3005 y los conectores de banana en la carcasa.</p><p>10º Conecta los cables al DPS3005 y al conector banana como aparece en las imagines de muestra. Saca los cables del interruptor por el orificio.</p><p>11º Atornilla el conjunto con los tornillos m3x20mm.</p><p>12º Suelda los cables al interruptor y colócalo en su posición.</p><p>13º Ya puedes conectar el equipo a la batería.</p><p><br>**** ADVERTENCIA<br>Recuerda que las baterías Parkside x20v no tienen protección para la sobre descarga por lo que debes de tener cuidado y no descargarla por debajo de 20V. Revisa el voltaje de la batería en la esquina inferior derecha del DPS3005 *****</p><p> </p><p>Os recuerdo que tengo algunos diseños más en mi pagina de cult3d y que acepto donaciones.</p><p><a href="">https://cults3d.com/es/usuarios/kjbturok/creaci%C3%B3n</a></p><p><br>Si os a sido de utilidad agradezco un me gusta y sígueme.</p><p><br>Un saludo y gracias.</p><p> </p><p> </p><p><br> </p>
With this file you will be able to print Remix PARKSIDE X20V TEAM RD DPS3005 PORTABLE 100W POWER SUPPLY WITH USB PORTS with your 3D printer. Click on the button and save the file on your computer to work, edit or customize your design. You can also find more 3D designs for printers on Remix PARKSIDE X20V TEAM RD DPS3005 PORTABLE 100W POWER SUPPLY WITH USB PORTS.
