REMIX PARKSIDE X20V TEAM KSGER STM32 OLED T12 PORTABLE SOLDERING STATION WITH HANDLE
prusaprinters
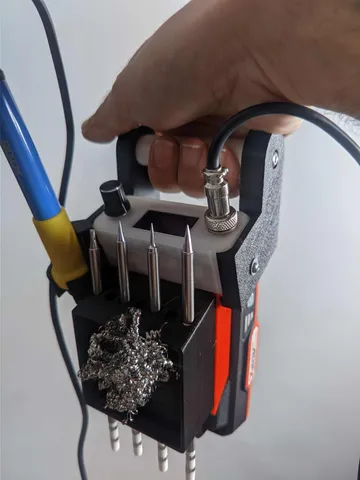
Updated 07/09/2022A bracket has been added for use on ikea skadis or similar murals.**********************First I want to thank the user JAAANIK for his cool design "PARKSIDE X20V TEAM KSGER STM32 OLED T12 PORTABLE SOLDERING STATION" uploaded to cult3d. All thanks and merits to him.A carrying handle and a sponge holder with a hole for magnet and soldering iron tips have been added to the original design.For the assembly of the electronics I refer you to the website of the original design. There you will find the links to purchase the electronics needed for assembly.https://cults3d.com/en/3d-model/tool/parkside-x20v-team-ksger-stm32-oled-t12-portable-soldering-station***It is not necessary to download the print files unless you want the original model without changes ***.For the additions that I design the following is necessary:Choose the files to be printed.You have two options to choose from. One with the handle at the top and one at the bottom. With the handle on the top the Soldering Iron is more compact, but somewhat more uncomfortable to carry.Personally I prefer the handle on the bottom. It is more comfortable to carry and makes the assembly more stable on the table.It needs:- 2 screws m3x12mm that replace the m3x8mm of the original model.- 2 nuts m3.- 2 washers for m3 screws.- 2 screws M5x12mm.- a 6mm drill bit to drill the holes (it is not necessary to use a drill, but it helps).- (Optional) A 19.47 x 2.78mm round magnet (glue is only needed if the magnet is smaller than that size).Mounting:- Use the m3x12mm bolts with their respective washers and nuts to attach the handle arms to the control panel. It is recommended to use washers to avoid breaking the arms when tightening the screws.- Use the m5x12 mm screws to attach the arms to the handle. No washer is necessary in this case, tighten to the bottom without forcing to avoid damaging the thread.- Use the 6 mm drill bit to rework the holes in the sponge holder in case the soldering iron tips do not fit properly. To help yourself you can use a drill at very low revolutions.- Glue the sponge holder to the battery connector with quick glue.- If the magnet is of the right diameter it is not necessary to glue it. You can use scouring pad, sponge or both at the same time. That is all. I look forward to your comments, good or bad, as long as they are constructive. If you like my designs give me like and share. If you like them a lot invite me to a coffee.https://www.buymeacoffee.com/kjbturokhttps://www.paypal.com/paypalme/ChinadlaConchinchina Thanks! ESPAÑOL Actualización 07/09/2022Se a agregado un soporte para usar en murales ikea skadis o similares.************** Primero quiero dar las gracias al usuario JAAANIK por su genial diseño "PARKSIDE X20V TEAM KSGER STM32 OLED T12 PORTABLE SOLDERING STATION" subido a cult3d. Todos los agradecimientos y méritos a él.A su diseño original se le an añadido un asa de transporte y un soporte de esponja con hueco para imán y puntas de soldador.Para el montaje de la electronica te remito a la web del diseño original. Allí encontrara los enlaces para adquirir la electronica necesaria para su montaje.https://cults3d.com/en/3d-model/tool/parkside-x20v-team-ksger-stm32-oled-t12-portable-soldering-station***No es necesario que descargue los archivos de impresión a no ser que quiera el modelo original sin cambios.***Para los añadidos que diseñe es necesario lo siguiente:Elige los archivos que va a imprimir.Tiene dos opciones a elegir. Una con el mango en la parte superior y otra en el inferior. Con el mango en la parte superior el Soldador es mas compacto, pero algo mas incomodo de llevar.Personalmente prefiero el mango en la parte inferior. Es mas comodo de transportar y hace el conjunto mas estable en la mesa.Necesita:- 2 tornillos m3x12mm que sustituyen a los m3x8mm del modelo original.- 2 Tuercas m3.- 2 arandelas para tornillos m3.- 2 tornillos M5x12 mm.- una broca de 6mm para repasar los agujeros (no es necesario usar taladro, pero ayuda).- (Opcional) Un imán redondo de 19,47 x 2,78mm (solo es necesario pegamento si el imán es menor a ese tamaño).Montaje:- Use los tornillos m3x12 mm con sus respectivas arandelas y las tuercas para unir los brazos del mango a el panel de control. Se recomienda usar arandelas para evitar la rotura de los brazos al apretar los tornillos.- Use los tornillos m5x12 mm para unir los brazos al mango. No es necesario arandela en este caso, apriete hasta el fondo sin forzar para evitar dañar la rosca.- Use la broca de 6 mm para repasar los agujeros del soporte de esponja en el caso de que las puntas de soldador no lleguen a entrar correctamente. Para ayudarse puede hacer uso de un taladro a muy bajas revoluciones.- Pegue el soporte de esponja al conector de batería con pegamento rápido.- Si el imán es del diámetro adecuado no es necesario pegarlo. Se puede usar estropajo, esponja o ambos a la vez. Eso es todo. Espero sus comentarios ya sean buenos o malos mientras que sean constructivos.Si te gusta mis diseños dale me gusta y comparte. Si te gustan mucho invítame a un café.https://www.buymeacoffee.com/kjbturokhttps://www.paypal.com/paypalme/ChinadlaConchinchina Gracias!
With this file you will be able to print REMIX PARKSIDE X20V TEAM KSGER STM32 OLED T12 PORTABLE SOLDERING STATION WITH HANDLE with your 3D printer. Click on the button and save the file on your computer to work, edit or customize your design. You can also find more 3D designs for printers on REMIX PARKSIDE X20V TEAM KSGER STM32 OLED T12 PORTABLE SOLDERING STATION WITH HANDLE.
