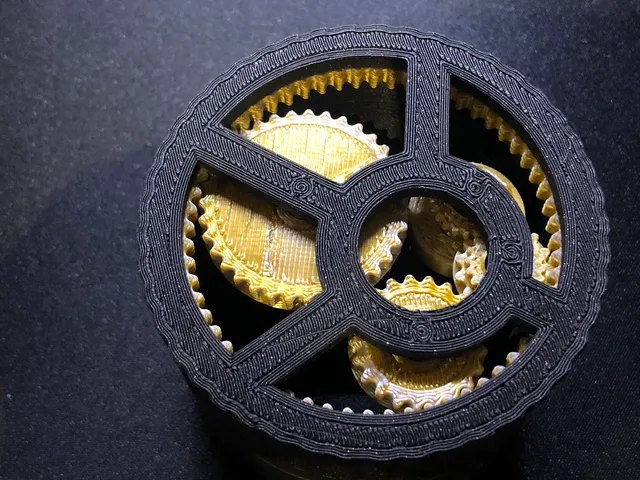
Remix of TOP and PIN for Spirographic WDT Tool
prusaprinters
This is a remix of @joeshmoe9898_813349 Spirographic WDT Tool NOTE: I just played around the TOP and PIN file, you will need other original files from his project. Files you need from original project.Gear A V5.stlGear B V5.stlGear C V5.stlGear D V5.stlInverted Gear Rounded.stlMiddle V3.stlBase Holder.stl / Stand.stl (optional)Tab A.stl (optional) Screws and WashersM2*12 screws x 3 M2*8 screws x 1 (for Gear C ) Washers (you need washer to smooth the friction) Stainless steel needle 0.35/ 0.4mm stainless steel needle x10 Tool you need,Small hand drill (you will need to pre-drill the hole on [Top (edit),stl], otherwise it is easy to break the screws hole.) StoryWhen I first look at this project , I love the design already, I think it can work, so I download all files and try to make one. And thinking it is a good week end project.I love the locking mechanism, only using the Gears to hold the Middle and Top part together which is super awesome. I also love the Gear ring in separate file, so you can print in different color easily. make it much nicer look and no glue required.But after print all the files, and try to put everything together, i found some problem, the V5 GEARS can not fit into the V2 TOP, the hole size are different. so i modified the TOP file, I also removed the M2 hex nuts. I think it is strong enough to hold it by just M2 screws itself. and it look much better as well (just personal opinion).but if you want to make one, please pre-drill the screws hole on TOP part by small hand-drill first, make sure the M2 screw can go in but not breaking it. as the original screw hole are bit too small for M2, I end up broken the TOP part and need to reprint again.I also changed the PIN file , so I can just insert the 0.35/ 0.4mm stainless steel needle inside, just cut the needle to correct size in both end and insert it to the gear. if the PIN is too hard to insert to the GEAR, just use sand paper to sand it.The PIN is small and thin, it is easy to be broken. specifically after you sand it. if it really broken and stuck inside, just use a small hand-drill to drill it out, you don't need to reprint the gear. I did it couple time already. if you think the PIN is too long (As it is what I am thinking now, but I am too lazy to edit it😆 ) you can just use your Slicer software to cut it, just print one and try it first, it only take you few min each.Over all is a super fun project, Thanks joeshmoe9898 again for the original design, very appreciated for his work. Love it's small size, It look beautiful, very functional, And the WDT result are great as well. the only down side is turning those small gears in such small thin plastic casing, you will fell quite a bit of friction (don't get me wrong, it is still functional, and work well, very good WDT result, but you will feel the friction). and I think joeshmoe9898 is still finalizing the design, I am very looking forward to his final version as well. Final ThoughIf you like it's look and want to make one, or for a weekend fun project, it is good to do it now. (it look good and work well). but if you want something to use it in day to day bases, then wait for joeshmoe9898's final version. or find something else, there is other much smoother Spirographic WDT Tool out there, but it will be either a lot bigger, not that sexy look or need metal bearing. Happy 3D printing….!!
With this file you will be able to print Remix of TOP and PIN for Spirographic WDT Tool with your 3D printer. Click on the button and save the file on your computer to work, edit or customize your design. You can also find more 3D designs for printers on Remix of TOP and PIN for Spirographic WDT Tool.
