Remix/MK3S+ RHD Nozzle Fan Shroud
prusaprinters
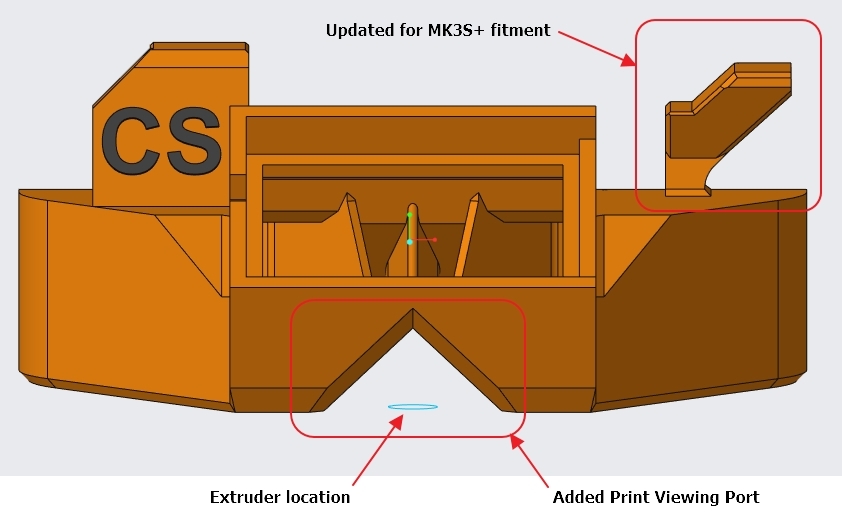
<p>This is a remix of <a href="https://www.thingiverse.com/thing:4124587">https://www.thingiverse.com/thing:4124587</a>. Thanks for the great design @RH_Dreambox, it works really well! I made some tweaks to enhance the part and also attached both the .stp file and the .stl file for your remix.</p><p>I did a few enhancements as detailed below and in the pics:</p><ol><li>Added a viewing port to see the nozzle during print.</li><li>modified the right mounting fixture specifically for MK3S+ fitment to help keep the fan duct level.</li><li>Added mounts for 3x 3mm LEDs right at the nozzle tip</li><li>Added chamfers to reduce weight where possible</li></ol><p><strong>PLEASE SHARE YOUR PRINTS, AS I'M NEW TO THIS HOBBY, AND WOULD LOVE TO HEAR IF THIS REMIX WORKED OUT FOR YOU.</strong></p><p>Notes:</p><ol><li>I have a blue silicone sock on my heat block so it blocks some light from getting to the nozzle. However, I plan to add some aluminum tape on the front parts of the shroud to help reflect some more light. It does not replace the need for ambient flood lights to better observe your print.</li><li>I ordered white 3mm LEDs (24v) from <a href="https://www.amazon.com?linkCode=ll2&tag=thingiverse09-20&linkId=e4759bff1fa9a55a0f897d801ce2d765&language=en_US&ref_=as_li_ss_tl">Amazon</a>:</li></ol><p>https://smile.amazon.com/gp/product/B07VD1KRDW/ref=ppx_yo_dt_b_asin_title_o03_s00?ie=UTF8&psc=1 </p><p> 3. I printed the fan duct in white (ABS) to both reflect and diffuse the light better. Plus the fan shroud "glows" during the print, which is a pretty cool effect I think. </p><p> 4. Some soldering needed to connect the 3x LEDs in parallel, and route the wires with the main cable bundle to the Einsy board and tapped into one of the main PSU terminals so it's always on when the printer is ON. </p><p> 5. Not recommended to print in PLA due to high heat in proximity to heat block. ABS highly recommended--I prefer white color (or even PC if you have an enclosure.) </p><p> 6. Print with 4-5mm brim to keep the part from warping. Turn bridging ON. (I use a Wham Bam print surface, works great!). </p><p> 7. Some overhang areas in the inside don't bridge well, so you'll need to do some trimming / post-processing.</p><p><strong>Updated 5/2/2021:</strong></p><p>I added aluminum foil tape (HVAC duct tape, buy at any home/hardware store) for 3 reasons:</p><ol><li>serve as heat spreader so that the heater block has less of an effect on the ABS plastic.</li><li>Reflects radiant heat from the heat block, thereby reducing the amount of heat the shroud retains.</li><li>serves as light reflector to get more scattered light to the extruder.</li></ol><p>If you add this to your collection and/or download the model, please click the <strong>LIKE </strong>button!</p><p>Happy printing!</p><h3>Print Settings</h3><p><strong>Printer Brand:</strong></p><p>Prusa</p><p><strong>Printer: </strong></p><p>I3 MK3S</p><p><strong>Rafts:</strong></p><p>No</p><p><strong>Supports: </strong></p><p>No</p><p><strong>Resolution:</strong></p><p>200</p><p><strong>Infill: </strong></p><p>20</p><p><strong>Filament:</strong> Generic ABS White</p><p><br> </p><p><strong>Notes:</strong></p><p>Print in 200um or 150um (preferred), both works.<br>Printed on MK3S+.</p><h3>How I Designed This</h3><p>I used Pro/Engineer Creo to make the mods. Thanks to @RH_Dreambox for releasing the .stp file</p><p> </p><p> </p><p> </p><p> </p><p>Category: 3D Printer Parts</p>
With this file you will be able to print Remix/MK3S+ RHD Nozzle Fan Shroud with your 3D printer. Click on the button and save the file on your computer to work, edit or customize your design. You can also find more 3D designs for printers on Remix/MK3S+ RHD Nozzle Fan Shroud.
