Refurbish Stereo Microscope with modern HD digital camera
thingiverse
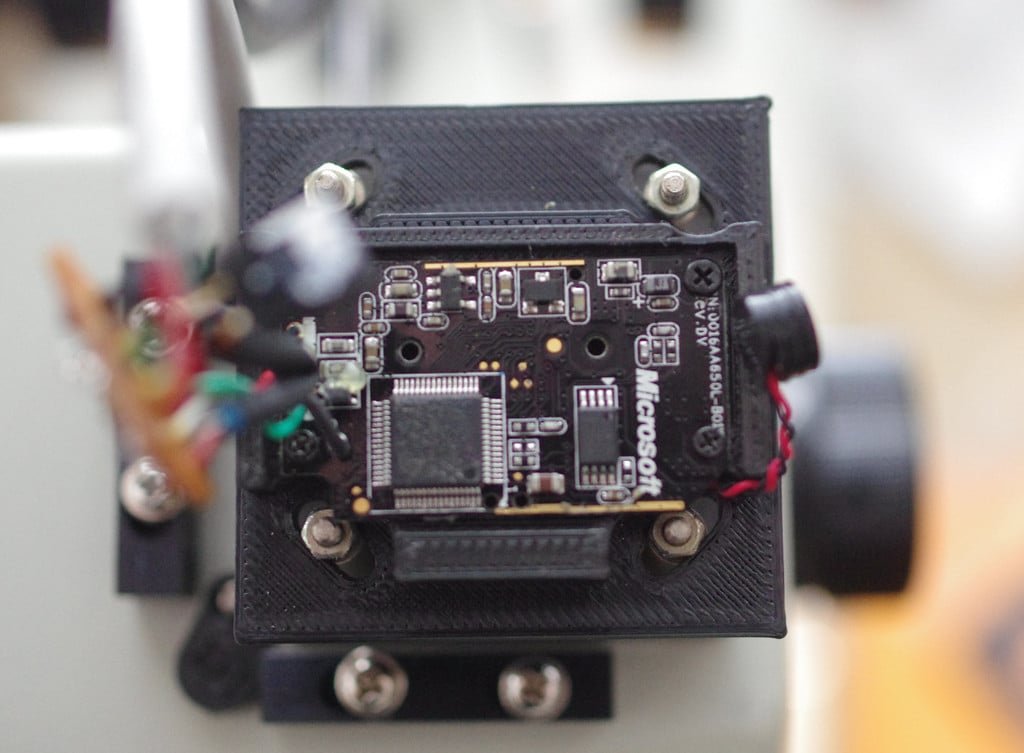
I realize the chances of replicating this mod exactly are slim, so I'll treat this post as a guide to refurbishing an older digital microscope with a modern HD camera. Some microscopes like the Motic 143 have a built-in USB camera. Even though the actual microscope is considered new, made just a decade ago, the camera may not be up to today's standards. In fact, most of the time there's no way to make these cameras work on Windows 7 or 10. The mod is incredibly easy - we simply swap the old CCD imager with the guts of a good HD CMOS USB camera. A great source for such chips are webcams because you can pick one that's supported by recent OS and test it beforehand to see how it looks. You practically need just the inside PCB with the CMOS chip, no lenses, as we'll reuse the optics of the old camera. Also save those mini screws - handy! The only downside is that common webcams are 1/2.5", while the CCD on the old microscope is larger (looks like 1/1.9"). That means the new cam will show a center crop of the image. Well, we can't have everything and maybe someone will come across a webcam with a 1/2" or larger chip. I chose the Microsoft Lifecam HD3000 mostly because I had one at hand (bought it for $5 in a garage sale), it had reasonably sharp images and 720 HD video, and it was recognized by all my computers on W7 and W10 without any need of drivers when I tried. (The HD3000 supporting software however can't be installed on Windows 10 even if you tried, but no harm done, the Windows catalogue has the correct driver). The camera has also a small footprint which is exactly what we need. Another good candidate would be Lifecam Studio. There's a remix for Lifecam STUDIO as well. Also breaking it apart was really easy - the camera popped up open just by using my fingernails revealing just a few screws holding the PCB. Thank goodness for cheap manufacturing! So instant hit on all accounts. Wiring is easy too - both cameras use USB and every USB cable conforms to the same color coding, so it's really just cutting the new webcam wire and then attaching red to red, white to white... make sure you recognize which black wire is the outer shielding and which is the actual minus wire because there are usually two of those. I used a small piece breadboard PCB to attach the wires to each other. A top of my microscope camera housing had an LED and so I simply wired it through a small connector to the red and black wire of the USB wire through 1Kohm resistor. So for Motic 143 and Lifecam HD3000, I did all the job for you and designed the exact correct bracket. For other combinations - use it as an inspiration, get digital calipers and start measuring! A microscope will have an IR cutoff filter (cyan colored) in front of the chip - depending on the webcam such filter may be part of the lens. Anyway without the IR cutoff the image would be washed out and colors will be off - especially green color of PCB would simply look dirty bluish. The bracket has a place on the bottom to attach the original IR filter from the microscope. Another tip: before assembly clean the CMOS and the filter with some optical fluid otherwise you may have dust blobs on it. I was satisfied with the result. The image is in the same range like most of the 1/2.5" based digital microscopes that use similar spec chip. It gives clear, reasonably sharp images and good colors. Of course, the better the CMOS is, the better would be the result.
With this file you will be able to print Refurbish Stereo Microscope with modern HD digital camera with your 3D printer. Click on the button and save the file on your computer to work, edit or customize your design. You can also find more 3D designs for printers on Refurbish Stereo Microscope with modern HD digital camera.