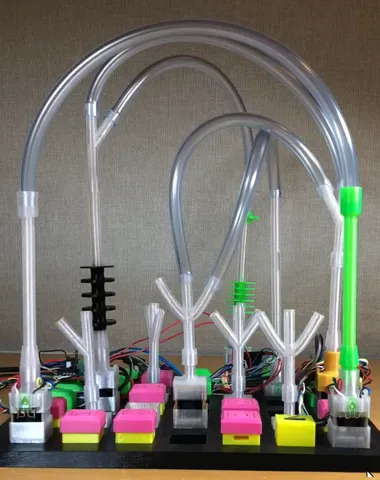
Reconfigurable Portable 3D Pinball Thing
prusaprinters
First look at 3D pinball I'm making out of old door latch solenoids that have been lying around doing nothing. As a kid I wanted to make a pinball machine. So with just a few solenoids, a 3D printer, and some bits and pieces I'm going to make a two player 3D pinball thing. It will have multiple 5mm ball bearings flying around at high speed, it will be module based and reconfigurable, portable and run on a couple of 18650 batteries. I'm using an RP2040 Pico board to control the thing and tune it. It may not be needed in the final version.The video shows a firing test with 3 ball bearings in the tube and two solenoid modules spaced about 30cm apart. The 12V solenoids are pulsed for 7ms at 54V and in that time the plunger moves about 12mm. In the last 2mm it imparts its momentum onto the ball bearing which goes onto to travel around 30cm in 85ms which is about 3.5m/s. The solenoid modules have an infrared LED and receiver to detect the presence of a ball bearing. The base was created so the bits could easily be swapped around as I went about designing and testing, however it has now become a feature. The blocks fit in real tight and the whole thing is really stable. It takes some effort to get them apart - but no glue required, and you can change it around. The other bits on the base (in the video) are previous test pieces or bits that may be used in the future, and are mainly here for show, but it gives you an idea of what I'm trying to achieve. Next step is likely to be RC servo based flippers and some magnetic components. The pink & yellow modules will contain micro switches for player controls.But for now these bits are incomplete.Solenoid LauncherI used solenoids out of ES2000 electric door strikes. Further investigation reveals that they are F0626 push type. The housing and the plunger push fit onto the solenoid base which ensures the optimal starting position for maximum transfer of momentum. Solenoid & plunger. In fired position (about 2mm protrusion). Solenoid TopThe solenoid top is a little more complicated. On the sides there are space for an IR LED and IR detector opposite. The LED and detector were recovered from an EE-SB5 reflective sensors - as used in printers to detect paper. The sensor is used so the system knows when there is at least one ball ready for firing. It also allowed me to time and tune the system. About 8ms to launch at 48V, in comparison to 12V it takes 32ms. In the front goes a rectangular green LED that lets you know when the detector is tripped. I printed mine in clear PETG, probably not a good idea as it won't work in brightly sunlit rooms. Connecting TubesOriginally they were designed so that the 6mm PVC fits over the tube. However this caused too much interruption at the boundary, so now they work like a plug and socket. Green fins, etc are just for show. Long tubes have some small bits sticking out the side. I use build support on these to stabilise the entire height whilst printing. ElectronicsWorks reliably but needs to be simplified - once I know what I am making. Schematics below. Python source code included, as are FreeCAD design files. Also using DC boost circuit to achieve 48V from 2C LiPo ($13 at Banggood). Firing Test #1This video shows rapid firing tests - you can just make out the high speed ball bearings going across. Also notice the green indicator on the front of each one. Firing time is 7.8ms (with three balls, much faster with ⅓ of the mass) and travel time between launches is 107ms.https://youtube.com/shorts/V4jExfrkXwg This is very much a work in progress… Have fun,mark
With this file you will be able to print Reconfigurable Portable 3D Pinball Thing with your 3D printer. Click on the button and save the file on your computer to work, edit or customize your design. You can also find more 3D designs for printers on Reconfigurable Portable 3D Pinball Thing.
