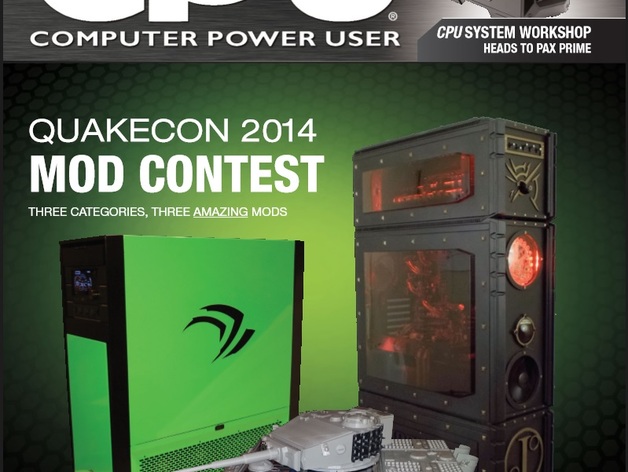
RC Tiger 1 Tank Computer Case - Quakecon 2014 Winner
thingiverse
Radio Control Tiger I Tank Computer Case Made for Quakecon 2014 Won First Place in Fabrication Contest On June 16th, 2015, 3DPrint.com Wrote Article About It:http://3dprint.com/69747/3d-print-tank-case-mod/ Videos:http://youtu.be/N6i7Czt696Mhttp://youtu.be/qGgSlTyJCnEhttp://youtu.be/sbSo8lJBDVs Build Log Can Be Found Here:http://community.coolermaster.com/index.php/topic/12791-tiger-1-tank-computer-case-cooler-master-edition-build-log/ It Was Featured on the Cover of CPU Magazine for September 2014 It Took Me Over 300 Hours of Print Time on My Replicator X2 Printer. Design and Construction Time Not Included. CPU Magazine September 2014 Article: Quakecon Mod Contest's Scratch Build Category Winner Builds PC in Image of a Game The winner of the scratch build category is truly an unconventional choice. The winner of this year's contest builds a PC that represents one of his favorite games. It also incorporates features from World War II that would make any war gamer or history buff happy. Adam "DOHCDragon" Owen Won Quakecon Mod Contest Twice Last year's scratch build category winner also won this year's. He did so by building a computer case in the image of a German Tiger I tank from the popular video game World of Tanks. 3D Printing Makes Everything Possible Owen decided to use 3D printing to bring his creation to life. It took him about a month to figure out the software and the printer. Owen says he wanted to learn more about this technology. He also wanted to build something that combined two things he loves: custom computers and games. Brainstorming Began Early Owen thought long and hard about what type of project he could undertake with 3D printing technology. The initial idea was a robot from the video game Wolfenstein. After seeing how difficult it would be, Owen scrapped the idea in favor of the Tiger I tank. Tank Body Designed to House Computer Components Owen designed the tank body around his PC components. It had to accommodate his motherboard and other important parts. Owen wanted the case to hold as many computer parts as possible. A Combination of Designs Used to Create 3D Model To create a good design, Owen used models he found on the internet combined with 3D software. He created multiple prototypes before achieving the desired outcome. Building Started from Tracks Tracks are a big part of what makes this tank stand out. It took Owen a week to print the first tracks. After that, he moved onto other parts such as wheels, tubs and more. A total of eight motors had to be attached to get all of it to move. RC Controllers Needed Owen used a receiver from an old RC quadracopter that he purchased on eBay for $30 to control his 3D-printed tiger tank. To turn the wheels into fully operational treads, Owen found 80 turn motors in a rock crawler that had to be added onto each side. Hard Parts Required Designing and Printing Transmission The hardest part of the project was designing and printing the transmission himself. It is a complex system with an overdrive of 31 to one that gives him precision and smoothness when he moves his treads forward or backward. Battery Powered To make it more interesting, Owen designed it so that batteries power both his tread motors as well as the turret motor. He says he got those batteries from Home Depot at an inexpensive price point. In addition, EVGA makes great Power Supplies that have charging built-in. If you build a 3D printer computer out of wood like i did with metal frame support on top and inside, You'll never know about power failures since it gets shut off. This design will definitely keep your Computer components safe at all times during usage. How To Instructions: Most things should be self-explanatory if the following parts are completed as listed. There are three motor transmissions needed with an input ratio of 100:1 per axle for smooth turning control. One is from an electric scooter; it runs the entire tank forward or backward at low speeds which enables slow operation for precise tracking, while providing very strong thrust without jerking. This works perfect because they also include reverse capability, giving us good torque over our ground effect of high mass at normal and max weight ratings combined! Here are my next Steps in Creating Another Model For You to Make Use of: Metal rods should be attached together at each corner of the chassis with metal fasteners before gluing everything else onto it. Make Pins for Trays using ABS Plastic These trays have tiny plastic inserts which hold the actual tray tracks themselves inside of them, allowing easier installation when putting these parts together into functional use once more! Next step: attach other components and details (piping etc) around the frame before placing motors on board as mentioned earlier today!
With this file you will be able to print RC Tiger 1 Tank Computer Case - Quakecon 2014 Winner with your 3D printer. Click on the button and save the file on your computer to work, edit or customize your design. You can also find more 3D designs for printers on RC Tiger 1 Tank Computer Case - Quakecon 2014 Winner.
