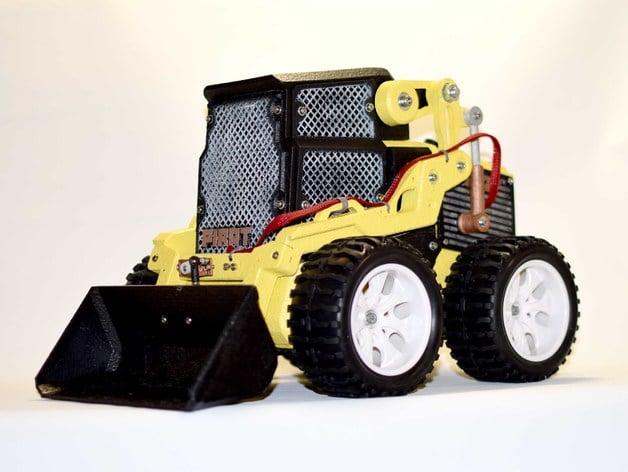
RC Mini Loader
thingiverse
There are only 44 parts involved in this build, making it quite straightforward to comprehend. The necessary screws include M3, M5, and M8 types. A small video of the project is available here: https://youtu.be/ac2Qkmy_yXM. You can also download the full version from redpah.com/product/3275/rc-mini-loader or pinshape.com/items/31101-3d-printed-rc-mini-loader. To build this model, you will need to buy a few items. The weight of the finished product is approximately 2.8kg (6.17LB). Its dimensions are 400mm x 270mm x 260mm. The working area of the printer is at least 18x18 mm. I used plastic PLA for printing, and then applied textured paint to give it an anti-gravel effect, followed by regular paint to achieve an old metal look. The big servo required can be found here: https://hobbyking.com/en_us/hobbykingtm-high-torque-servo-mg-bb-w-proof-12-8kg-0-22sec-58g.html. For the mini servo, visit https://hobbyking.com/en_us/hobbykingtm-hk15148b-digital-servo-2-8kg-0-14sec-19g.html. You can also find a suitable motor on aliexpress: https://ru.aliexpress.com/item/12V-133RPM-Connect-High-Torque-Rotary-Speed-DC-Geared-Gearbox-Motor/32693625987.html?spm=2114.30010708.3.26.5US9Ik&ws_ab_test=searchweb0_0,searchweb201602_2_10093_10091_10090_10088_10089,searchweb201603_1&btsid=e00655cc-93d0-4203-b99c-68930730f6fe. Alternatively, you can find a suitable motor on hobbyking: https://hobbyking.com/en_us/133rpm-brushed-motor-w-75-1-gearbox.html or https://hobbyking.com/en_us/294rpm-brushed-motor-w-34-1-gearbox.html. To connect the motor, you will need a 12MM Hex connector. You can find one here: http://www.ebay.com/itm/3-4-5-6-7-mm-Brass-Shaft-Couplings-Coupler-Motor-12MM-Hex-connector-DIY-Screws-/181739759207?var=&hash=item2a5088a667:m:mHCAxiTwXWJ3r5XeMDFTPTw. The wheels required can be found here: https://ru.aliexpress.com/item/4PCS-RC-car-1-10-HSP-12mm-racing-wheel-rim-tires-diameter-115mm-width-55mm-Suitable/32817164528.html?spm=a2g0v.search0104.3.17.nmWdjp&ws_ab_test=searchweb0_0,searchweb201602_0_10152_10151_10065_10344_10068_10345_10342_10343_10340_10341_10543_10541_10084_10083_10307_10301_10539_10312_10313_10059_10314_10534_100031_10604_10603_10103_10605_10596_10107_10142,searchweb201603_33,ppcSwitch_0&algo_expid=16021120-6e5c-4f2d-850e-684c7df79624-2&algo_pvid=16021120-6e5c-4f2d-850e-684c7df79624&rmStoreLevelAB=2. The speed controllers are connected in parallel to the receiver from the model aircraft equipment. The HobbyKing X-Car 45A Brushed Car ESC is suitable for this purpose and can be found here: http://www.hobbyking.com/hobbyking/store/__8992__Turnigy_9X_9Ch_Transmitter_w_Module_8ch_Receiver_Mode_2_v2_Firmware_.html. To configure the console, I recommend visiting your local forum on aircraft modeling. There, you can easily find a guide on how to set up the remote control. You can also visit the international forum: http://www.rcgroups.com/forums/index.php for more information.
With this file you will be able to print RC Mini Loader with your 3D printer. Click on the button and save the file on your computer to work, edit or customize your design. You can also find more 3D designs for printers on RC Mini Loader.
