RC dolly for small planes (e.g. 3Dlabprint 1:12 warbirds)
thingiverse
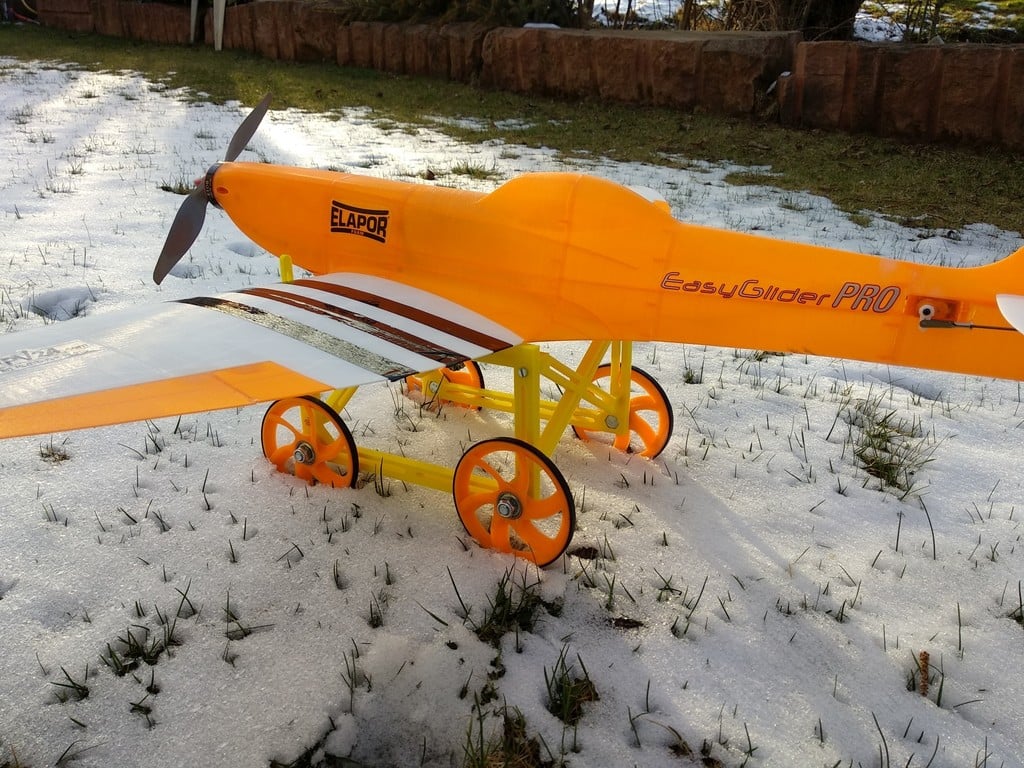
It's always been tough for me to hand launch small low wing planes, such as the warbirds found at 3Dlabprint (small Spitfire, ME 109, Mustang, etc.). On one hand, a fixed landing gear looks ridiculous on these planes. So I've always relied on someone else to help me with launching when I'm alone. A dolly would have been just what I needed, but I didn't want a huge one designed for big gliders. Instead, I wanted something small and dismountable that wouldn't take up too much space in my workshop or car trunk. I couldn't find anything like it anywhere. So I took matters into my own hands and designed my own dolly with all the features I wanted. It's compact, sturdy, and can be taken apart quickly if needed. Plus, it has big wheels that can handle rough terrain. Here's a little tip: Many of these small warbirds don't have a rudder, so you can't steer the dolly once it's rolling. If you notice the dolly is about to break away, stop the launch immediately and try again. Print Instructions: Resolution: 0.25mm Perimeters: 3 Infill: 20-25% Support: Required for small pins in front of frame parts All parts are made from PLA except for tires, which are made from flexible material like flexible PLA or TPU. Use about 15-20% infill for the tires and at least 4 top and bottom layers. Bed temperature, printing temperature, and print speed depend on your specific material. You can also use fidget spinners as wheels if you don't have flexible material available. Just glue a rubber band around their outer diameter to improve grip when rolling. There are two versions of the frame parts: one for large printers with 250x200mm beds and another for smaller printers with 200x200mm beds. The small printer version is simply cut in half, requiring you to glue the front and rear parts together using 3 pins (infill=60%) on each side. BOM: 10 x M4 screws (20mm) 4 x M8 screws (30mm hex head) 4 x ball bearings (608ZZ) 8 x M8 hex nuts (4 self-securing optional) 10 x M4 hex nuts 10 x washers (M4) (may not be needed, depends on screw size) 2 x soft self-adhesive strips (optional) CA-glue (optional kicker) Assembly Instructions: See pictures for part order. It's pretty straightforward. Put M4 nuts into each hole of the braces. Mount wheels by putting M8 screws through the frame, then add an M8 nut from the other side, tighten, and attach wheels with another M8 screw (self-securing if desired). Tighten last nuts slightly so wheels can turn freely. Mount braces and frame parts together using M4 screws. Use washers if screw heads are too small. Adjustable stopper in front: put one M4 nut into each hole of the frame, then attach a M4 nut to a M4 screw and screw it all into the hole where you previously placed the M4 nut. To finish, add soft material strips (e.g., foam rubber) on top of the frame for plane wings to rest against. If hex screws/nuts don't fit: 1. Holes too small: heat up hex nut/head slightly and press in. Let it cool down – done. 2. Holes too big: glue nuts with CA glue, add oil to screw, mount hex nut on screw (only a few turns), apply glue to inner walls of hole, press nut/screw down, and let glue cure. If wheels feel loose on rims, secure them with CA glue. Have fun and let me know if you like it or not!
With this file you will be able to print RC dolly for small planes (e.g. 3Dlabprint 1:12 warbirds) with your 3D printer. Click on the button and save the file on your computer to work, edit or customize your design. You can also find more 3D designs for printers on RC dolly for small planes (e.g. 3Dlabprint 1:12 warbirds).