RC Car V2 (almost) fully printed
prusaprinters
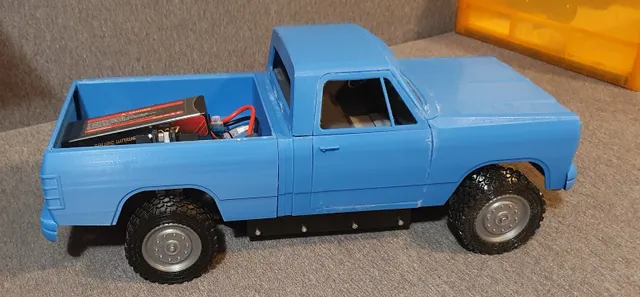
06/01/24: If you are interested in RC cars check my UNIMOG RC Chassis (model U5023 - 2014) at 1/10 scale.04/05/23: I've released a new limited slip differential #4 that can replace the original differentials of this car (mounting adapters provided). You can get it here:https://www.printables.com/model/470129-rc-car-differential-4-with-limited-slip04/06/23: I've released a new differential (V3) that can be used in this V2 car.You can find it here: https://www.printables.com/model/444446-rc-car-differential-3It is smaller and prints faster.March 2023: I'm releasing the second version (V2) of my 4WD RC car. The goal was to deliver a design that was more to “scale” allowing it to be used for scale models. This is a redesign - not a simple upgrade. The wheelbase is 309 or 313 mm depending the way you position the rear chassis in the beams. You can assemble the 4 rear beam screws making the car slightly longer if you need a 313 wheelbase. In this case rescale the rear transmission shaft in the slicer to add 4mm in one direction ( the length). This V2 uses my new differential and my new 16 to 1 gearbox. The steering is also direct from the servo but this time the servo is not upside down. The Ackermann is still there even though it is not fully accurate due to the adjustable wheelbase (but then this is close to negligible). Servo angle has 2 limiters; one at 19° the other at 25°; with the Dodge ram body https://www.printables.com/model/298041-dodge-ram-rc-car-body-remix I'm using 19° because at ca 20° my 275/60 R20 Michelin tires will bump into the fender…Depending on you body or tires 25° allows for sharper turns.You will notice that this time the design is even more crammed than before. So mounting requires a little bit of patience and the order is even more important. One example is the drag link that goes through the gearbox ! I've simplified some aspects like the suspensions arm axles where the plastic axle has be eliminated and the screw itself is the axle… I've used less screws and nuts overall. The shock absorbers are similar to my previous design and fully printed ! As the car is heavier in the front you can compress them a little more by using the middle hole instead of the top hole for the upper shock axle. This time I'm using only PLA except for the tires (TPU) but I've printed the rear tires in PLA (!)You will need the RC stuff, M3 screws and nuts, and a bunch of ball bearings30 MR117-2RS (11x7x3)10 6700zz (15x10x4)4 MR115-2RS (11x5x4)The motor is still a 2216 and I'm using the “propeller” mount. Add some grease on the gears and maybe also in the inner rim where the knuckles sit.As for the previous V1 version I'm archiving the files for reference and after a while I think I'll remove them.I hope you like this new design and decide to embark on a new adventure !I'll be adding some pictures to help assembly…------------------ V1 DETAILS ------------------------------------02/11/23: I added a retrofit kit for the differential (DIFF V3 folder for stl and gcode); the kit uses 2 new ball bearings sizes. For each differential you will need 4 MR117-2RS (11x7x3) and 2 6700zz (15x10x4) and to reprint a few parts. This is a retrofit from my new differential design https://www.printables.com/model/351652-another-rc-car-differentialIt should solve the issue of part DF07 breaking too often. In the new design the diameter of DF07 was increased from 4.8mm to 6.8mm making it much stronger.12/18/22: TeeCee made a very nice video of his build featuring a fine Unimog body: 11/28/22 update: Fixed a naming bug in the gearbox with the big gears ; thanks to TeeCee for reporting this ! GB05 is only used for the 3 first shafts - the fourth big gear has a bigger hole; GB18 should now be used for the output shaft (adding STL for this part now). I've also updated the gears print file.10/22/22 update: car body is available ! https://www.printables.com/model/298041-dodge-ram-rc-car-body-remix-----------------Well this was a long one and I'm happy to release it, finally !Please note that in this design the only metal parts that are needed are nuts and screws (M3) ball bearings and the RC stuff (motor, servo etc…). Everything else is plastic (even the axles). So in this V1.0, the car has 2 differentials. In my tryouts I cheated 😊 because I used only the front differential as it would have taken a few more hours to print / mount the rear one…The steering solution is not the usual one (no bell crank here) ; I managed to use directly the output of the servo. I have implemented an Ackermann geometry so that the front wheels don't turn with the same angle in curves. Due to the ratio between the width and the length of the car, the angle difference is quite noticeable.To reduce the speed of the motor (2216 brush less) I designed a 5 to 1 herringbone gearbox (4 stages). For more pictures of the gearbox see https://www.printables.com/model/225851-5-to-1-gearbox-for-2216-motor. (you don't need the files they are all here !)The differential reduces the speed of the motor by an additional 2 to 1 ratio (so it's 10 to 1 overall). For more pictures of the differential GB see https://www.printables.com/model/246505-updated-rc-car-differential-gearbox (you don't need the files they are all here !)My shock absorbers are fully printed and I use a PETG printed spring. Compared to my original design I increased the springs' strength by a factor of 2. With all four springs the wheel axles almost align with the differential axles.My tires are printed in PLA which is OK if you drive the car in a garden for instance.There is a V2 for the tire and the inner rim; I've not tested it yet; it is supposed to block the rotation of the tire vs the rim… Or you can put a drop of glue. (But the notch makes it dis-mountable)RC stuff used:one 2216 motorone “car” bigger ESC (it has a switch and a fan)The flysky and its receiverone 2S battery one 20 kg servo (the bigger ones)A lot of M3 hex screws and nuts (I almost used up my 440 pieces M3 combo box - different lengths ranging from 6 to 40mm ).Quite a lot of MR115-2RS B115 (5x11x4 mm) and 608 ZZ (8x22x7 mm) ball bearings. (20 each should do). The wheel cups hold one 608zz each.As for mounting instructions, I will try to add partial Fusion 360 views and cross section to help but I will not be making Tamiya-like mounting instructions ! You can also look at the subsets I have released previously and find some other pictures… I had originaly thought that some screws needed to be glued so that they do not unscrew because of vibration (like in the u joint of the drive shaft). But this prevents dismounting; so you should NOT glue the screws because if you need to dismount the differential then you will need to break the drive shaft and reprint it…And then, well it's a rc car but it's a car ; so the mounting order is important and sometimes it's crammed like in real life…So it's a journey !I am attaching all of the needed print files. I use only PLA or PETG.I have remixed a car body that fits the car: It's now available at https://www.printables.com/model/298041-dodge-ram-rc-car-body-remix You will notice that this time I have nearly made a real bill of materials and the part names follow a pattern : XXnn-kk-name XX is the sub assemblynn is the part number in this sub assemblykk is the number of instances the part is needed (in one single instance of the sub assembly)So for instance “WA03-03-Arm axle” means the arm axle is part 03 within the wheel assembly and you need 3 of those in each wheel assembly (meaning a total of 12 for the whole car).When kk is 00 it means the part is configuration dependent (usually 2 such parts are to be selected) “WA05-00-Front wheel holder” is needed for the 2 front wheel assemblies whereas “WA06-00-Rear wheel holder” is needed for the two rear wheel assemblies.But that was more of a design aid for me and it doesn't really matter now… (Unless you want to change the print settings which will leave you wondering how may of those do I need !) If you have been trying my earlier subsets, please take into account that some parts may have changed. Enjoy !
With this file you will be able to print RC Car V2 (almost) fully printed with your 3D printer. Click on the button and save the file on your computer to work, edit or customize your design. You can also find more 3D designs for printers on RC Car V2 (almost) fully printed.