Ray Gun from Black Ops UNDER RECONSTRUCTION
pinshape
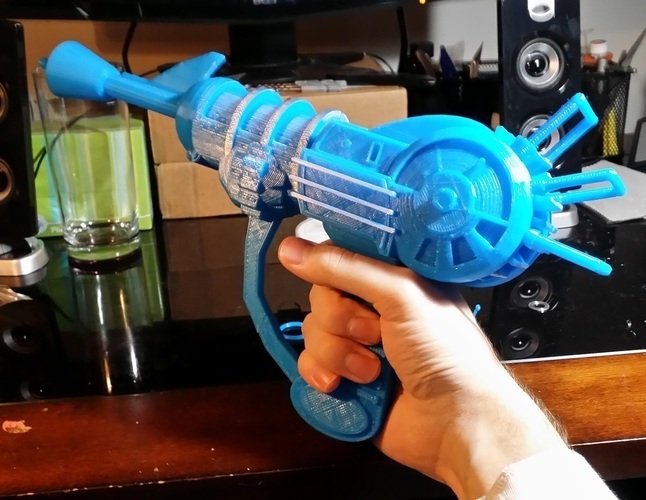
Human: SummaryRay Gun from Nazi Zombies in Call of Duty: Black Ops now ready to accept electronics and become a fully functional prop!\nI used some blueprints I found online to scale the model, and it feels quite comfortable in the hand.\nSupplies:\n\nEpoxy\nTwo small magnets\nSome wire\nClamps or weights (cans of soda work too)\nWax paper\nFlat surface\n\nHardware:\n\n4x M3x10mm Socket Head Cap Screws\n2x M3x16mm SHCS (for hinge and trigger)\n6x M3 Nuts\n6x M3 Washers\n1x M3 Threaded Insert Worth it to have 99 extra for other projects.\n\nElectronics:\n\nA 3.3V Microcontroller with at least 5 pins for data\nA Battery Charge Circuit for your MCU\nAdafruit Audio FX Mini Board\nAdafruit Mono 2.5W Amp\nMini Metal Speaker\nLiPo 1S Battery that will fit\n6 or more WS2812B LEDs on individual pads\nServo wire for those LEDs\n2 small pushbuttons.\nSPDT Switch\nRotary Encoder (aesthetic, optional)\nEncoder Knob (aesthetic, optional)\nTiny extension spring (I found one in an old tape deck at Goodwill) or small rubber bands.\nPrint SettingsPrinter: ORDbot HadronRafts: Doesn't MatterSupports: YesResolution: 0.4Infill: 20%Notes: This project needs translucent filament! I used clear PETG with good results, but that presented some challenges with overhangs. The "Grip", "Barrel", and small parts don't need to be translucent so choose your favorite filament.\n\nPrint a mirrored version of "Chamber Stop L".\n\nI'm using an E3D V6 Volcano with a 0.6mm nozzle, so the lines are quite thick for mine. The overhangs inside the frame can be a bit tricky, so choose your support settings wisely. I do not need a raft since I use a PEI build plate.\n\nI'd like to try to print it in ABS so that I can vapor smooth it, but that will be a challenge.Post-PrintingA. Assemble the Gun BodyI suggest painting the silver paddles on the "power" parts first, painting the red walls next to the paddles, then proceeding to the rest of the build. Those paddles will be a real pain to paint after you have glued everything together.\nUsing a very strong 5 minute epoxy is recommended.\n\nAfter painting the paddles lay all three pieces for each side of the gun (left or right) on wax paper covering a flat surface and epoxy the parts to one another. Make sure they remain aligned while the epoxy cures, by using hot glue to strap them to the main part.\nC. Now Set Up Your ElectronicsInstall the switches and rotary encoder.\nSolder your LEDs together and make sure they all fit.\nSolder your MCU to the LiPo Charger.\nSolder the Amp the FX Board.\nSolder the speaker to the Amp.\nHot glue the speaker to the left Chamber Stop print.\nSolder the switches to the MCU.\nInstall the Chamber Stop with hot glue.\nTest system over USB.\nGlue MCU to print with hot glue while still plugged into USB.\nSecure other electronics with glue.\nSolder or plug in your LED strip.\nInstall battery.\nBolt everything together.\nProfit.
With this file you will be able to print Ray Gun from Black Ops UNDER RECONSTRUCTION with your 3D printer. Click on the button and save the file on your computer to work, edit or customize your design. You can also find more 3D designs for printers on Ray Gun from Black Ops UNDER RECONSTRUCTION.