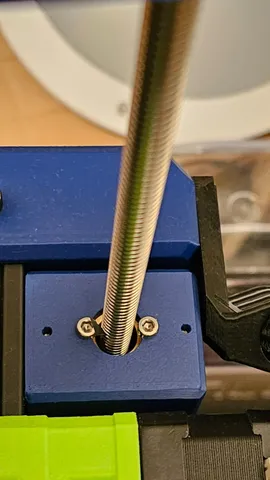
RatRig V-Minion Z decoupler (resolves Z Banding / Z Wobble)
prusaprinters
Hi, It seems that I got lead screw that it not 100% perfect and I was experienced errors in prints related to Z wobble that Official TR8*4 Anti-Backlash Nut Block could not solve. After tightening official Anti-Backlash Nut Block issue was gone but returned after few days of printing. After release of V-Core 3.1 I liked how they resolved same issue on bigger printer so I gave it a try. Main purpose of this build was to add Z-decoupler from RatRig (but similar and compatible items can be found on AliExpress, Amazon ect. but I liked Bi-metal version RatRig offers) while retaining all of the other parts of the printer including all of the screws on standard places with standard length.Second thing I wanted to do is to set everything so Z print height is not changed by this modification so you do not loose anything by doing it so print area is still 180x180x180mm. Needed materials:1 pcs - Bi-Material Lead Screw Decoupler or similar1 pcs - TR8x4 POM Lead screw Nut or similar4 pcs - M3x8 Cap Head Screw1 pcs - F688ZZ Ball Bearing2 pcs - M3x30 - optional if you are using optional printed part for decoupler Assembly is straight forward, print all of the parts (I've printed them in ABS but PETG will be just fine).press insert F688ZZ Ball Bearing from the bottom in Z-CAP (Bearing is flush with printed part when inserted from bottom)assemble Lead screw decoupler and Lead screw nutprinted Z decoupler must be mounted on X beam in place of Anti-Backlash Nut Block before adding assembled leadscrew decoupler with lead screw nut I've been using it a lot for few months now and Z wobble is GONE!!!!I'm happy to make good printer better…
With this file you will be able to print RatRig V-Minion Z decoupler (resolves Z Banding / Z Wobble) with your 3D printer. Click on the button and save the file on your computer to work, edit or customize your design. You can also find more 3D designs for printers on RatRig V-Minion Z decoupler (resolves Z Banding / Z Wobble).
