Raspberry Prusa Case i3mks+
prusaprinters
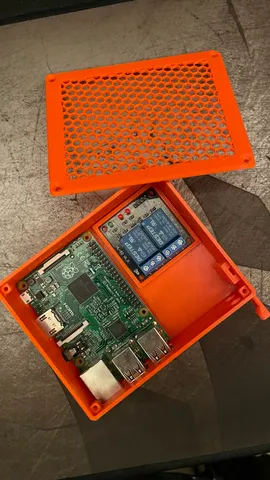
UPDATE V.4This model is made with room for a dual channes 3.3v relay https://www.ebay.de/itm/275083605147?hash=item400c42b49b:g:7WMAAOSwUhthzS-v&amdata=enc%3AAQAHAAAA4PzJoawVY5LNVihOS76Ia%2BYoXjUrHiRRuBS%2FPXkWN3WmcI58NCPYatSVQhaU9VbcrKyjFsfsK99u5W1EoR9XI5qaLq0YNhz98gvsQ01FSAAzdah7%2F5hdMgnVfENglbN1dR2itrBnur4iJ9XIzeg0FhuIpCw30EutSahCIlRidVl7jKwxPN9jaE99smut86SxhGjQzlqBz5NbsRv8AvKMALSYOm2EdYFtmFrCoumreixSxNsO4fMuqPf3OyAJd1LkMXJekKCSIvubSzzzt5DkHyai5YUi6qxMYUiZWiEltXVB%7Ctkp%3ABk9SR8zmpLagYQThis is also made with mesh modifiers in prusaslicer so i get a custom honeycomb cooling added to parts --------------------------------- V.1 Below -------------------------------Had to use my old pi2b since theres shortage, and i dont care for the stuff lying loose. Remixed so the 5v dc relay can be installed and printer turned on/off from octoprint. Used GPIO pin Pin 1 → Relay board VCC (3.3v) even though the relay states 5v it works with 3.3vPin 6 → GroundPin 17 → Relay board IN Make sure theres room for Z-Axis and X-Axis to move around the cables. I ziptied the cables to the Einsy box Printed in PETG 0.30 Draft since i did not need it to be pretty, just functionel. Boards are glued with gluegun to secure.!Warning! If you are not aware of how to proper use cables and insolation on these, dont mess around with the PSU power cable. Its running high voltage and can short circuit. Ask a friend or an electrician!For the PSU cable i used Wago Joint Sleeve which are easy and works very well.
With this file you will be able to print Raspberry Prusa Case i3mks+ with your 3D printer. Click on the button and save the file on your computer to work, edit or customize your design. You can also find more 3D designs for printers on Raspberry Prusa Case i3mks+.