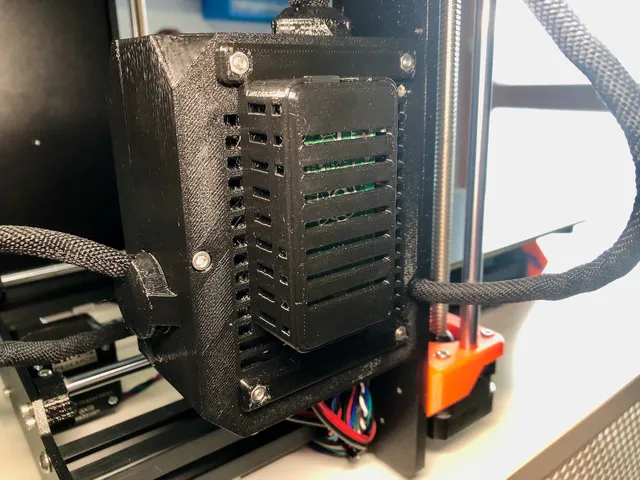
Raspberry Pi Zero (2) W mount for Original Prusa i3 MK3S+
prusaprinters
IntroductionThis mount might help you get more stable WiFi connection with Raspberry Pi Zero (2) W mounted in your i3 MK3S+ in case you're experiencing issues when using the Pi mounted by following the official, Prusa-published instructions. WiFi connection stability problems may result from thermal or/and electromagnetic interference issues when your Pi board is mounted inside the Einsy board case. This modified mount may help you with either or both of these issues by allowing for more distance between Einsy and Raspi. It also allows for mounting optional small stick-on radiators on the Pi.Revision history2022.12.09 - v1.1Added a cutout for CSI (camera) ribbon cable2022.07.11 - Original releaseHardware needed 4 * M3 x 14 mm screws.Extra-long, 37.8 mm pin headers. You can get some from Kamami: https://kamami.pl/en/goldpin-connectors/1178405-goldpin-czarny-1x40-listwa-kolkowa-pietrowa-raster-254mm.html , https://kamami.pl/en/goldpin-connectors/565044-goldpin-black-1x20-pin-header-2-54mm-pitch.html , TME: https://www.tme.eu/pl/en/katalog/signal-connectors_30/?s_field=1000011&s_order=desc&search=pin%20header&mapped_params=707:1444164; or search the usual electronic parts sources.You'll need 5 loose pins and you can pull them off the parts above fairly easily with needle nose pliers.2x7 pin header “base”.PrintingPrint both parts with PETG. I have used 0.20 mm layer height, no supports needed. Make sure that all five pin holes are clean and you're easily able to stick the pins through them.InstallationPin headerPlease follow the official Prusa how-to at https://help.prusa3d.com/guide/prusalink-and-prusa-connect-setup-for-mk3-s-_221744 to learn how to prepare the pin header and make one, paying close attention to the pin locations. The only difference is, we're using even longer, 37.8 mm pins instead of the 18 mm ones. If you're migrating from the original solution and already have the shorter pins soldered to your Pi, you'd have to carefully desolder them first. This can be tricky and you'll have to be very careful not to lift or otherwise damage the solder pads, but with a bit of patience, lots of flux, desoldering braid and/or desoldering gun, could be done successfully. If unsure, delegate this task to your electronics-tinkering friend as we don't want to ruin this precious Raspi board ;-) If all is done properly, you should end up with something like on the photos.Heatsinks (optional)You can optionally install some stick-on miniature heatsinks on Pi's SoC chip and WiFi RF can to further help in keeping thing cool, making sure you're not shorting anything out. Just please be sure to use some high quality ones as some of them tend to “unstick” or “slide down” by themselves! If you decide to use ones, check on them often initially to make sure they're not ones of that kind so they won't short anything out.BracketWe'll use the original 4 screw holes that mount EINSY RAMBO board to its plastic enclosure but we have to use the longer, M3 x 14 mm screws instead of the original M3 x 10 mm. To avoid knocking everything out of alignment, undo the screws one by one, remove the nuts on the outside and swap the screws for 14 mm ones (one by one), so the PCB sits in its proper position at all times. Then, place the bracket over the screws that stick out of the case, install the original nuts in their respective holes in the bracket and tighten the screws.Raspberry PiOnce you're done, carefully install your Pi in the bracket, being careful with the pins and make sure all 5 pins go smoothly into the Einsy board. Click the Pi in place so the four printed posts in the corners are flush withe Pi's PCB. Snap the cover on.
With this file you will be able to print Raspberry Pi Zero (2) W mount for Original Prusa i3 MK3S+ with your 3D printer. Click on the button and save the file on your computer to work, edit or customize your design. You can also find more 3D designs for printers on Raspberry Pi Zero (2) W mount for Original Prusa i3 MK3S+.
