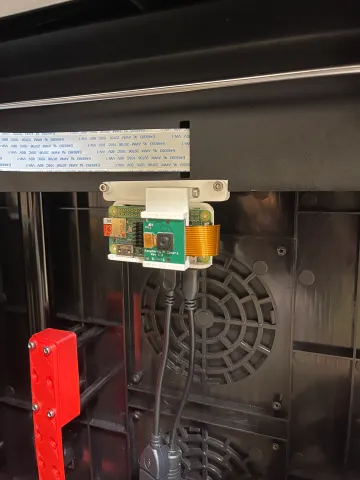
Raspberry Pi Zero 2 W Case with Gimbaled Camera with Mount for X-Max (X-Plus)
prusaprinters
Raspberry Pi Zero 2 W Case with a Gimbaled Camera with Mount for X-Max (X-Plus)This compact open case for the Raspberry Pi Zero includes a gimbaled camera mount. The case allows for mounting to a support of your own, but a support designed for the back frame rail on the Qidi X-Max (X-Plus) is included.A few 6mm and 12mm M3 Machine Screws are needed for assembly. Nuts are used for the Gimbal to Case and Case to Frame Mount, but the Camera Mount to Gimbal relies on threading into the Gimbal.Any stiff Filament will work. To help the parts fit together as designed I recommend checking flow setting using Hume Beam's flow calibration cube: https://www.printables.com/model/81314-flow-calibration-cubeI installed the Octolapse Plug-in. It requires the Slicer's start gcode to be modified (see the link below).The following links are the ones I used for setting up Octoprint on my X-MaxYouTube How ToRaspberry Pi Zero 2 W OctoPi 3D Printer Control: https://www.youtube.com/watch?v=9hj-LkIQs48Fix CBD Firmwarehttps://community.octoprint.org/t/i-cannot-successfully-print-on-my-printer-running-a-firmware-identifying-itself-only-as-cbd-make-it-or-zwlf-make-it/17481https://github.com/OctoPrint/OctoPrint-FixCBDFirmwareSlicer Start Up Code for OctoLapsehttps://github.com/FormerLurker/Octolapse/wiki/V0.4---Automatic-Slicer-Configuration#if-you-are-using-cura-follow-these-steps954 USB-to-TTL Serial Cable: https://www.amazon.com/dp/B00DJUHGHI?ref_=cm_sw_r_cp_ud_dp_AKW2GXWWQDJSGGG4TYBAInstalling the cable: https://youtu.be/2LYccJNFsnc Micro USB/Male to USB A/Female cable: https://www.raspberrypi.com/products/micro-usb-male-to-usb-a-female-cable/Raspberry Pi Zero 2 W: https://www.raspberrypi.com/products/raspberry-pi-zero-2-w/Power Supply: https://www.raspberrypi.com/products/micro-usb-power-supply/Camera Module: https://www.raspberrypi.com/products/camera-module-v2/Pi Zero Camera Cable: https://www.amazon.com/dp/B085RW9K13?ref_=cm_sw_r_cp_ud_dp_6NMSZXSXET75VN7GQ7DEMicro SD Card: https://www.amazon.com/dp/B00M55C0NS?ref_=cm_sw_r_cp_ud_dp_WM09HR3JM6Y22PQVET5SLED LightsThe specification according to Qidi for the front light strip is 24V 3W. A link to a 5 meter strip below. It has 300 lights and uses about 40W. It can be cut in six light increments. 18 lights uses about 2.5W and 300mm which fits nicely on the back frame rail.https://www.amazon.com/dp/B073QNMS5J?ref_=cm_sw_r_cp_ud_dp_XS3A9J62VZ9VT8S4PGD2Note: I added a diffuser on the front LED lights so they don't blind the camera.
With this file you will be able to print Raspberry Pi Zero 2 W Case with Gimbaled Camera with Mount for X-Max (X-Plus) with your 3D printer. Click on the button and save the file on your computer to work, edit or customize your design. You can also find more 3D designs for printers on Raspberry Pi Zero 2 W Case with Gimbaled Camera with Mount for X-Max (X-Plus).
