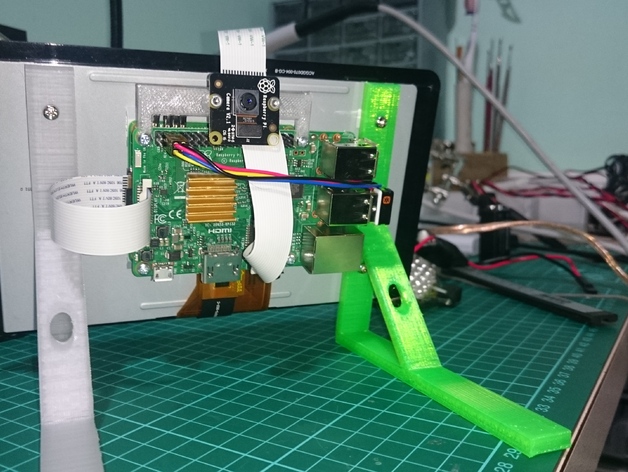
Raspberry Pi Stand + Camera Mount
thingiverse
Super simple stand + camera mount for a Raspberry Pi 3 (may work on others) and Pi Camera v2 for timelapse. Makes use of the top two screws that came with my Raspberry Pi screen, but you'll also need 2 more tiny screws for the Raspberry Pi camera (and another 2 for the gel holder). I got mine out of an old hard drive. Stands are held on with 4x M3x6 screws (2 each leg). Stand designed in Fusion360 (so no OpenSCAD for that), camera mount designed in OpenSCAD, so if one wishes to change the angle of the camera, one can do so. I printed the pi_stand.stl and there's just enough room for the official Raspberry Pi power cable under there, but with a thicker power cable you might need to use the 5 or 10mm higher version. Note: 5 and 10mm version untested in terms of stability. UPDATE Added a gel holder for the blue bit of stuff you get with a Pi Noir camera. Print Settings Printer: DIY + Mendel90 Rafts: No Supports: No Resolution: 0.25/0.3mm Infill: 15-20% Notes: You'll need 2x whichever stand option you choose for each Pi and 1x camera mount. Printed at 0.3mm layer height @ 0.54mm extrusion width for the camera mount and 0.25mm layers @ 0.45mm extrusion width for the stands. Sliced with Skeinforge. Notes n stuff Gel holder is in 2 parts. Part A and Part B (pA and pB stl's). Both parts are included in "gel holder.stl" but are available separately for whatever reason. Print in 2 halves and glue them together so a slot exists to drop the little filter down into. I used a butane soldering iron to simply melt the two halves together, but whatever you use, make sure you stick them together without the gel in there and with it off the camera. Don't want the fumes to get into the optics. First screw the camera board to the camera mounting piece with the more central holes in the board. Then screw the gel holder onto the camera board using the two outermost screw holes near the very edge of the board. Next, you can screw the mounting piece onto the Raspberry Pi up where the GPIO pins are (see photographs). Screws should miss the GPIO pins if they're small enough. I got my screws out of an old hard drive and they're pretty low profile.
With this file you will be able to print Raspberry Pi Stand + Camera Mount with your 3D printer. Click on the button and save the file on your computer to work, edit or customize your design. You can also find more 3D designs for printers on Raspberry Pi Stand + Camera Mount.
