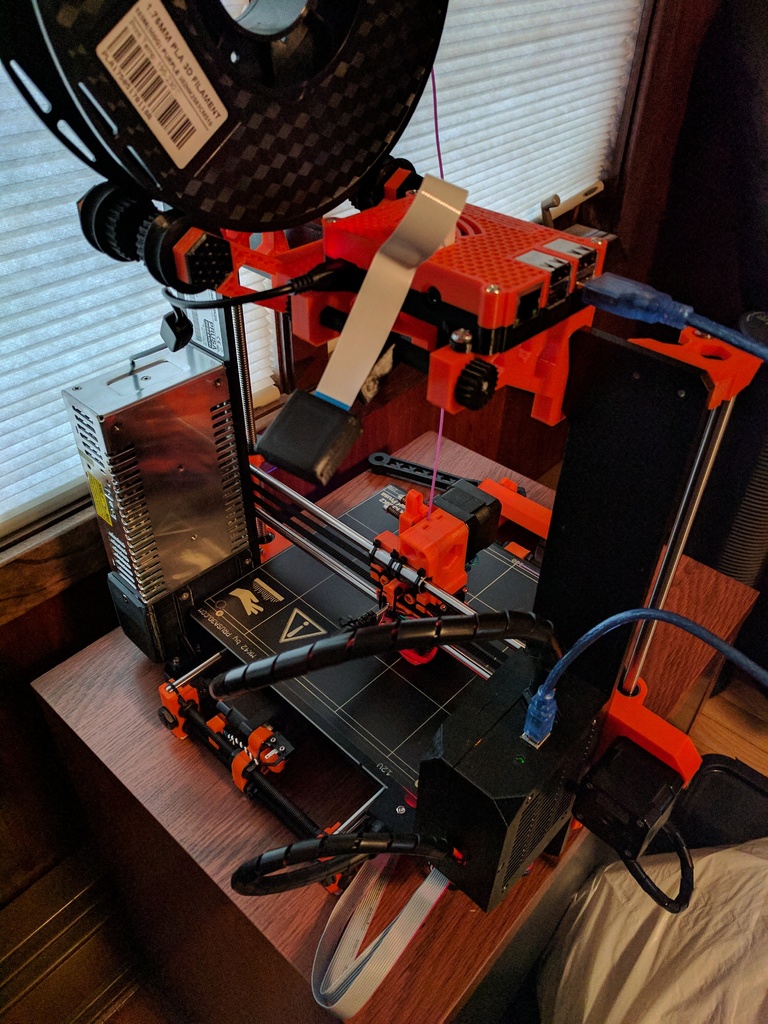
Raspberry Pi Mount for Prusa i3 Mk2
prusaprinters
<p>This is a mount for a Raspberry Pi running Octoprint for the Original Prusa I3 Mk2. Other designs I've seen have mounted the Pi down near the controller, which can get in the way of the wiring bundle.</p> <p>After being inspired by an excellent filament holder design (<a href="https://www.thingiverse.com/thing:1832235">http://www.thingiverse.com/thing:1832235</a>), I decided that's how I wanted to mount the Pi on my printer, as well. Using arms inspired by that project, and a Pi case taken from another project (<a href="https://www.thingiverse.com/thing:922740">http://www.thingiverse.com/thing:922740</a>), I merged the two into a solid, effective mount for the Pi.</p> <p>Additionally, holes in the mounting arms can be used for mounting additional hardware. Included with this design is a mounting bar and nut set that attach with a ball-joint to a Pi Camera (v2.1) mount to hold the camera below and behind the Pi -- where it can get a shot of the build surface, but is clear of moving parts.</p> <p>If you want to build alternate mounts for that mounting rod, the ball is a 7.5mm radius sphere. It fits very tightly, but the friction holds things in place.</p> <p>If you want to design your own cross-mount rods, the rod is a 4.6mm radius cylinder, with six sides, that is 85mm long, plus threads.</p> <p>Update 4/25./17 --</p> <p>I just realized the camera mounting arm I'd uploaded had asymmetric threads on it -- one end stuck out a few mm farther than the other. It doesn't impact anything but aesthetics, but I've updated the arm so they match.</p> <p>Update 4/27/2017 --</p> <p>I've also designed and uploaded an add-on for mounting LEDs for the camera. It can be seen here: <a href="https://www.thingiverse.com/thing:2278786">http://www.thingiverse.com/thing:2278786</a></p> <h3>Print Settings</h3> <p><strong>Printer Brand:</strong></p> <p>Prusa</p> <p><strong>Printer:</strong></p> <p>Prusa Mk2</p> <p><strong>Rafts:</strong></p> <p>Doesn't Matter</p> <p><strong>Supports:</strong></p> <p>Yes</p> <p><strong>Resolution:</strong></p> <p>.2mm</p> <p><strong>Infill:</strong></p> <p>20%</p> <p><strong>Notes:</strong></p> <p>Printing this is best done in multiple steps. I printed the side arms using 3 shells, 20% infill at .2mm layer resolution. You need to print two.</p> <p>The end nuts for the camera mount rod, same settings work. You also need two.</p> <p>For the camera mount rod, because of the threads and the ball joint clip, you need to print it with supports. I printed mine with ..2mm contact distance, so they peeled off relatively well. There isn't an orientation you can print it that won't require supports, so I just did it flat on its side.</p> <p>For the camera box lid, you can print without supports.</p> <p>For the camera box itself, you also need supports, as above. The box definitely looks better at a .15 resolution, but the coarser texture of the .2mm resolution helps friction in the ball joint.</p> <p>For the Pi case itself, I've included the specific files I used from the other project, however there are other versions there to fit a Pi2 vs Pi3, and there are remixes of the cover with different designs linked from it. as well. I only included them because they're the specific ones I know worked for me.</p> <p>I printed the top case with a 20% hex infill, with no tom or bottom layers, which gives the nice hex patterning in the photos. It looks cool, probably helps heat to some extent, but it isn't necessary.</p> <p>If printing a case from the other project, don't print the 100mm vesa mount case, these are for the "normal" 75mm case.</p> <h3>Post-Printing</h3> <p>Assembly should be pretty obvious. The Pi camera fits in the box, and the lid friction-fits over it. The ribbon cable comes out the top. It snaps into the cross bar (which may take some effort, but it will fit). The cross bar goes through the side arms at the angle and position of your choice. The nuts go on the ends to center it.</p> <p>The Pi case mounts to the arms using M4/40 10mm hex screws.</p> <p>The pi case itself seems to work best with 4 #4 1/4" screws to hold the board down, and 4 #4 3/4" screws to hold the case. The original thing for it, linked above, suggests some metric sizes that should work, too.</p> Category: 3D Printer Accessories
With this file you will be able to print Raspberry Pi Mount for Prusa i3 Mk2 with your 3D printer. Click on the button and save the file on your computer to work, edit or customize your design. You can also find more 3D designs for printers on Raspberry Pi Mount for Prusa i3 Mk2.
