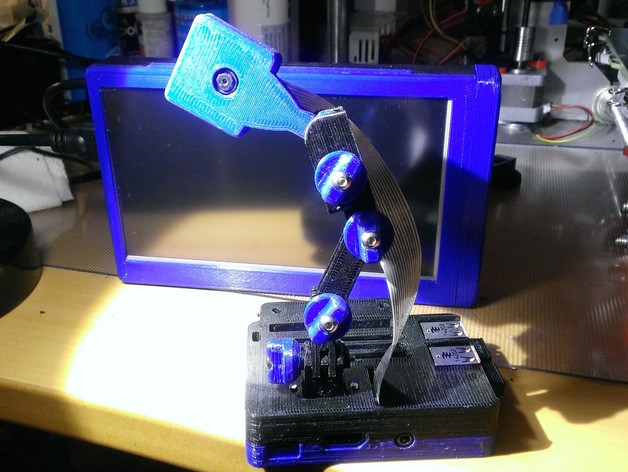
Raspberry Pi Case Camera Mount for 15mm Open Beam OB1515
thingiverse
Here is the video of a timelapse print in action using OctoPi (OctoPrint). I captured this footage with my Raspberry Pi camera set to HD, which I mounted on the print bed: https://youtu.be/1Q_HYHBMtgM. To create the same effect at home, you'll need some LED bar lights; you can build your own for under $6 with these easy-to-follow instructions:http://www.thingiverse.com/thing:1398522. I used a Raspberry Pi case that includes a camera mount and adjustable arm - just add some links to extend it as needed. The case itself features mounting holes and bosses so you can attach it directly to Open Beam OB1515 extrusion material. It's specifically designed for use with OctoPi (OctoPrint), and I recommend using the latest quad-core Raspberry Pi 2 board. Alternatively, the B+ board will also fit perfectly in this case. You can find all the details you need - including a link to download the OctoPi image, best deals on the Raspberry Pi 2, and more - at BigCooter.com:http://bigcooter.com/?p=1442. For those interested in learning how it's done, I created an LED light pipe from 1.75mm filament using a simple bending technique. All you need is some translucent plastic and a housing hole. I designed the upper case and parts with Tinkercad; feel free to edit them online at https://www.tinkercad.com/things/guyw6v1ZJTw. Similarly, I used Tinkercad to create the lower case and its components, which you can access online at https://www.tinkercad.com/things/7ZGF2xiv0pu. To print out this amazing Pi case and camera setup, use no support material, a 15% infill with PLA or ABS. You'll need to drill two threaded holes of 2.5mm diameter and tap M3 screws in them. Also, screw clearance holes should be drilled between 3.0 and 3.3mm in diameter. Important: note that the Raspberry Pi camera has a factory-set focus distance not optimized for this particular application. To achieve better macro shots, simply turn the camera lens about one-third to three-quarters of a turn counter-clockwise (CCW). Keep in mind that these lenses are fixed by glue at the factory, but with careful manipulation using a magnifying glass and an exacto knife or quality needle nose pliers you should be able to shift them successfully - exercise caution when doing so. Optional: if you'd like, mount the camera directly onto your print bed, whether that's on a separate Raspberry Pi case or connected via cable; take a look at some example photos for ideas! Here is an amazing timelapse of lower-case parts printing using OctoPi Timelapse, along with the camera refocused (1/3 turn CCW):https://youtu.be/OnvyQCy9Brc. Pi case: I found the initial idea in http://www.thingiverse.com/thing:465678, which was great but not perfectly to my specifications - therefore, it's now Remixed into a much better Pi enclosure, including some really valuable design elements that I just can't recommend highly enough. I also created this camera case from scratch as part of the Raspberry Pi camera setup for OctoPrint; I remixed this design too (check out:http://www.thingiverse.com/thing:247590).
With this file you will be able to print Raspberry Pi Case Camera Mount for 15mm Open Beam OB1515 with your 3D printer. Click on the button and save the file on your computer to work, edit or customize your design. You can also find more 3D designs for printers on Raspberry Pi Case Camera Mount for 15mm Open Beam OB1515.
