Raspberry Pi 3 A+ case, with holder for Ultimaker 2/2+
thingiverse
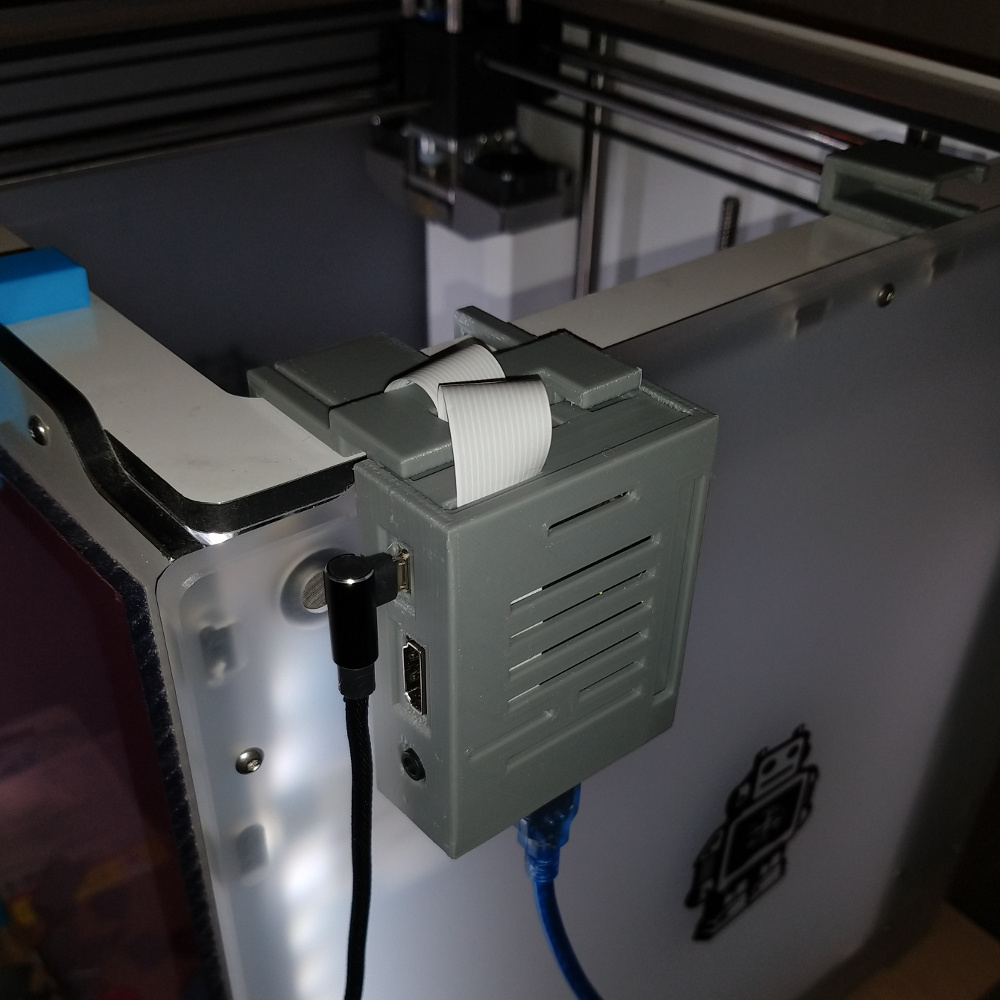
I needed a custom case and holder for my Octoprint server. Since no pre-made solutions existed for the Raspberry Pi 3A+, I designed one from scratch. The case and holder snap together easily, with no screws or tools required for assembly or disassembly. However, the case might fit too tightly to the holder, so a flathead screwdriver may be necessary to bend open the mechanism and remove it. The holder securely hangs over the top of the UM2 chassis, making removal easy. Two cable guides help route the camera cable around the inside edge of the chassis and behind the belts and rods. If you prefer to place it between the arms of the case holder like I did, use cam_cable_holder_2; otherwise, use cam_cable_holder_1. As a camera holder, I recommend this design: https://www.thingiverse.com/thing:3910671. To use it, you'll need a longer camera cable, such as this one: https://www.aliexpress.com/item/32895011936.html from aliexpress.com. A 50 cm cable works well for me, with about 20 cm tucked away between the case and the outside of the UM2 chassis. A 30 cm cable should be sufficient. For mounting the camera holder inside the chassis, I used Tesa Powerstrips: https://www.tesa.com/en/consumer/mounting-hanging-sms/adhesive-strip-powerstrips. These are easily removable double-sided tapes that don't look pretty from inside the printer, but they're convenient for finding the best camera position. You could also use 3M Command strips like these: https://www.command.com/3M/en_US/command/products/~/Command-Small-Refill-Strips/?N=5924736+3294529207+3294736527. Another great camera holder is this design: https://www.thingiverse.com/thing:3816440. The camera sits on the top near a corner, and you can use the stock camera cable that comes with Raspberry Pi cameras (15 cm). However, I prefer the view from inside the chassis, so I use the other camera holder mentioned above. I use a 150-degree wide-angle camera obtained from aliexpress: https://www.aliexpress.com/item/32726563700.html. The field of view on stock Raspberry Pi cameras is too narrow for my taste, but your experience may vary. This camera works well with both inside and top mounting solutions described above. The FreeCad files are included so you can easily improve the design or make adaptations and remixes. This is my first design, and I'm sure I've made some rookie mistakes in the design or how I used FreeCad, so please be kind.
With this file you will be able to print Raspberry Pi 3 A+ case, with holder for Ultimaker 2/2+ with your 3D printer. Click on the button and save the file on your computer to work, edit or customize your design. You can also find more 3D designs for printers on Raspberry Pi 3 A+ case, with holder for Ultimaker 2/2+.