Raspberry IR-Camera
thingiverse
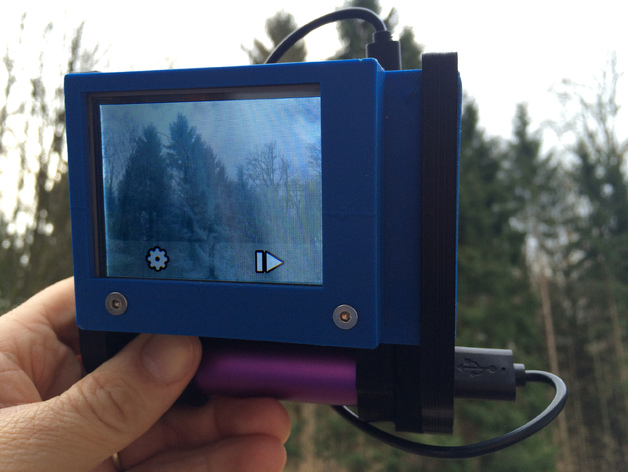
A year ago, I stumbled upon an intriguing project that caught my eye - building an infrared camera with a Raspberry Pi (Raspberry Pi Geek 01/2015). Although I had different components, particularly another display, I was determined to make it work. When I acquired a 3D printer later, I saw the opportunity to create a nice housing as well. At that time, my ir-cam was assembled in an old cigar box;). But then I discovered the excellent "Raspberry Pi portable case" - http://www.thingiverse.com/thing:703638. I had a Raspberry B+ and the watterott touch display installed, so I needed to modify the lid of the portable case to suit my needs. Furthermore, I had to adjust it in such a way that I could attach (glue) the step-up-ring to the box in front of the cam and use the whole thing more like a normal camera. Before we dive into the details, some information about IR photography: A normal digital camera has an ir-filter installed with the sensor. This filter removes the light above the visual spectrum from the photos, making the colors look natural. But you all know those night-cams that work with some IR LEDs and - to humans - invisible light. Those cameras - and the NoIR camera module for the Raspberry - don't have that filter installed. So the ir-light, also part of the natural light, reaches the sensor as well. This results in slightly "false" colors. To get the full effect, you now have to keep most of the visual light out. Therefore, you need to obtain an IR-filter that works the other way round than the one described before. Now a lot of color is gone and - as most noticeable - the green of leaves and grass appears white now because the chlorophyll reflects most of the IR-light. With a camera like that, you can take pictures with an unreal but fascinating look. Have a look at webpages that deal with infrared photography to get further tips - especially for postprocessing. WHAT YOU NEED HARDWARE Raspberry PI (B+ or PI2 - other Box models here: http://www.thingiverse.com/thing:703638) Pi NoIR-Cam-Module SDHC Card Touch-Display (http://www.watterott.com/de/RPi-Display-B-Plus or from adafruit - other Box models*) GPO Adapter (Cable) for the display (http://www.watterott.com/de/GPIO-Adapter-fuer-das-RPi-Display-BPlus - or equivalent for other displays) Battery (22 mm diameter, for other dimensions*) USB Cable Step-up rings (fitting to the size of your filter - to 52 mm here) IR-filter (IR 720 from Polaroid or Delamax) W-LAN-Stick (optional) Some screws I provided some links for your convenience - as mentioned, you will find those things at other sources too. For a different type of Raspberry, display, or battery with another size, have a look at the files that come with the original case: http://www.thingiverse.com SOFTWARE For the watterott-Display there is a SD-Image with preinstalled drivers, which I recommend (https://github.com/watterott/RPi-Display) PiCam (Instructions on how to build a Raspberry touch-camera can be found in the mentioned magazine or here: https://learn.adafruit.com/diy-wifi-raspberry-pi-touch-cam) Instructions: Print the housing, glue the step-up-ring to the cam-holder. I used two-component adhesive. When hardened, attach the camera to the holder and screw it to the back of the case. Next mount the Raspberry within the case, again with some screws. Assemble the rest as shown in the picture. Screw the filter to the step-up-ring... TIPP: Use a W-LAN-Stick to connect the Pi to your home net. With Samba activated, you can get the pictures easily to your computer for postprocessing.
With this file you will be able to print Raspberry IR-Camera with your 3D printer. Click on the button and save the file on your computer to work, edit or customize your design. You can also find more 3D designs for printers on Raspberry IR-Camera.