RainbowLamp
prusaprinters
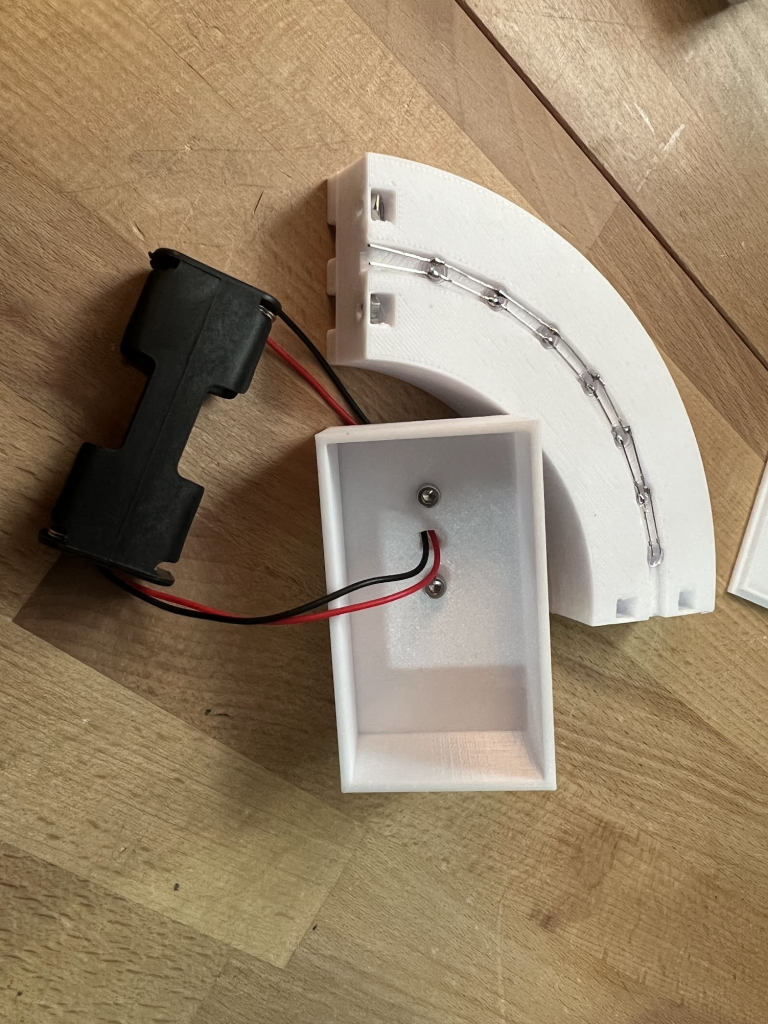
<h3>RainbowLamp</h3><p>3D model for a RGB color changing LED lamp. <img src="https://github.com/SuperIlu/RainbowLamp/raw/main/doc/two_lamps.jpg" alt="two lamps"></p><p> </p><p>3D model</p><p>The 3D model was created using <a href="https://www.rs-online.com/designspark/mechanical-software">DesignSpark Mechanical</a>. The source files as well as STLs are included. You need to print one of each piece:</p><ul><li><strong>v2_rbl04</strong>: the lamp arc</li><li><strong>v2_box03</strong>: the base and battery holder</li><li><strong>v2_bottom02</strong>: a lid for the battery holder (in my print it stays on just with press fit)</li></ul><h3> </h3><h3>Printing Parameters</h3><p>I printed my version with white SuperPLA (215C nozzle, 70C bed), 20% infill, brim active and supports everywhere. The surface orientation was as shown below. <img src="https://github.com/SuperIlu/RainbowLamp/raw/main/doc/print_param.png" alt="prusa slicer screenshot"></p><p> </p><p>Other parts</p><p>You will also need:</p><ul><li>7 RBG color changing LEDs (I used LEDs from <a href="https://shop.blinkyparts.com/en/detail/76374904542142cbb9d4bba147246f99">blinkyparts</a>)</li><li>A battery holder (I used a double AA one as shown below)</li><li>2x M3x6mm screws</li><li>2x M3 nuts</li></ul><h3> </h3><h3>Assembly</h3><p><img src="https://github.com/SuperIlu/RainbowLamp/raw/main/doc/assembly.jpg" alt="picture of a partly assembled lamp"></p><p>The arc can be attached to the base on both ends. This way you can e.g. form a half circle or use an arc on both ends of a bookshelf.</p><ul><li>clean the printed parts (I used a knife and a small screwdriver)</li><li>put in the LEDs with the longer wire on the outside of the arc</li><li>start bending the wires from the farthest LED in the direction of the end where you want to attach the base</li><li>repeat for all LEDs</li><li>the wires should be barely long enough to build up a solder chain as shown on the picture</li><li>shorten the wires of the LED at the base ~5mm</li><li>puth the wires of the battery holder through the middle hole in the base</li><li>solder the red wire to the LED wire on the outside of the arc</li><li>solder the black wire to the LED in the inside of the arc</li><li>puth the nuts into the holes in the arc and attach the base with the M3x6 screws</li><li>put in some AA cells to test if everything works</li><li>optional: put some hot glue on the back pf the LEDs to make sure that stay in place (please ignore the butchering in my picture, my gun failed)</li></ul><p><img src="https://github.com/SuperIlu/RainbowLamp/raw/main/doc/assembled_glued.jpg" alt="picture of a partly assembled lamp"></p><h3> </h3><h3>License</h3><p>The contents of this repository is licensed under <a href="https://creativecommons.org/licenses/by-sa/4.0/">CC BY-SA 4.0</a>, see LICENSE.md for details. <img src="https://camo.githubusercontent.com/0df8fd3e955d97ae69dedfa2568fb2dd4186cd60917ca40aefabb7466d5b46ce/68747470733a2f2f692e6372656174697665636f6d6d6f6e732e6f72672f6c2f62792d73612f342e302f38387833312e706e67" alt="Creative Commons License"></p><h3> </h3><h3>Contact</h3><p>You can find me on <a href="https://twitter.com/dec_hl">Twitter</a> if you want...</p>
With this file you will be able to print RainbowLamp with your 3D printer. Click on the button and save the file on your computer to work, edit or customize your design. You can also find more 3D designs for printers on RainbowLamp.