Rain Barrel Drain with Grate
prusaprinters
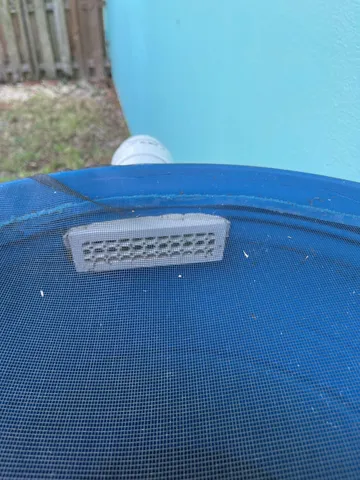
What is this thing?Introducing the greatest way to maintain the water level in your own rain barrel.This drain was designed around the common blue 55 gallon plastic drum, often found sealed and without a lid. The rain barrel is made by removing the top of the drum to allow for rain collection and a spigot is added at the bottom to allow for using the collected water. There are plenty of tutorials and pictures online for this stuff, so I won't cover it here.But what happens when it rains so much and your barrel fills up before you can use the rain water its collected?You need a drain. And this great drain is the drain that you need.Where to install it…Place the internal grate part as high as possible. The external piece is designed to fit within a 3" PVC 90* elbow. A section of 3" PVC sewer pipe is a direct fit into an adapter for common black corrugated drainage pipes and fits the 90* elbow. All of these items can be found at your local hardware store. Examples of extra stuff you'll need to make this work:Example Adapter for Corrugated Pipe (not part of the 3d printed parts):Example of Corrugate Pipe (not part of the 3d printed parts):The printed pieces are designed to allow for easy flow and will allow for the same volumetric flow as the 3" PVC.How to install the parts:Use the *_outer_cover to locate and mark the place that the drain will mount. Mark the cut out and create the cutout in the barrel. You can use just about anything to make the cut out. A saw. A razor blade. A dremel tool. You're cutting in plastic… its not that hard.From the inside of the barrel, insert the *_inner_grate thru the cutout so that the grate is on the inside of the barrel. Check fitment and adjust cutout as needed. To ensure the cutout is water tight, seal the *inner_grate in place using silicon caulking (or any other sealing product of your choice). On the outside, fit the *outer_cover over the *inner_grate and use some caulking to secure it to the barrel as well. The *outer_cover will help to support the drain.Now the *pipe_connector can be slid over the *inner_grate piece. No sealing is required here, but feel free to make it a permanent install if you wish.Connecting the other pieces…Now that the drain is installed on the barrel, the drainage system can be connected. Use a 90* fitting to direct the flow where it needs to go.For my install, I directed it down via a 3" pipe into a 4" corrugated pipe drain that was buried and routed to the street with a pop up emitter to allow the water for flow away from the house. Printing suggestions:Recommend that these parts be printed in PetG/ASA or some other filament that can withstand the weather.Infill is not critical here as most of the parts are fairly thin. Number of walls (perimeters) is more important to ensure water tightness (I used 4 walls and random seams). No supports are necessary.I designed the parts in inches because, America, so you may need to scale the parts in your slicer.I have included a step file for each part so you can take it and modify it for you particular needs.Make it bigger!Make it smaller!Change the grate pattern!Whatever you want to do!The possibilities are endless!Why is this so important and awesome?Collecting rain water is a great way to reduce your dependency on your local water supply. The rain is falling, and your roof is diverting hundreds of gallons of it away and into the sewer system when your yard can absorb it all. Why not collect it and hang on to it for that dry spell? Just a suggestion, it is important to keep the water clean. So drain the barrel at least once a month to reduce the chance for algae to grow. Water your lawn. Water your garden. Wash your car.
With this file you will be able to print Rain Barrel Drain with Grate with your 3D printer. Click on the button and save the file on your computer to work, edit or customize your design. You can also find more 3D designs for printers on Rain Barrel Drain with Grate.