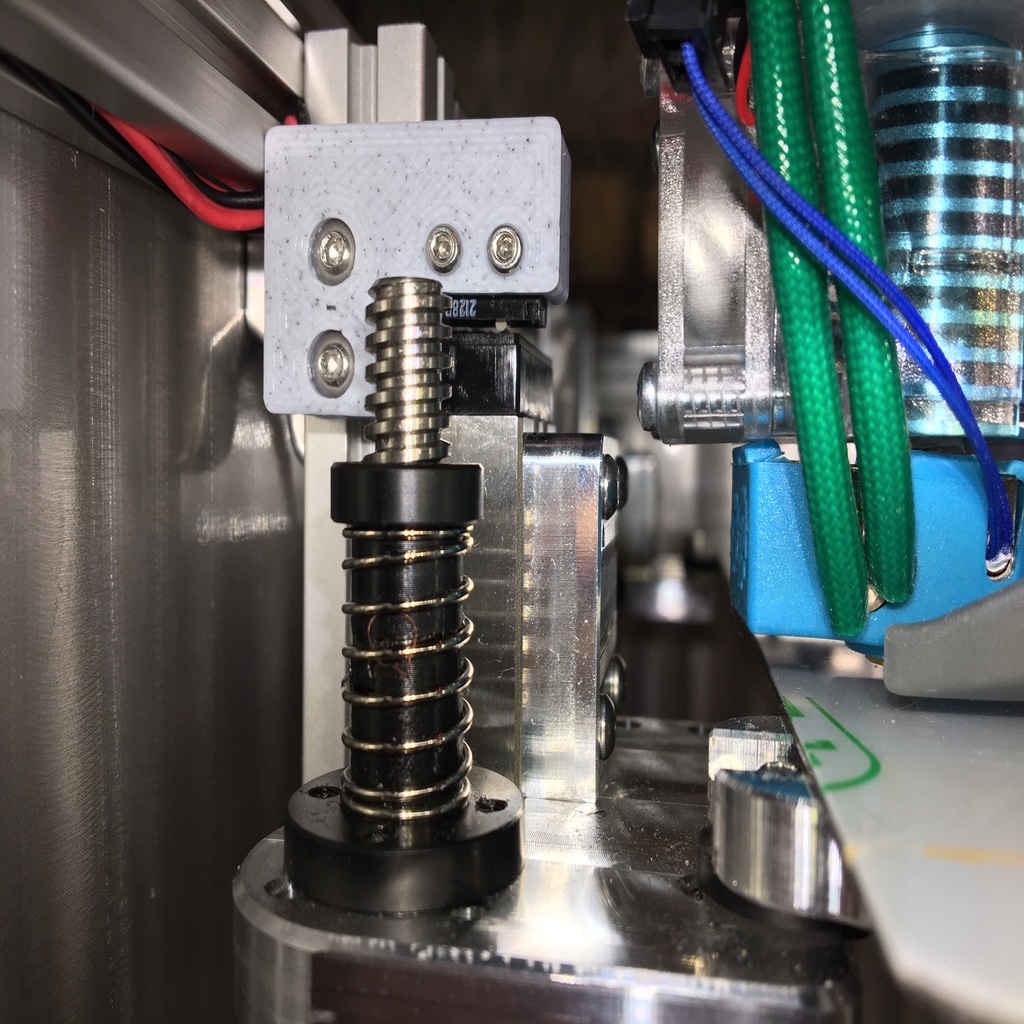
Railcore Anti-Crash Z-stops (RACZ)
prusaprinters
<p>These safety Z-endstops for the Railcore 300ZL trigger an emergency stop when the bed goes higher than it's supposed to (also known as a crash). These switches will stop all motion, acting faster than you can, and will help prevent damage during a crash, such as jamming the bed into your nozzle, cracking your anti-backlash nuts, bending/breaking your titanium heatbreak, etc. (all of which have happened to me before I installed these). Depending on where you set the switches to trigger, you may still get a little scratch on your build surface, but hopefully won't have to replace any parts! Be sure to place them so they won't trigger during normal operation -- this will take some experimentation. The Railcore will not even operate if any of the 3 switches are tripped, so it will be obvious. This mod is highly recommended for probes using a normally open configuration, as crashes would be more likely (e.g. Piezo, BLTouch).</p> <p>Wire the switches as NC (normally closed). You can wire all three in series and hook up to one spare endstop (say E0 or E1 on the Duet, or E2, E3, E4, E5, or E6 on the Duex) which is the method recommended by dc42 on the <a href="https://forum.duet3d.com/topic/7478/emergency-stop-end-stops-how-to/4">Duet forum</a>. I put mine on E2. Alternatively, you can wire each one separately to its own endstop, which should still work. Wire them the same as your X and Y endstops, plugging into the Duet or Duex connecting the outer 2 pins of the 3. Nothing should be connected to the middle pin on the board, or on the switches if you use the same ones from the Railcore BOM listed below.</p> <p>There are 3 files. One for each Z-extrusion including one for those who have flipped their Z-axis assembly on the right like I have. The mounts are designed to keep the wires sequestered so they can be routed through the extrusions without potentially causing problems by being out in the open.</p> <p>The flipped axis mount is particularly tricky since it must clear below the part cooling fan to preserve the gain in X printing space afforded by flipping the Z-assembly (see picture). I recommend soldering the wires on either side of the leads so the wires remain out of the way of each other. I also clipped the center lead from the switch to avoid an erroneous trigger. If you haven't flipped your Z-assembly on the right, then you can mirror the file for the front left switch in your slicer.</p> <p>Mount the parts to the Z extrusions with M3 12mm button head bolts (counter sunk because most people will have a few 12mm laying around, but not likely to have 14mm). Use M2 12mm bolts and nuts to mount the switches.</p> <p>Here's some sample code that you would put in your config-user.g file. See the g-code manual for details on M581. This would invoke trigger 0 (i.e. M112) when a rising edge is detected on the E1 endstop input:</p> <p>M581 E1 S1 T0</p> <p>To install, home and tram your bed (G32 three times). With the printer off, bring the extruder assembly as close to the Z-tower you're tuning and manually turn the Z-stepper until the nozzle touches the bed. Adjust the level of the switch assembly until it makes contact or a little higher (see proper positioning picture above). If you want, you can raise the bed a little more to see how far you have to press on the nozzle until the switch actuates. If you're uncomfortable with how far you're going, adjust the switch closer. Return the stepper to its original position (you may want to put a little mark at the coupler so you know where it was). Do this for each Z-tower. Then, turn the printer on and home. You should be set. If you trip a switch during homing at this point, first try manually lowering the stepper at that switch until it doesn't trip, then re-home. If it still hits, raise the switch a little. If you are installing these as part of your build and can't home or level yet, just use a torpedo level to get your bed close. Once you are done with your build, you will probably need to adjust the height of the switches.</p> <p>A shortcut method I like to use is:</p> <ol> <li><p>get your bed level with G32 a few times</p> </li> <li><p>home</p> </li> <li><p>move to Z=0 with the nozzle where you left it for homing (at/near the middle of the bed)</p> </li> <li><p>adjust each enstop so that the microswitch is just touching its respective rail carriage</p> </li> </ol> <p><em>note: this method is tricky because if you accidentally trip one of the endstops, it will emergency reset your printer while your nozzle is touching the bed, so you will need to lower the bed by turning the leadscrews by hand and start over. If you don't, your BLTouch will not deploy properly on restart and trigger an error until you get the bed lower</em></p> <p>Parts you will need:</p> <p>M3 12 mm button head or socket head bolts and nuts (6 each)</p> <p>M2 12 mm socket head bolts and nuts (6 each) <a href="https://www.mouser.com/ProductDetail/Omron-Electronics/D2F-01F?qs=0w99tykdtPLhoVh2lktm%252bQ%3D%3D">Omron D2F-O1F microswitches</a> (3) same ones from the BOM</p> <p>wire (I used 22 gauge red/black paired wire)</p> <p>Duet <a href="https://www.filastruder.com/products/duet-connector-kit-1?_pos=2&_sid=3539a8379&_ss=r">connectors</a></p> <p>Also recommended to reduce the possibility of damage is to lower your amperage on your Z-steppers in homez.g, and homeall.g. I use 400 mA and it seems to work fine.</p> Category: 3D Printer Parts
With this file you will be able to print Railcore Anti-Crash Z-stops (RACZ) with your 3D printer. Click on the button and save the file on your computer to work, edit or customize your design. You can also find more 3D designs for printers on Railcore Anti-Crash Z-stops (RACZ).
