Rail mount and frame for flexible solar panel
prusaprinters
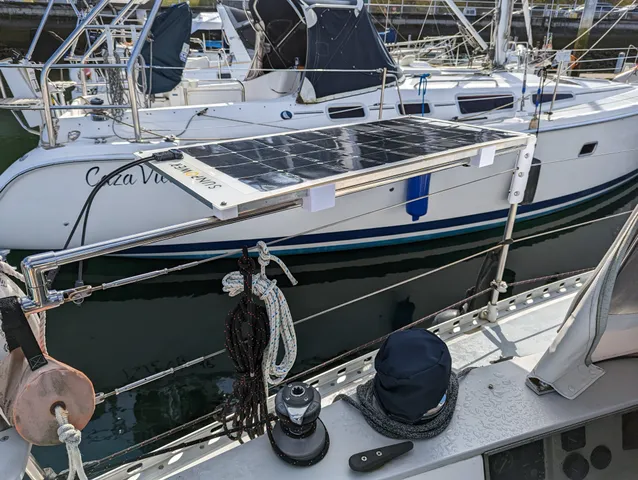
This is a project for mounting a flexible solar panel on a boat, using an existing or new 1" stainless tube that is part of or added on to the boat's lifelines and stanchions. There are three main parts to this project:Corner pieces with slots for captive square nuts to form a rectangular frame for a flexible solar panel using ¾" aluminum square tubingMounting clamps that are secured to the frame and mount it on a 1" circular tube railA piece to attach to an existing stanchion to facilitate adding a new 1" stainless tube section above existing lifelines. You may not need this, and it is designed to fit the tapered stanchions on a Wauquiez Pretorien sailboat.This was designed for mounting a Sun Power 110 watt flexible solar panel. It can be adapted for other panels by using different lengths of ¾" aluminum square tubing.The square tubing for my project was purchased at Home Depot, and all the fasteners and knobs were purchased from McMaster Carr.Print the corner pieces with a thin slab of support enforcer covering the entire part, and small 3mm x 3mm x 25mm support enforcers as shown in the photo:The mounting clamps can print on their sides with no supports.I printed everything in PETG with a 0.60mm nozzle. I used four perimeter shells. Support settings were loosened to facilitate removal using PETG: 0.3mm top contact Z distance, 3mm pattern spacing, 1 top and bottom interface layer, and 95% XY separation.The stanchion extender for adding a new 1" stainless tube was printed with supports everywhere. These parts are different for starboard vs. port sides. The lifeline takes a slight 10 - 15 degree turn at the stanchion, which is mirrored on opposing sides of the boat.The mounting clamps hold the panel tight enough that it does not require a support strut to hold it horizontal, but you will need to secure the 1" stainless tube so that it cannot rotate. There is a slight gap between the two parts of the mounting clamp on the parts that are squeezed together by the tightening bolt so that it will clamp tightly.On the Wauquiez Pretorien, I was able to accommodate the new 1" stainless tube at the aft end by adding a tee fitting, a short 5.5 cm piece of tubing, and a 90 degree elbow. I drilled a small divot in the tubing to seat the set screw in the elbow so the tubing will not rotate.Fasteners are 6/32 screws and square nuts for the corner pieces, ¼" 20 screws for the panel grommets and mounting clamps, and 5/16" studs with knobs and square nuts, all in stainless steel. Nylock nuts were used where it attaches through the solar panel grommets as well as on the stanchion mount/extender.There is a drill guide for marking the spots to drill in the aluminum tubing for the corner pieces. The mounting clamps are attached by drilling and tapping holes in the frame for ¼" 20 screws.Stainless and aluminum react to one another, so if you care about disassembly after much use, you may want to use Tef-Gel on the threads to prevent corrosion and isolate screw heads using nylon washers. I didn't bother.This is not yet tested at sea or fully installed with wiring. I expect I will make small design changes. For example, if it rattles with the motor running I may need to secure it with some shock cord. And I am not sure exactly how well it will maintain a horizontal position: I may need to add a third rail mount clamp, or make the two in use wider so they have a greater bearing surface to clamp more tightly.UPDATE: I updated the corner.3mf and project files (f3d and step) to reflect a change I made to the corner frame piece. It was just too tight, especially given variations in the ¾" aluminum square tubing. It is 0.2mm smaller in the width and height of the piece that fits in the aluminum tubing. I also made the holes to go through the solar panel corner grommets larger, to give some wiggle room during assembly. I found one of my frames was just a little too narrow, causing the panel to have a slight buckle on assembly. I am hoping the larger holes will accommodate some of this tightness. One additional tip is to be sure to get all of the support material off the corner pieces, including the interface layer. I use a file to get the interface layer off, and some scraping with a utility knife.
With this file you will be able to print Rail mount and frame for flexible solar panel with your 3D printer. Click on the button and save the file on your computer to work, edit or customize your design. You can also find more 3D designs for printers on Rail mount and frame for flexible solar panel.