RAGE! Foam Dart Blaster
thingiverse
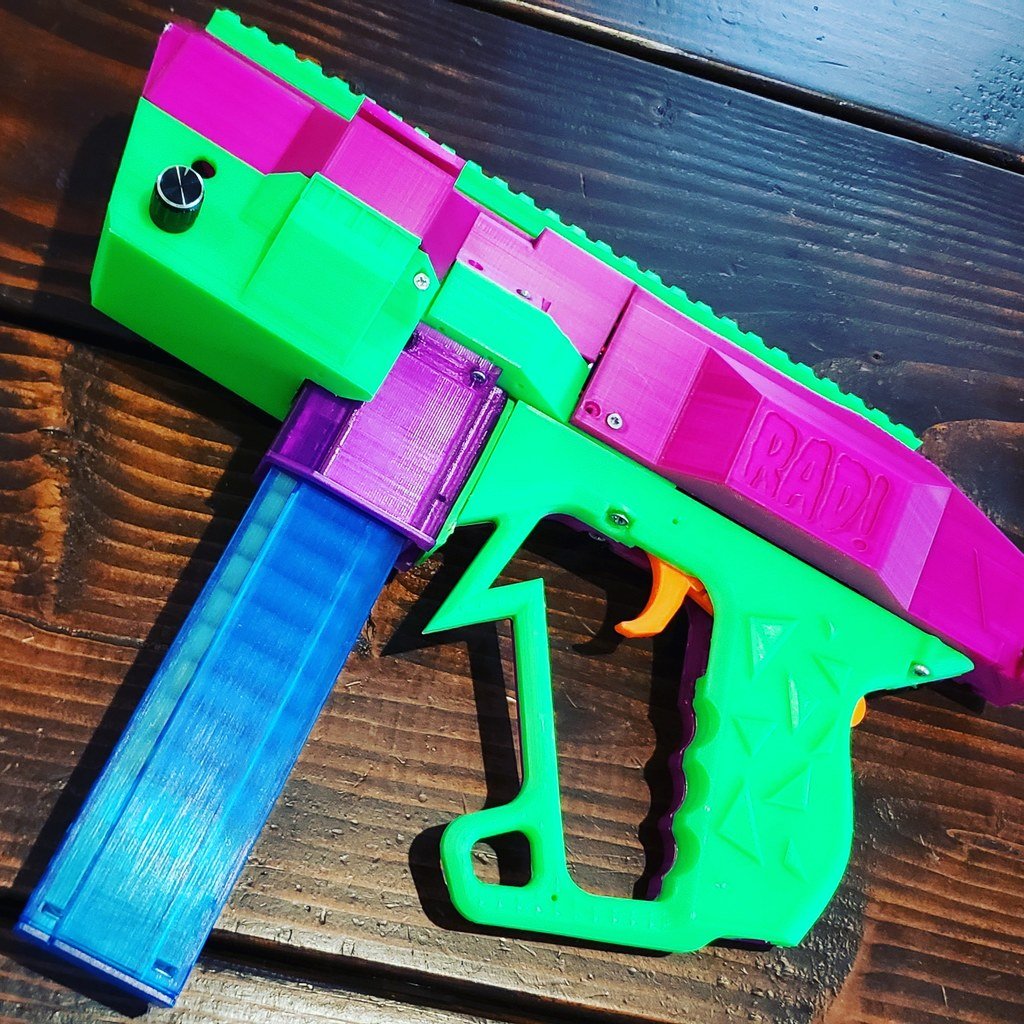
This is RAGE! A Foam blaster designed for short dart (Talon) systems. The key feature of this design is the fact that it uses a smaller solenoid than most other solenoid builds. I designed this around a solenoid that's about half the size of the 35mm ones that are currently popular, but it functions exactly as needed at only 15mm stroke. You can get the hardware directly from my Etsy shop: https://www.etsy.com/shop/RadBlasters/ Other than that feature, this is basically a primary blaster designed with competitive Nerf in mind. Fully built, this can reach 150-160 FPS on 2x Fang Revamped motors with Inferno Wheels...and it can be select fire too! Here's a guide for every part and how I currently print them: Front Receiver - I print it as it sits on the blaster. I add enough support to ensure I can get good bridging underneath. It can print upside down too. The less support the better, as this is a very visible piece. Print at your desired resolution with 4 perimeters and at least 40% infill. Don't print faster than 50mm/s. Rear Receiver - same as the front. Grips - I print flat, so you will need support. Print with 4 perimeters and 20% infill. Front lower housing - print just as it sits on the blaster. You can get away with no supports with 4 perimeters and 20% infill. Brace - this is a critical component as most of the blaster bolts to it. Print as it sits on the blaster with supports touching buildplate. Make sure the supports remove clean in the motor section so the motors sit flush. 4 perimeters and at least 50% infill. Magwell - This will likely print fine for you with no supports. 4 perimeters and 20% infill. Dart Guide - this is the triangle piece. The intention is to epoxy on the solenoid, centered just below the plunger rod. This guides the next dart in line forward so that it clears the rod on its way up. You may need to trim the top edge back to get the right angle for your darts. If you don't use this part, you may have issues with darts dragging on the rod, so I highly suggest adding it. Pusher cap - flat point down. Everything else can be printed without support. As far as assembly is concerned, it's all pretty self-explanatory when you see the models, but here are a few tricks: Use as little wire as possible, but make sure you use good wire. The wires run from the grip and back, across the side of the solenoid. When soldering motor wires, make sure you have slack in the wire between each. The motors may torque a bit under rev, so you don't want tight wires. Don't be scared to hot glue around the motors and solder joints to help them from moving. If you're going to install the Suild select fire board, make sure your wiring is very tidy. You'll then run the POTs to the dedicated holes in the front housing. On-off and select-fire switches go on the other side. You won't have to do any of this if you're running it as semi-auto. I'm going to add plugs to cover the POT holes eventually. The Rev switch is designed to slide over the tab of a 15/21a microswitch. You can either glue it in place or put a slight bend in the Tab so the rev switch stays on. Trigger - basically floats between the two sides of the grip, so you can run one long screw from one side or a short screw from both sides to give it a pivot. Use a screw with a smaller OD than the trigger's ID. Front Muzzle - Turn it so the angle of the face is touching the buildplate and then use supports. Rails - You'll want 4 perimeters and 50% infill on the top rail. Bottom rail is okay to print with less infill, but you'll know better than me what you plan on doing with the rails! Keep track of everything rad on my Instagram and @ me with your builds! https://www.instagram.com/radblasters/
With this file you will be able to print RAGE! Foam Dart Blaster with your 3D printer. Click on the button and save the file on your computer to work, edit or customize your design. You can also find more 3D designs for printers on RAGE! Foam Dart Blaster.