Rackmount ELV Charly Homematic CCU
prusaprinters
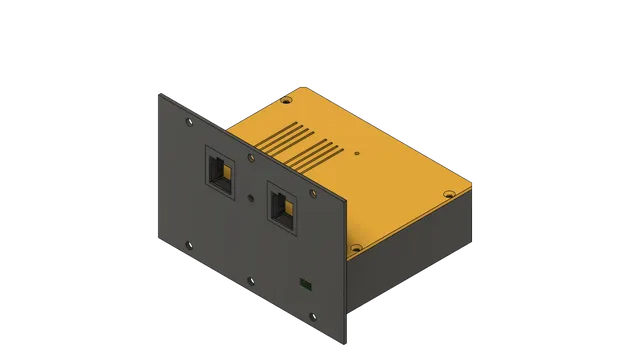
for english description see below.Deutsch19 Zoll Gehäuse für ELV Charly. Was ist ELV Charly?ELV Charly ist ein Raspberry Pi (3B) kombiniert mit einem Homematic Funk-Modul RPI-RF-MOD (die selbe Hardware wie in einer Homematic CCU3). ELV bietet dafür auch passende Gehäuse an, die aber selbstverständlch nicht rackmount-fähig sind. Anschlüsse Original-GehäuseVorderseiteLED-Lichtleiter, der sowohl die grüne als auch rote Status-LED des Raspberry Pi signalisiert.SD-Karten-SlotRückseiteRJ45 LAN-Port1 USB-Port5.5 / 2.1 mm Hohlbuchse Strom-Anschluss (5V DC)DeckelStatus RGB-LED RPI-RF-MOD19 Zoll Montage: Anforderungen und UmsetzungDie Anforderung an die 19 Zoll Montage sind:StabilitätLAN-Buchse in der FrontUSB in der FrontLEDs in der Frontaufgeräumtes DesignStabilitätDamit die Konstruktion stabil bleibt, wollte ich einen 19" Metall-Rahmen, in den ich dann diverse 3D-gedruckte Module integrieren kann. Entschieden habe ich mich für DAP 2 HE Rackblende f. Modulsystem 10 Segmente MP-1. Der Rahmen hat 2 HE und lässt sich in 10 Segmente unterteilen. Mein Modul für Charly benötigt 3 Segmente. Zu dem Rahmen gibt es auch passende Abdeck-Blenden aus Metall.Eine Auswahl weiterer Anwendungen, die auf diesen Rahmen setzten, habe ich in dieser Kollektion zusammengefasst.AnschlüsseAn der Gehäuse-Rückseite werden alle rückseitigen Anschlüsse des Raspberry Pi und des Funkmoduls herausgeführt:1x RJ45 GBit LAN4x USB-A1x 5.5 / 2.1 mm Hohlbuchse 5V EingangAn der Blende sind Aufnahmen für 2 Keystone-Module integriert. Mit den passenden Keystone-Modulen lassen sich der LAN-Port sowie ein USB-Port nach vorne herausführen.RJ45USB-ALEDsDie LEDs sind an der Front-Blende herausgeführt:Die Status-LEDs des Raspberry Pi verwenden den originalen Lichtleiter des Charly-Gehäuses. Dieser wird in die passende Aufnahme meines Gehäuses eingesetzt.Die Status LED des RPI-RF-MOD muss über einen Lichtleiter am Gehäuse-Deckel aufgenommen an die Frontblende geführt werden.Entsprechendes MAterial kann z.B. bei Conrad bezogen werden:Bestell-Nr.: 183638 - 62Bestell-Nr.: 1571475 - 62Im Gehäuse-Deckel ist exakt über der LED eine Aufnahme, in die sich der Lichtleiter einführen lässt und somit exakt positioniert ist. Außerhalb des Deckels wird der Lichtleiter um 90° gebogen und nach vorne zur Blende geführt. Dort wird er in die entsprechende Aufnahme eingeführt.MontageDas Modell ist für den 3D-Druck optimiert und besteht aus drei Teilen:Front-Blende mit massiven Aufnahme-Streben (schwarz) fürs eigentliche GehäuseGehäuse-Boden (orange), wird in die Streben eingeschobenGehäuse-Deckel (orange), wird von oben mit den Streben verschraubt und sichert gleichzeitig den Gehäuse Boden.Für die Befestigung des Gehäuse-Deckels empfehlen sich kleine Senkkoopf-Holzschrauben mit 2,5 bis 3,0mm Durchmesser und 10-12mm Länge.Den Lichtleiter des Charly-Gehäuses in die dafür vorgesehen Aufnahme des Gehäuse-Bodens einsetzen.Raspberry Pi in Gehäuse-Boden einsetzen und mit 2 Schrauben fixieren.RPI-RF-MOD auf den Raspberry PI aufstecken und mit 1 Schraube fixierenDen Gehäuse-Boden in die Führungsnuten der Frontblende-Streben einführen und nach vorne schieben. Dabei ist darauf zu achten, dass der Lichtleiter im Gehäuse-Boden in die entsprechende Aussparung an der Frontblende gleitet.Gehäuse-Deckel aufsetzen und mit zwei Schrauben fixieren.Lichtleiter-Aufnahme für 2mm Lichtleiter von vorne in Frontblende einclipsen.2mm Lichtleiter von oben in den Gehäuse-Deckel bis auf Anschlag einführen und wieder eine Winzigkeit zurückziehen, damit der Lichtleiter nicht direkt auf der LED aufsitzt.Den Lichtleiter entsprechend einkürzen, um 90° biegen und in die Aufnahme an der Frontblende einführen.Keystone Module in die Frontblende einclipsen und mit den rückwärtigen Ports verbinden.DruckeinstellungenMaterialIch empfehle PETG. Es spricht aber wohl auch nichts gegen PLA.InfillInsbesondere bei der Frontblende empfehle ich mindestens 15% Infill. Die Streben für die Gehäuse-Aufnahme und die Keystone-Aufnahmen sind doch einigen mechanischen Belastungen ausgesetzt.SupportsKeine Stützstrukturen!WarpingUm Warping entgegen zu wirken, empfehle ich “Micky Mouse Ohren” an den Ecken. ================================================================ English19 inch case for ELV Charly. What is ELV Charly?ELV Charly is a raspberry pi (3B) combined with a Homematic radio module RPI-RF-MOD (the same hardware as in a Homematic CCU3). ELV also offers suitable cases for this, but of course they are not rackmountable. Connections of original caseFrontLED light pipe signaling both the green and red activity indicators of the Raspberry Pi.SD-card slotRearRJ45 LAN-Port1 USB-Port5.5 / 2.1 mm low voltage socket / power connector (5V DC)CoverHealth RGB-LED RPI-RF-MOD19 inch assembly: Requirements and implementationThe requirements for 19 inch mounting are:stabilityLAN socket in the frontUSB in the frontLEDs in the frontclear designStabilityTo keep the construction stable, I wanted a 19" metal frame, in which I can then integrate various 3D-printed modules. I decided to use DAP 2 HE Rackblende f. Modulsystem 10 Segmente MP-1. The frame has 2U and can be divided into 10 segments. My module for Charly needs 3 segments. To the frame there are also suitable cover panels made of metal.A selection of other applications using this frame I have summarized in this collection.TerminalsAt the back of the case all rear connectors of the Raspberry Pi and the radio module are led out:1x RJ45 GBit LAN4x USB-A1x 5.5 / 2.1 mm low voltage socket / power connector (5V DC)At the front panel there are integrated sockets for 2 keystone modules. With the appropriate keystone modules the LAN port as well as a USB port can be led out to the front.RJ45USB-ALEDsThe LEDs are guided out at the front bezel:The system LEDs of the Raspberry Pi use the original light guide of the Charly-case. This is inserted into the matching mount of my case.The status LED of the RPI-RF-MOD must be brought to the front panel via a light guide on the case lid.Appropriate material can be obtained e.g. from Conrad.de:Order no.: 183638 - 62Order no.: 1571475 - 62In the case cover there is a hole exactly above the LED, into which the light guide can be inserted and is thus exactly positioned. Outside the cover, the light guide is bent by 90° and guided to the front of the cover. There it is inserted into the corresponding insert.AssemblyThe model is optimized for 3D printing and consists of three parts:Front panel with solid mounting struts (black) for the actual caseCase bottom (orange), is inserted into the strutsCase cover (orange), is screwed to the struts from above and secures the case bottom at the same time.Small countersunk wood screws with a diameter of 2.5 to 3.0 mm and a length of 10-12 mm are recommended for fastening the housing cover.Insert the light guide of the Charly case into the designated holder of the case bottom.Insert the Raspberry Pi into the bottom of the case and fix it with 2 screws.Put the RPI-RF-MOD onto the Raspberry PI and fix it with 1 screw.Insert the case bottom into the guide slots of the front panel struts and push it forward. Make sure that the light guide in the housing base slides into the corresponding cutout on the front panel.Put on the case cover and fix it with two screws.Clip the light guide holder for 2mm light guides into the front panel.Insert the 2mm light guide from above into the case cover up to the limit stop and pull it back a tiny bit so that the light guide does not sit directly on the LED.Shorten the light guide accordingly, bend it by 90° and insert it into the holder on the front panel.Clip the Keystone modules into the front panel and connect them to the rear ports.Print instructionsMaterialI recommend PETG, but you can also use PLA.InfillEspecially for the front panel, I recommend at least 15% infill. The struts for the case mount and the keystone mounts are exposed to some mechanical stress.SupportsNo supports needed!WarpingIf you have trouble with warping I recommend "Micky Mouse Ears" on the four corners.
With this file you will be able to print Rackmount ELV Charly Homematic CCU with your 3D printer. Click on the button and save the file on your computer to work, edit or customize your design. You can also find more 3D designs for printers on Rackmount ELV Charly Homematic CCU.