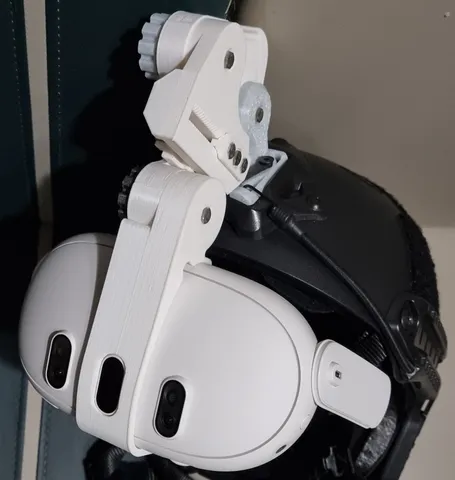
Quest Helmet Attachment
prusaprinters
Made an attachment for the cheap helmet I found online. It has the tactical railings and NVG holder so I wanted to try to make an Oculus helmet of sorts just as an experiment. V1:The locking mechanism for the NVG mount just slots in place and is removed by tilting it. It's a bit flimsy but the Quest hasn't dropped when using it so far. You could use another NVG mount for a GoPro instead (like GoPro NVG Mount by snyz - Thingiverse). Does not move much when the side clips are used.For the left and right locking mechanism on the rail, I used a spring from a broken mechanical keyboard switch. (Note that using two lefts or two rights would result in only one side locking in place.)Things to improve:Troublesome to put on and remove.Side clips necessary to hold the Quest in place.Make the joints stiffer so that the Quest can stay in place after adjusting.The screws holding it in place unscrews itself when adjusting. (Requires constant tightening)Needs a screwdriver/hex tool to adjust and tighten the screws.Moving the Quest using the rail is kinda redundant. Probably better to remove it entirely. Locking mechanism for the NVG mount is a bit flimsy. V2:Redone all of the parts. Much more stable compared to the 1st version; now being able to hold in place without the side clips. Still a bit shaky and requires tighter tolerances. You can use the 2 middle holes of the connector to further tighten the joints. You can use this without the facial interface if you prefer.*Used .6mm nozzle for the print in the picture and adjusted the 3D model from this. Not sure if normal PLA is good enough, used PLA+ for this print. PETG carbon fibre for the front clip and mount lockRequires:2 M4*30 screws/bolts, 2 washers, 2 M4 nuts/butterfly nuts for the connector (better to use bolts and butterfly nuts as it is more convenient to use)2 M4*8 for the helmet mount lock. You could use inserts/nuts here if you prefer. (In the picture it is directly screwed in without either)Improved:Easier to put on and remove.No more side clips necessary.No more tools needed to tighten the screws.No more rail to print Locking mechanism now works properly, the quest can be held up by the helmet properly. To improve:Improve tolerances to mitigate movement further.Still front heavy, unless weights are added on the back of the helmet.Separate the connector into two parts to get better adjustments.*Probably better to buy better helmet straps that can be easily adjusted to balance the load on the head. V3.1:Works best without the facial interface.Combined the previous versions into this one. This is probably the last version for this project.You can use this without the facial interface and have the lens as close to your eyes as possible.This version is the best for people with spectacles/glasses and also have long fringe.*Used .6mm nozzle and .2mm height for the print in the picture and adjusted the 3D model from the resulting tests.Installation of the rail carrier:1: Insert 2 M4*35 screws/bolts into the Retainer through the Rail and Carrier. Insert two springs then cap off with 2 M4 nuts 2: Insert an M4 nut into the Cap 3: Screw in the M4*40 into the middle This should act as a button to ‘unlock’ Rail Carrier (make sure that there is enough space to be able to press the springs down.Requires:3 M4*35 screws/bolts for the gear locks2 M4*35 and 1 M4*40 screw/bolt for the rail locking mechanism 2 springs 5-8mm (Strong springs)6 M4 nuts2 M4*8 for the helmet mount lock.Improved:Even easier to put on and remove due to the rail More adjustable than the previous versionsTo improve:Better tolerancesRail mechanism a bit flimsy to useNeeds better locking mechanism as the parts still move if some force is appliedPressure of the facial interface is uneven, making it a bit uncomfortable.Check out Spiggytech's remix for this design as well: https://www.printables.com/model/656693-redux-quest-2-helmet-attachment V3.2:Adjustments made to the overall model in order to make it more stable. Now has minimal movement when using the facial interface. Added a quest 3 variant and a short rail version. If you are using the Quest 3 without the facial interface, print the spacer.Works best without the facial interface.Use the Cap from V3.1 and the ScrewFasteners from V3.1/V2Same Requirements as V3.1 with additional 2 M4 nuts and 2 M4*12 screws (for the carrier)*Note that the test model was printed with a .4mm nozzle, and the tolerances of the actual file were adjusted according to this print.
With this file you will be able to print Quest Helmet Attachment with your 3D printer. Click on the button and save the file on your computer to work, edit or customize your design. You can also find more 3D designs for printers on Quest Helmet Attachment.
