Quansheng UV-K5 and variants 18650 Battery pack
prusaprinters
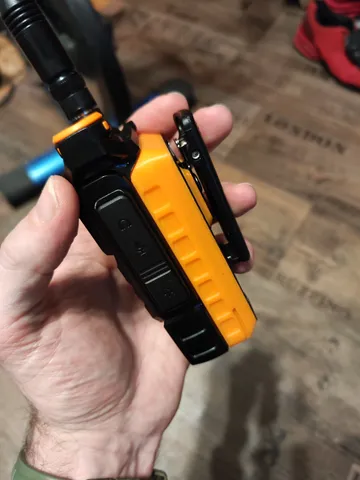
UPDATE 14.04.2024:Added “Battery pack activator” this little tool now enables you to activate your battery pack after swapping cells on the go. The BMS sadly shuts down every time you disconnect the battery and needs to be activated again, this can be done by plugging it into the charging cradle or connect it to a power bank over the USB C port for a short moment which is not always an option on the go. See demonstration in the video below. For the activator you need the same type of metal sheet you used for the other connections on the battery, 2 M2 Screws, and a bit of wire. Fold the metal sheet in the middle ( 8mm in diameter unfolded and 4 when folded) and push it through the cutouts. Check how far you need to push it in to make contacts to the lithium cells. The same goes for the m2 screws, screw them in and testfit them for proper contact on the top side ( dont overdo it you dont want to pinch them to hard!! It should easily go on and come off) Use two pieces of wire to connect the folded metal sheats to the screws on + and -.What the activator does is connecting the raw output to P+ and P- making the BMS think its an external power source and turns on. This is totally save to do so no worries. UPDATE 07.04.2024: Added a separate printed back surface for duo ton setups, its of course optional but looks so damn good :D after gluing it on use a Stanley knife to take off the edge in multiple steps until the transition of the layers become one. UPDATE 03.04.2024: Added a belt clip mount I borrowed from ( Quansheng UV-K5 18650 battery with charging contacts by GonzoG - Thingiverse)As I did not like it to be glued alone I added a slot and pins that needs to be melted down once glued and mounted to the base, this way there is a mechanical connection added to improve the stability of the belt clip mount who is under constant stress caused by the spring of the original belt clip. To melt the pins down I simply used a iron nail with a fitting size head a lighter and pliers to hold the nail. Heat up the head of the nail and then push it down against the pins melting them down. Of course dont heat it up to much, you dont want to melt the base.________________________________________________________________________________An 18650 Batterypack for the Quansheng UV-K5. Perfect for preppers as at some point in the apokalyptic future the original batteries wont be available for purchase anymore XD Only downside is that the battery pack will “shutdown” once one battery is taken out. Means when you insert batteries the battery pack wont work until you connected it once for a second to the charging cradle (activates the 2S protection circuit board) I am rocking 3500mAh hours batteries in it.I tried 3 different designs available online but some needed pcb etching, some I could not slice for the love of god with any of the slicers I tried, and some worked fine but failed in stability or the missing charging possibility, so I took the design that worked best for me and started to improve it. The original Design from zero scripts was really nice but I had several problems with it. The biggest problem was the locking mechanism, as the push button was held in place by a small top cover the needed to be glued in place, failed in several occasions for me resulting in the whole battery falling of the radio. I improved the top cover in a way that it now mechanically clips in into the base unit and is secured with two pins. That way its pretty much impossible to loosen up and fall out. I also added the gaps on the side and metal contacts so you can now also charge the battery pack in the original charging cradle. I got rid of the name on the side and added a nice grippy pattern on both sides. Added the letters “Push” to the lock button and angled it slightly inwards like on the original oneI widened both stems the push button presses against to make it more solid and make it look nicer on the bottom when clipped in the radio by adding rounded corners similar to the original battery pack.A cable management tunnel in the middle running from the top down to the bottom part and also cleared out some more space for the cable routing. Added support material in the main file so you DONT have to add any by yourself!Attaching the Battery pack to the radio the first time will take a bit of force as its a friction fit, but it should work flawless, thats also when you will realize the clever mechanic behind the push button lock and why its almost impossible for it to fail now ;) ( unless you break the clip)Stuff you need for this build: 2x 18650 (2 identical!! type of cells) cells without protection, source that one locally, the higher capacity the better.Even so you can charge the battery pack with the original charging cradle, you should also get a charger like this :LCD-2 AA 18650 Akkuladegerät 3,7 V 1,2 V, LCD-Bildschirm kann die Kapazität anzeigen, 2 A Schnellladegerät für Li-Ion-Akkus 26650 21700 18490 18350 17670 17500 16340 14500, RCR123A, NI-MH/NI-Cd AAA: Amazon.de: Elektronik & FotoThe reason being is that it is very important that both batteries you slot into the battery pack have the exact same voltage and capacity (same type of cell and brand)! Never place differently charged 18650 cells with different capacity into the battery pack as that will damage your cells! The Battery protection circuit will prevent any possible danger situation but it wont work as intended.Battery connectors: 100 stücke Batterie Batterie schrapnell AA oder AAA batterie frühling 5 Keine. positive und negative kontaktieren stücke 50pairs S09 - AliExpress2S lithium Ion 18650 protection: 5pcs 2s 3a Li-Ionen-Lithium-Akku 7,4 V 8,4 V Ladegerät Schutz platine BMS PCM für Li-Ionen-Lipo-Batterie zellen paket (aliexpress.com)Metal band for contact points:1 rolle 10m 18650 Li-Ion Batterie Nickel Blatt Platte Vernickelt Stahl Gürtel Streifen Stecker Spot Schweißen Maschine Batterie schweißer (aliexpress.com)Fabric tape for battery pull latch:Isolierband hitze beständiges Kabelbaum band Isolierung Kfz-Stoff Stoffband wasserdichtes geräusch beständiges Klebeband - AliExpressDouble sided sticky foam tape for battery contacts:https://www.amazon.de/tesa-Montageband-Fliesen-geeignet-Spiegelklebeband/dp/B01FHBNV02/ref=sr_1_35You also gonna need some thin wire, solder iron, solder, superglue, a small spring for the locking mechanism push button, ALWAYS make sure that you use the same type of 18650 cell in a pair matching the same voltage, capacity and brand!2S Lithium protection circuit ( check pictures) should be straight forward. Both cells connected in series. B+ and B- connected to the end of the battery poles measuring 8.x volts.BM contact goes in between both cells. P+ and P- get connected to charging contacts and spring loaded radio connectors on top. Check polarity of how to connect + and - by comparing it with the original battery! Pro Tip1: I lately love using 3D printing resin and a UV lamp, That way I can quickly fix stuff into place and with a few seconds of exposure under uv light it is a super quick and easy to work positioning tool. Thats the white spots you see inside the case. ( white hardened resin) in addition resin is not conductive so also great for the metal traces and solder spots!ProTip2: When you do soldering in the case place some piece of thin cardboard or paper under your metal bands/ solder spots, if you place the tip of your solder spot to long on the metal you most likely will end up melting the PLA underneath it and push it outwards, which will look terrible on the outside!
With this file you will be able to print Quansheng UV-K5 and variants 18650 Battery pack with your 3D printer. Click on the button and save the file on your computer to work, edit or customize your design. You can also find more 3D designs for printers on Quansheng UV-K5 and variants 18650 Battery pack.